Any domestic cat, regardless of its age and breed, needs a separate living space where it can feel protected and calm.
When thinking about how to make a cat house with your own hands, you should start with planning and drawings.

When building such a house with your own hands, it is necessary to take into account some features and nuances.

Dimensions and shapes of the home
The variety of cat house designs is amazing. However, the most optimal designs are in the form of beds and houses equipped with a scratching post. It's better if everything is connected together.
The size of a cat’s future apartments is influenced by two factors:
- animal size,
- free area for installation of the structure.

If there are several furry ones in the family, then the play complex is simply necessary. Photos of a cat house show that the variety of modern finishing materials allows you to create designs that can harmoniously fit into interior compositions of any style.

Construction materials
The following materials are most often used to build a cat’s home:
- for the manufacture of the frame, chipboard, MDF and plywood sheets, boards made of natural wood are suitable;
- it is possible to sew a soft house for your beloved cat in the form of a comfortable bed from fabric and foam filling;
- simply create cat houses from ordinary boxes;

- To decorate a scratching post for a furry one, you should stock up on jute or sisal rope. Just do not need to secure them with staples or nails, since the animal can damage its limbs;
- PVC pipes or metal and wood products are suitable for the base of the scratching post;
- synthetic winterizer and foam pieces are chosen as filler for pillows and mattresses;
- the interior is decorated with fur, plush or fleece;
- to cover the external facade, the material is selected based on the animal’s habit of tearing its claws: carpet would be a good option;
- adhesive compositions for work should be purchased without a pungent odor, which can scare away the cat.
Installation of cat housing
The main condition when placing cat apartments is the stability of the structure.

The level of installation is also important, because cats like to watch what is happening from above. Therefore, the optimal height for the house will be 1-1.2 meters from the ceiling.

But the beds and platforms should be distributed on different levels designs.

Preparing to build a house
Before starting construction, you should acquire the following materials:
- Fiberboard board 40 by 120 cm (base) and 44 by 55 cm (walls), chipboard 44 by 60 cm (roof);
- Seven slats (spacers) about 40 cm long, 3 by 4 cross-section;
- PVC pipe with a diameter of 11 cm and a length of 60 cm and a jute rope (scratching post) and a board 40 by 20 cm (inclined scratching post);
- Fibreboard and chipboard with foam rubber 44 by 30 cm (bed);
- Upholstery fabric fabric.
Design process
The instructions on how to make a cat house with your own hands are quite simple.

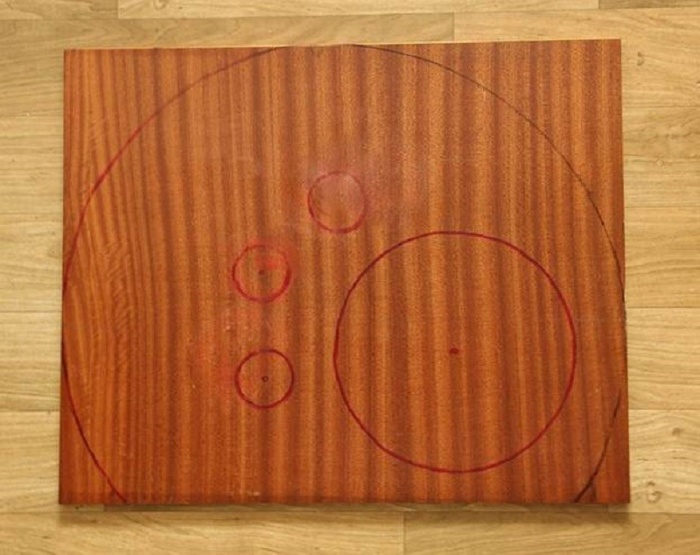
First of all, rectangular parts are cut out from chipboard and chipboard panels according to size. Circles with a diameter of 27 cm are drawn on two parts.

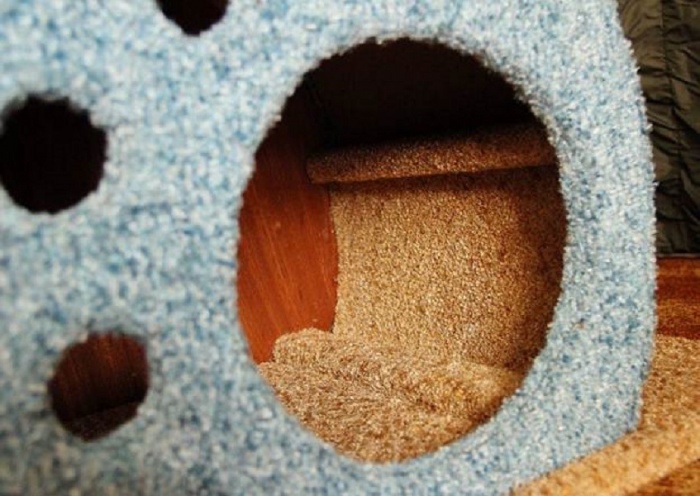
The rear wall plane remains blank, and several holes are marked on the front: one with a diameter of 22 cm is the entrance, and several small ones in the form of windows. Next, holes are cut out using a jigsaw or drill according to the indicated marks.

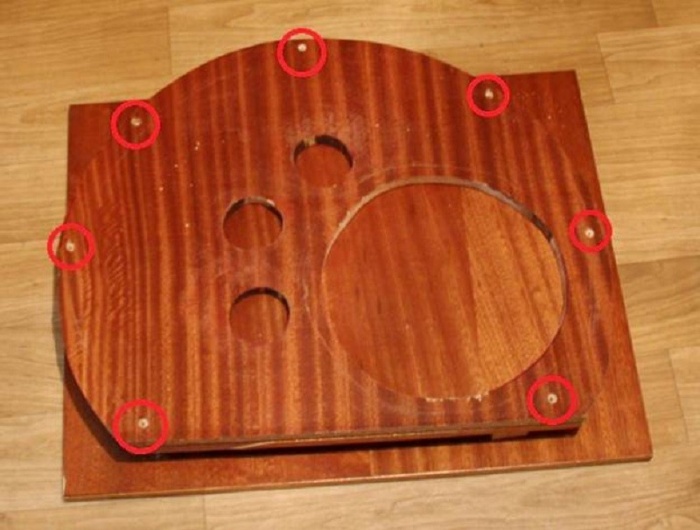
After this, the two resulting elements are combined in order to mark the places where the vertical slats will be installed. It's better to take 7 pieces. The marks will be through drilled holes on both walls.

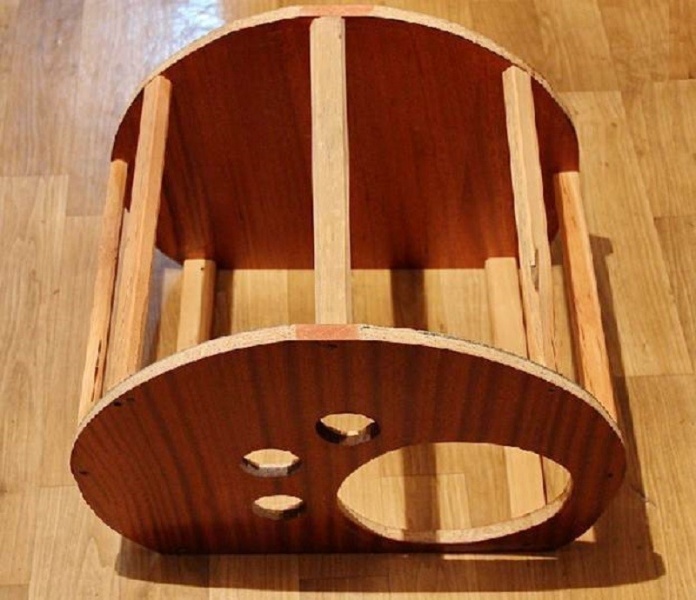
The slats for the cat's home must be pre-processed: planed, leveled and sanded. The front and the same rear elements of the house are connected with slats using self-tapping screws.

Note!


On a chipboard base in the place where the house will be attached, foam rubber should be placed and a circle should be drawn where the scratching post will be installed. The entire surface of the base is covered with decorative material, which is convenient to attach to a stapler.
Roof of the house
To do this, the upper part is pasted over, and the slats that are located in the lower part inside the structure are closed. Afterwards, the finished house is attached to the base, selecting the screws of the required size.

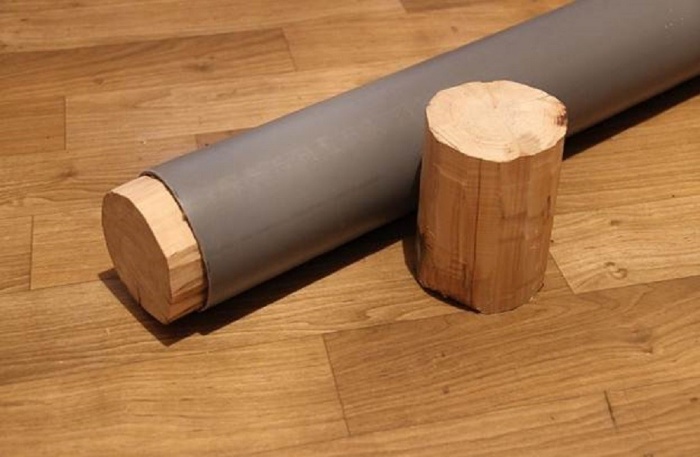
To ensure that the pipe placed inside is stable, it is fixed on both sides with wooden blocks. They are attached with screws or glue.

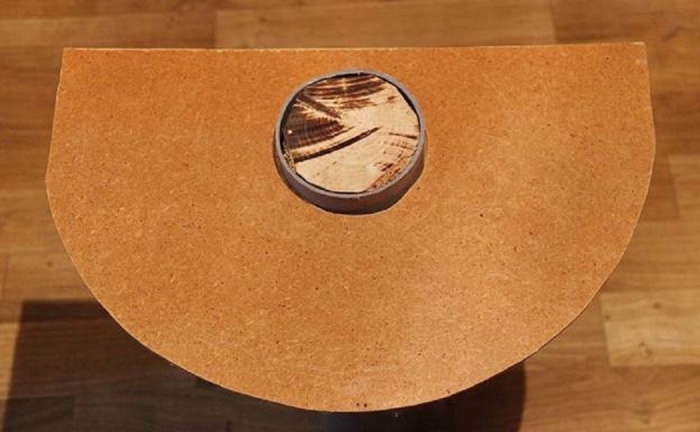
To arrange the bed, semicircular parts are cut out of chipboard and strung onto a pipe. Once the location for the scratching post has been determined in a vertical position, the pipe can be connected to the base of the house.

At the end of construction, a string with a favorite cat toy is attached under the bed.
Note!


The bed itself is covered with foam elements and the selected fabric. The pipe is wrapped with jute or sisal rope, which is attached with glue.

The edges of the cat scratching post are upholstered with fabric, and it is better to wrap the middle with rope. Next, the board is attached at the top to the frame of the house, and at the bottom to the base of the building.

Cat play area
At the beginning of construction, a box of suitable dimensions is made. The entrance to the interior can have any shape and form. The assembled box is attached to the base of the complex. The pipes are attached to the house using angles and screws.
The next level of the gaming complex is represented by a couch. To make it interesting for the animal to move around its home, you can install a ladder on the side or inside the building, securing it with corners.

The upper level is designed in the form of a gable roof installed on 4 pipes.

Note!

After collecting the entire complex, you can begin decorating.

All pipes should be wrapped with suitable ropes; beds and other floors can be covered with carpet sheets. All cuts and walls of openings must be covered with furniture slats to ensure safe movement for the animal inside the complex.

DIY photo of a cat house


It’s better to start with a paraphrase of Mark Twain: “Rumors about the harmfulness of cats have been greatly exaggerated.” Even the generally accepted standard of eccentricity - the Siamese - can be quite understanding and accommodating. The only thing that owners need to understand is that a cat in the house is not a pet, not a meaningless amusement. She doesn't look down on you, as Winston Churchill thought, and if for no apparent reason someone throws a boot at you, like in Kipling's fairy tale, then what can you do but walk around on your own? The cat is a member of your family, and it must be accepted into the family on mutually acceptable terms. The best way to do this is to build a cat house. Then she won’t crawl under the sink behind the trash can, and after that into the drawer with bed linen, and won’t tear up the wallpaper, and won’t tear at her wife’s slippers. And in general there will be no hassle with her, but there will be comfort and warmth.
There are many cat houses on sale, for every taste and budget. But, firstly, they are designed for the average representative of a particular breed, and a cat, as we will see below, is an embodied individuality. Secondly, fashion is fashion - prices for almost all models are clearly inflated. And finally, there is nothing complicated in their design; it is preferable to use used materials in all respects, therefore A cat house is one of the household items that makes complete sense to make with your own hands. In the literal sense: although a cat’s nose is not a dog’s, and certainly not a bear’s, it can smell the smell of a master’s hands from the outside, and he may not like it, and the housewarming party will be ruined. Well, what can you do, it’s not a pet, a cat. Personality from mustache to tail tip.
It’s not difficult to make a home for a cat, but exactly how to do it is full of subtleties. For example, once upon a time Vasek and Murki were dressed in old felt boots and felt hats, and they were simply thrilled there. As it turned out, the problem is in the felt - it does not accumulate static electricity at all, allows evaporation to pass through freely and does not rot. Felt cat sleeping bags are still in use today, see figure, but natural felt is now expensive and not very accessible, and cats do not recognize synthetic felt. Therefore, when planning to build a house for a cat, you should thoroughly understand: what is it? How and how do domestic felines live, what should be in the house, what should not be, what is acceptable and permissible? And for this, in turn, you will have to delve into the peculiarities of cat biology.
Note: By the way, it turns out that gender differences also need to be taken into account. More precisely, the following are features of behavior in various situations. From which it follows that a house for a cat is structurally not quite the same as for a cat, see below. However, cats are generally unpretentious creatures, and in terms of labor intensity, both houses are equivalent - it is minimal. As is the consumption of materials.
What does nature say?
The cat has been domesticated since time immemorial, and it has outlived many of the habits of its wild ancestors, and has developed others in its place. But this does not apply to the most powerful instincts: survival and procreation. It is necessary to take them into account, so let us first turn to the primitive feline savagery.
Origin
Wild forest cat Felis silvestris
Zoologists classify the domestic cat as a special species, Felis catus. Its most likely ancestor is considered to be the European forest cat Felis silvestris, which is still in small numbers, but quite happily living in the forests from Scotland to the Caucasus. The following arguments are given in favor of the “paternity” of the Euroforest, such as, firstly, the similarity of size and exterior: the gray-striped Felis silvestris can only be distinguished from a feral garbage dump by an experienced specialist, by the blunt thickened end of the tail and other small features, see Fig. Secondly, the Euroforest does not shy away from housing and sometimes settles in the attics of inhabited houses. Thirdly, it easily mates with domestic cats, producing viable, fertile offspring.
Supporters of the South Asian origin of Felis catus object: the Euroforest settles near humans, but who was able to tame it where and when? Temper is the devil in the flesh. Spring concerts can scare a Tyrannosaurus rex, fatal outcome Fights for females are common. Small cats of South Asia do not put so many decibels into their serenades, and their mating tournaments are not as recklessly bloody as those of the European forest cat. This is understandable: in the jungle you won’t get hold of anyone with wild screams, but in the tropical forest, where everyone eats each other as best they can, the smell of blood can bring more serious predators to the love list.
Note: small African wild cats are excluded from questions of feline genealogy; against them the Euroforest is a kitten. The African forest cat, in the words of one of J. Darrell’s native companions, “can tear apart a person in the shortest possible time,” see “The Hounds of Bafut.”
One way or another, such representatives of the genus Felis of temperate latitudes as the house, manul or caracal clearly did not contribute to the gene pool of Felis catus. In the same way, for example, like the Indo-Malayan fish cat, whose habits are more reminiscent of a beaver, otter or seal than of their own kind. And the likely contenders have a lot in common, which is significant specifically for the house.
Biology
All possible ancestors domestic cat- small solitary predators. In this case, nature offers 3 options for survival tactics: dig a hole and become an omnivore, like a fox or a badger, form a pack and chase large prey until exhaustion, like wolves, or switch to a twilight-nocturnal lifestyle and become a stealther: it doesn’t take long to steal pursue, look out, wait, quietly creep up; then - several lightning-fast jumps, and, if the prey is gone, switch to another object.
Note: pure ambushers, waiting for the meat to climb into the mouth on its own, in an air environment that does not compensate for body weight and poorly transmits pressure waves, are rare and are found mainly among cold-blooded animals; It is difficult for a warm-blooded animal to catch enough biomass in this way to support life in the air.
It follows: a cat is a full-fledged individual. If the personal character of, say, a wolf is his own business only as long as it does not contradict the interests of the pack, then a cat, if compared with human psychology, is a congenital introvert. There's nothing wrong with that; An introvert can be a sociable, sympathetic person. But he definitely needs some kind of nook where he can be himself. Living, for example, in a hostel is torture for an introvert; he would rather deny himself many things, but rent an apartment. That is, a house for a cat is necessary. Otherwise she will arrange it for herself. Perhaps, where you are not at all happy.
The hunting territory of small cats is large, up to 2-3 square meters. km near Eurolesny. But they use it differently. Cats patrol during the day, looking for places to go out for prey in the evening. As a rule, the den is made permanent and, if there are no disturbance factors, they can spend the night in it all their lives. Only spend the night: guarding the territory takes up all your free time. And in order to sleep peacefully, they choose a place for the den that is, if possible, inaccessible, and certainly inaccessible to large animals. They prefer places at height, for viewing before leaving, and with a reserve in case of escape.
Cats have the added responsibility of bearing and giving birth to offspring. In the last days of pregnancy and with the brood, she can no longer be away for a long time. Small kittens cannot climb trees yet, so the den should be low, and it needs to be changed with each litter so as not to be identified. But you need more than one food, and you can’t go far. This means you need to look from above, and higher. If a cat needs visibility for safety, then a cat also needs it for food, and the cat’s lair, in addition to being hidden, should be located near a good viewing platform.
ABOUT color vision cats
In the retina of a cat's eye there are many rod cells that react to the intensity of light; this is necessary at night and in twilight. There are no cones that perceive color that are sensitive to red, and there are very few green- and blue-sensitive cones. That is, a cat, like all animals except primates, practically does not distinguish colors. She sees approximately the same as a person suffering from a special type of color blindness - nyctalopia. Hence the conclusion about the house: design delights are the owner’s business. The cat will still only see the functionality.
Biology and ethology (the science of behavior) of cats are very interesting things; cats are the most highly specialized predators. However, to properly make a home for a cat with your own hands, the above is enough. That’s why we’ll take care of the house; it and the cat in it, if you’re interested, will then provide material for observations and conclusions.
Furnishings and arrangement of the house
Exercise
Cat muscles are designed to work in an instantaneous manner. If hormones have spilled into the blood for any reason, force must be applied immediately and immediately. A cat is not biologically suited to wait until you are taken out to a walk or area where you can swing systematically. Therefore, the cat house must be equipped with devices for physical exercise. Let's see what they are next.
What is Vaska and what is Murka
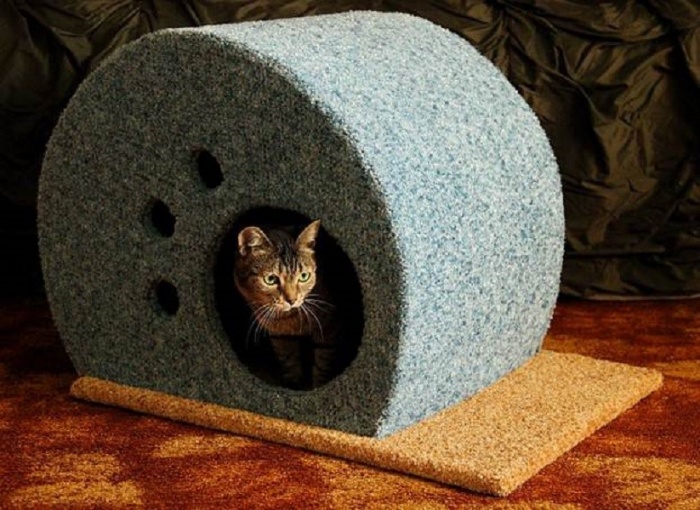
The second factor influencing home equipment is gender differences in behavior. A cat, for example, feels quite comfortable if he has to jump into a house; The instinct of self-preservation gives a signal that the home is sufficiently safe. The cat needs an overview, as already said, to make sure the surroundings are safe. Therefore, a cat can live peacefully in a simple house-sleeve, as long as it is raised (on the left in the figure), or in a combined house with a bed, on the right there.

Houses for cats
The cat is more concerned about the safety of the den, and the instinct of reproduction prohibits revealing its accessibility with its presence. Combining a bed with a house is no longer comfortable for her, firstly. Secondly, the observation deck itself needs several (minimum 2) levels: from the upper one, the surroundings are inspected for the presence of prey/enemy and the possibility of bringing out a grown brood, and on the lower ones, the cat either hides before jumping on prey, or distracts the attention of an unwanted the alien and leads him away from the brood, remaining in relative safety. Therefore, the cat bed should be at least two-level and not located directly on the house.
Back door
Having an emergency exit leading to the beds is highly desirable and mandatory for cats. The cat can still, relying on its dexterity, courage and ferocity, rush straight at the enemy, and while he is taken aback, hide, and then find another shelter. In case of a direct attack on the den, the cat is always ready to first let the kittens escape; if necessary, at the cost of his life.
General layout and dimensions
The diagram of a cat house that satisfies all the specified requirements and is suitable for both sexes is shown in Fig. on right. Its features:

Scheme of a universal cat house
- Beds of different heights are quite suitable for a cat, and it’s no worse for him.
- A cat will not perceive a post with a platform on the roof as an integral part of the structure, especially if the post is made of a tree limb, see below. Cats, like all animals except primates, do not even have the rudiments of imaginative thinking and spatial imagination.
- Pillars with beds provide ample opportunity for both exercise and claw points.
The dimensions of the living part of a house for a medium-sized cat are approximately 40x40 cm in plan and the same in height. The diameter of the entrances is 15-20 cm; The animal will not like an entrance that is too wide (safety!); however, you need to look at the hairiness and fatness of your pet. It is clear that the collected, lean Briton will duck into a smaller opening than the arrogant Persian, who seems twice as big as he actually is.
The dimensions of the beds are the same as the house in plan. The height relative to the ground, roof and each other is such that the occupant of the house, standing on hind legs, the front ones reached the overlying platform. Of course, all sizes are relative: for example, cats of the American tiger breed can exceed 1 m in length with a tail; the Guinness book records 117 cm.
Note: Generally speaking, the translation of tiger cat as “tiger” is not entirely correct. In American colloquialism, this expression roughly corresponds to the Russian “kotofey” - a hefty, cunning, hardened and blown cat. Not necessarily a stray, he, if he is a convinced renegade, will be a honky cat, but simply a homeless person who does not mind being picked up and sheltered - an alley cat.

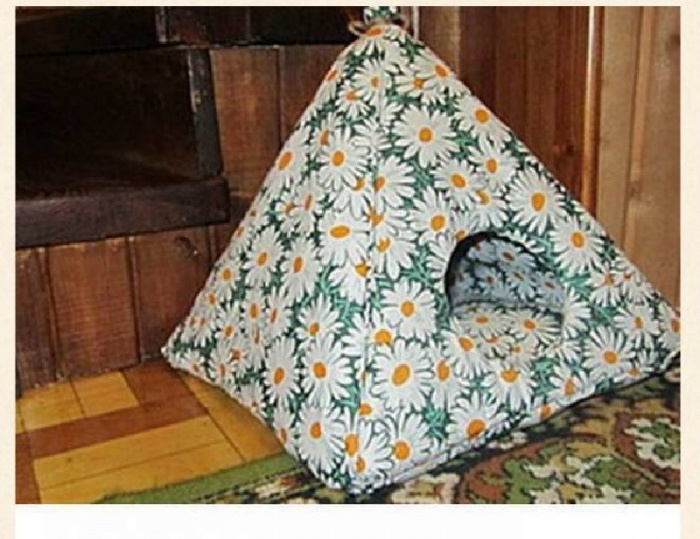
Wigwam house for a smooth-haired cat
About wigwam houses
Southern shorthair cats - Abyssinian, Bengal, Siamese - often stand on their tiptoes in houses. This may be due to the fact that their supposed ancestors willingly settle in tree hollows. In this case, a wigwam house (see figure on the right) with a height of about 60 cm is better suited. The technology of its manufacture is, in principle, no different from that of a cube house. For such a cat, in order to have offspring, it is better to make the house in the form of an imitation of a hollow: a round pipe, a spare hole is higher than the main one and goes out onto a platform enclosing the pole, see fig. further, in the section on materials.
Place for a house
Having decided on the size of the house, you need to choose a place for the cat and its home. Cats love to bask, and this is not a whim. From external heating them muscle tone subsides, the food eaten lasts longer and is better absorbed; Simply put, the body switches from afterburner to energy saving. Hence the first condition - closer to the battery.
Secondly, cats, as territorial animals, have a developed instinct of observation. Without “cleverness” - well, it’s boring to stare at the same sofa and wardrobe all the time. Therefore, it is highly desirable that you can jump from the roof of the house or one of the platforms to the windowsill; Let's warm up at the same time. Conclusion: the best place for a cat's house is a corner near the window with central heating, and with a stove - between the window and the stove. Most often, a scratching post is also placed here without any problems; however, this most necessary device for cats requires a separate discussion.
Maybe in the bedroom? 
Cat bed
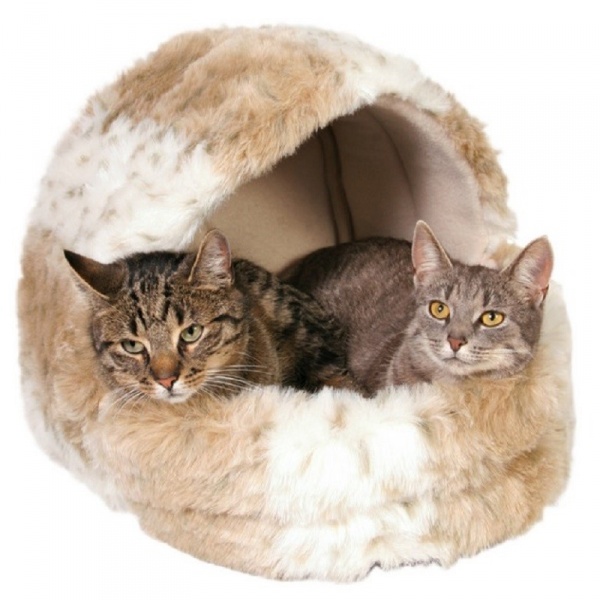
It's nice when a cat comes to bed in the morning. But when it doesn’t let you sleep or interferes with adults, then it’s already annoying. Meanwhile, from the cat’s point of view, it is simply either colder at night, or does not seem as safe as in its daytime habitat. There, maybe the street light is annoying, your eyes are sensitive.
In this case, the best solution is to sew a bed for a cat, see fig. This matter requires a separate discussion; Here we will only say that the best preparation is a sleeve of unusable fur clothing, saturated with the owner’s smell. And the most suitable place for it is under a stool or chair. And instinct tells the cat: there is a strong roof over its head, and they won’t step on it in the dark.

Cat house bed made from an old T-shirt
Another interesting option is a bed made from an old T-shirt on a rigid frame, it’s almost like a house, see fig. left; you can climb into the sleeves. The frame is best made from bamboo slats, wrapping the joints crosswise with thread and gluing with PVA. It is possible from steel wire, but then you need to put propylene sheaths on the steel; The heat-shrinkable tube used for electrical installation work (HERE) is suitable. Fiberglass, for example, the ends of rods, will not cause a protest from the cat, but they are more difficult to connect; PVA fiberglass does not hold well.
About complexes and kennels
As you know, there are entire breeds of cats that are playful and lazy. And many people keep not one, but several. In any case, if it is not a cat, then there will be offspring. What kind of house do you need then?
If you count on kittens that will then go into good hands, a kennel house like doghouse, see figure, with all required additional equipment. It is made longer, about 0.5 m for average cat: Alone in the house she curls up into a ball, but kittens need to be fed milk. For them, the long walls are made sloping, and with a shelf under the pitched roof - this way it will be more convenient for the brood, without disappearing from the parent’s eye, to train in climbing and claw point.

Kennel house for a cat with a litter
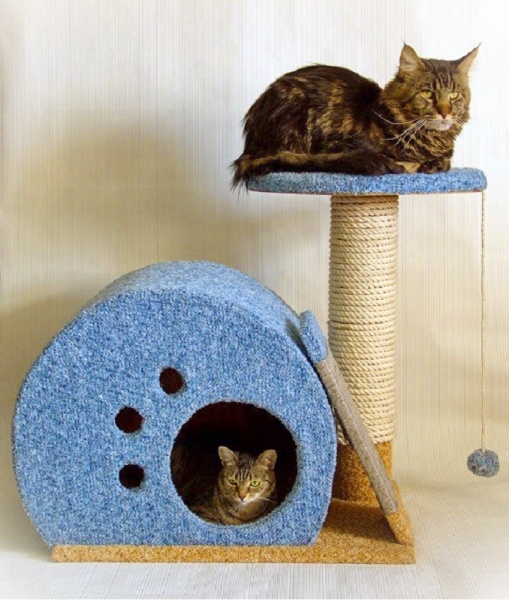
It is also possible to have a whole family of cats at home: although cats do not form prides like lions, the rudiments of social behavior among domestic animals have nevertheless developed over centuries of evolution alongside humans. However, remember: since there is a community of animals, there will be a hierarchy in it. Moreover, cats will remain individualists: if they have centuries of cohabitation with a person, then the festivities themselves are geological epochs. Therefore, it is better not to try to house at least a couple of mature cats in one house: a residential complex with a separate dwelling for each individual is needed, see fig. on right.

Complex for two cats living together
The technology for its construction is generally the same as for one house (see below), but there are specific requirements:
- Houses are on different levels; who gets what - the cats will distribute it themselves.
- For a subordinate individual (its house is the lower one), it is necessary to provide a covered (in the form of a pipe, for example) lounger on the same level as the house; in exchange for a subordinate position, she receives increased security, because The functions of the observer are taken over by the dominant one, and the subordinate no longer needs the upper observation platform.
- A third, connecting platform is needed, located approximately in the middle between the houses.
Note: There is no need to accustom cats to consumer democracy - in natural communities, connections are based on the laws of nature and are organized in such a way that the team as a whole benefits.
All in one 
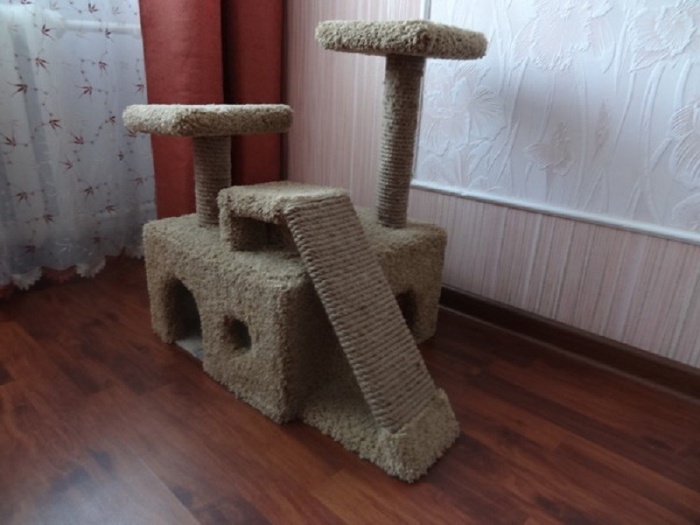
Small-sized scratching post house for a cat
In small apartments, finding space for even the simplest cat corner is not easy. Problem peace of mind on the minimum occupied area, this can be solved with the help of a bed, see above, but what about the claws? They are growing. A scratching post house with sides adapted for this procedure will help out. In fact, the point of claws for a cat is a serious matter and requires a separate discussion, but one of the simplest ways to implement such a house is shown in Fig. It differs from those described below in that it can only be made of wood: other material will not withstand the loads from claws.
Construction
If you read about what and how they recommend making cat houses, you often think: your own cottage was simpler and required a smaller set of tools. It would be unethical to reproach people who want to provide the best care for their pets with trying too hard out of love for them. So let's just see how to make something that the cat needs and will last her all her life, without extra costs and hassle. There is no point in making a house designed for more than several generations: a self-respecting cat will not live in a secondary apartment, it would be better then for a trash can, and then in a linen chest of drawers.
Materials
Materials for the house can be either natural or synthetic, but the smell does not repel cats. The best ones are used ones, smelling like home and owners. New ones with a noticeable human odor are eliminated unconditionally, while others must first be ventilated for a week or two on the balcony or in the country, but not in the garage or outbuildings with living creatures, and then kept in the apartment for the same amount of time. This does not apply to parts made of massive plastics: they can emit odors for years.
We definitely cannot recommend metals, especially visible metal fasteners - furniture corners, etc. Firstly, there may be cracks there that are invisible to humans and can catch a hair from the fur. Secondly, any metal part is a current collector, and the cat will have to endure pinches from static electricity from time to time.

Materials for building a cat house

In addition, if there is no padding polyester, you will need lining fabric (satin or twill); it can be replaced with leatherette with great success, if available. If you want to give the house additional strength, use small, up to 20 mm, nails. To attach the post - 3-4 wood screws 4.2 x (60-100). For soft houses and partly for wooden ones - cotton threads No. 10-No. 20 or harsh, thickest ones that can be tucked into your sewing machine. For the simplest temporary houses (for example, if you took a cat with you to the dacha), glue and tape are sufficient.
Note: Silk fabrics and threads are excluded - a cat’s house made from them will seem like an electric chair to her. Wool is undesirable in terms of sanitation and hygiene; it quickly gets dirty and rots from cat grease. Synthetics can be used antistatic.
About pipe pillars
For some reason, many recipes for building cat houses advise making poles from metal or PVC pipes. What is called, contrary to the obvious:
- More expensive than a piece of wood, which can be completely free.
- More difficult to process.
- To attach it to the site, you need a socket, which costs money, and additional fasteners for it and the pole.
- The rope winding holds much worse than the wooden one.
Tool
 To make a variety of houses using the methods described below, all you need is an ordinary house external tools: hammer, knife, scissors, screwdriver, awl, pliers, flat glue brush. An electric drill with a set of drills wouldn't hurt. If the house is made of wood and its parts are connected at an angle other than a straight one, a jigsaw will come in very handy: the support shoe of most models rotates to the sides and the end cut can be made at any angle. For a soft house, it is highly desirable to have a sewing machine, but if you have time, they can be sewn by hand; cutting is the simplest. Then they sew with a simple sail stitch, threading the purl branch of the thread into the loop formed by the front one.
About gluing and gluing
As you probably already guessed, we will either sew or glue the houses. Wooden ones can be strengthened during the assembly process by nailing them into the end, see below. But in order for the adhesive joints to be strong and reliable, you need to glue PVA as follows:
- A thin layer of glue is applied to both surfaces to be glued with a brush.
- Wait for the glue to gelatinize until its layer becomes translucent or with individual small yellowish-whitish spots. This takes 3-20 minutes depending on external conditions.
- The parts are pressed tightly against each other and secured with nails, strapping, clamps, etc. You can remove the bandage and continue assembly after 40-60 minutes.
Note: so that when assembling on glue and nails they do not come out askew, the places for them must be marked in advance (step - 30-70 mm), and the end of the counter part should be pricked with an awl in the middle of the thickness to a depth of 3-6 mm. You will be surprised how easy and neat the assembly will be.
The pillar is attached to the lower platform, or the upper platforms to it, with glue in the same way, but immediately after compressing the parts, they are fixed with self-tapping screws, 3-4 per end. For self-tapping screws, you need to pre-drill holes with a diameter of the body of the self-tapping screw without thread (for 4.2 mm - 2.2-2.5 mm) and a depth of 3/4 of the length of the threaded part.

Scheme for applying glue for gluing with fabric
When gluing and pasting wooden parts with fabric, carpet and leatherette, glue is applied only to the wood with rays from the center and traced around the outline, not reaching 10-20 mm to the edge, see fig. The soft material is applied as soon as gelatinization begins, i.e. when the glue begins to turn yellow, pull it together from the inside with threads. You can't put pressure on your face! After an hour and a half, the face is ironed with a medium-hot iron using a barely damp cloth, and you can consider it forever.
Note: If foam rubber is placed under the fabric, then, of course, you cannot iron it. Then the foam rubber is glued first; As soon as it sticks, the fabric is on top, and everything is pulled together from the inside with threads until it dries.
The easiest way to cover a tree with synthetic padding is to apply strokes or drops of glue on it in increments of 30-60 mm in both coordinates, and wait for gelatinization to begin. Immediately place it on wood or cardboard; You can move it slightly, adjusting it along the contour. Then we press with the palm of our hand, and after 10-20 minutes you can continue to work.
Note: and the most important rule is - do not tear off the “left” part. If this happens, the connection needs to be separated, dried completely, the previous glue removed and re-glued.
The simplest cat house is cardboard. Most often, the packaging cardboard used is from boxes of household appliances that are out of warranty. A cardboard house can also be capital and permanent. So that packaging cardboard for a cat house can replace plywood and wood in general, it is glued in half, orienting the inner corrugations of the layers mutually perpendicular. The glue is applied in a fan, as described above, on both surfaces. Fold without pressing too hard until gelatinization begins. If such a cake is then impregnated with a water-polymer emulsion (this is, in fact, the same PVA, very diluted), you will get almost like plywood.
But the simplest of the simplest is a cat house made from a box of a suitable size. Here, apart from adhesive tape, scissors and 5-10 minutes of time, you don’t need anything at all, on the left in Fig. The bedding is a piece of synthetic padding polyester, an old grandmother’s warmer, foam rubber wrapped in jacquard or carpet, secured from the inside with threads, etc. If you find a piece of felt - mo-rr-m-r-r-bark! Meow! This house will come in handy, as already mentioned, when traveling, or if the cat has given birth and its permanent house is too small. Then, when the kittens grow up, the swaying tips of the pediments will quite pass for a worthless mouse. And the very gables will be used as ramps for climbing and for the point of claws that are not yet fully strong.

Cardboard cat houses
The Japanese, masters of making useful crafts out of nothing, came up with cardboard hive houses for cats, in the middle in Fig. The technology is quite painstaking, but simple: rings are cut and glued together with PVA. Cats like it without additional decoration, as long as there is bedding. The beehive house is very durable: if the base is made of plywood, it will last the cat for the rest of its life, as long as an inattentive guest does not inadvertently sit down.
The next option for using cardboard is beds for older kittens. It’s still too early for them to separate, but everyone already needs their own corner. Cardboard spools or tubes made from sheet materials will come in handy here. From them you can literally build a whole town for cat stuff in an hour, on the right in Fig.
Finally, a cat house made of cardboard can be permanent, on a plywood base and attached to a pole with a lounger. The cutting of parts for it is shown in Fig. Assembly - completely on glue; To secure the connection, you can quilt it with thread by hand. Decorative design and interior upholstery are optional. Preferable for smooth-haired southern breeds, and not only because it is made like a hollow. Southern cats (remember, their supposed ancestors lived in hollows) often sharpen their claws on the inside of the house. Here, no tree with fabric will last long, and it’s a pity for the labor. And the cardboard house is easily replaced with the same new one.

Cutting out parts for a cardboard cat house
Wooden
A wooden cat house is necessary for large and strong breeds: Persian, Siberian, the same brindle Americans, as well as for all breeds of clearly Euro-forest origin, for example. Norwegian. For a cat, the most important thing here is height, good review in all directions and a spacious upper lounger from which you can jump. A drawing of a house for a cat of this type is shown in Fig. For smaller breeds, the size can be reduced to suit your pet, but keep in mind: placing the bed under the tail is necessary. Cats don’t like it when their tail hangs down; a larger predator can pull it off.

House drawing for a big cat
A house with a standard design would be more suitable for a cat, see above. In general, the assembly sequence is as follows:
- The base is prepared, a pillar(s) with a sunbed(s) are installed on it.
- The details of the house are cut out to size minus 1 mm along the contour for the internal upholstery made of fabric with foam rubber, or exactly to size when upholstered with padding polyester.
- If the upholstery is fabric, the inner sides of the parts are pre-covered with twill or satin on 15-20 mm foam rubber, as described above; foam pads should not reach 15-20 mm to the edges; the fabric is glued to the ends of the parts.
- The house is assembled with glue and nails, as described.
- If the upholstery is synthetic padding, the house is covered with it from the inside; The joints of the layers are also glued together with sausages of glue.
- Excess interior upholstery is cut off from the outside.
- The outside of the house and sun loungers are covered with decorative fabric, without foam rubber.
- The jacquard is also glued to the ends of the sunbeds and entrance/exit openings; in addition, a fold inward of 20-25 mm is given with sizing.
- The house is installed on the base using glue; Once dry (1-2 days), you can celebrate your housewarming.
Note: We remind you that when gluing with fabric, the glue is applied with a brush to the wood, and the fabric is applied at the beginning of gelatinization. The ends are pasted over after the planes, pulling the fabric tightly.
Pole wrapping 
Wrapping a pole with rope
The pole is wrapped with rope until the base is pasted, for which you will then have to cut a circle in the fabric. In general, it is better to leave the base and roof of the house as is, wooden. The cat doesn't need softness there.
When winding, first make several flat turns on the base using glue, see fig. Then, already on the post, also 5-6 glued turns. They wind it all the way to the top, pulling it tight. The sliding coils are knocked out with light blows of a hammer. At the top, the procedure is repeated in the reverse order: the last 5-6 turns on the post are glued, then also several glued on the bottom of the platform. Finally, when the post is completely dry, add glue to the ends of the rope so that they do not become shaggy.
Note: If you are familiar with sailing/rigging, then it is better to measure the rope with a test winding and make the so-called at its ends. ogons; This the surest way from marking.
It seems that a good half of the cats still prefer a soft house, even without pillars with loungers. These are probably already domesticated. And here the question arises: how to arrange materials, which are basically shapeless, so that the entire product holds its shape? Not a sleeping sleeve though.
Cat people, I must say, solved this problem a long time ago. Intuitively or “scientifically”, who knows. But the principle has also been known for a long time: to fold materials with different indicators of flexibility in different directions, so that the overall shape is maintained. To do this, the house is sewn from foam rubber, sandwiched between 2 layers of fabric: the softer one goes on the inside, and the rougher, but more attractive one goes on the face. Sintepon is not suitable as a gasket, it is too soft.
The manufacturing sequence is as follows, see Fig. First, the bottom and blind sides are quilted with an envelope, pos. 1. Then, without overlaying the face, mark its outline on the wall with the entrance and quilt it with a zigzag, pos. 2. In this case, you need to place a newspaper under the foam rubber, because... It sticks to both the platform and the machine’s foot, and the pushers tear it. Next, the entrance is cut out, the face of the wall with the entrance is covered with facial tissue, tucking it inward, pos. 3, and quilt along the inner and outer contours. Finally, the house is finally sewn together, pos. 4, and turn it out through the entrance - the home is ready, pos. 5.

Sewing a cat house from foam rubber and fabric

Note: whoever knows how to sew will tailor it according to his favorite. However, there is special cases. For example, in Fig. on the right is a pattern for a house for a cat with offspring or for a large one; dimensions - in cm. In the latter case, the height of the entrance opening can be increased to 30 cm by choosing more material in the dome, the structure will withstand this. But in the bottom tape, so to speak, the base, you need to leave the same 10 cm.
In fact, for a cat family in a soft house, it is preferable to make the interior upholstery from leatherette. Firstly, for the sake of sanitation and hygiene: by turning the house inside out, you can wash it. Secondly, kittens do not yet control their claws as perfectly as adults, and they can become entangled in the fabric. Therefore, the video below suggests step-by-step instruction, how to make a soft house for a cat and kittens from fabric and leatherette.
Video: DIY cat house made of artificial leather

Multi-level cat house made of mesh
A kind of soft house for a whole collection of cats is made of mesh, and the partitions between the compartments are made of fabric with foam padding. Rigidity is provided by a propylene rod sewn along the contour. Cat people in Canada came up with these, and even foldable ones, and several companies successfully sell them, see fig. However, it also shows that something similar can be done independently. Distribution of levels according to hierarchy, jumping, review - everything is under the paw without unnecessary details, and can be hung on the wall in any suitable place. At least at the dacha or on vacation, if the administration or owners allow you to take cats with you.
And the most important thing
Namely: before you take up the tool, take a closer look at the cat. Where she goes, why she goes, what she does where, what she likes and what she doesn’t. Affectionate and firm characters are quite compatible in one creature. For example, Pantyukha, who lives with the author of the article, completely fell in love with a flat avocado box under the kitchen stool. The battery is right behind the back. He jumps from the stool onto the table, and from there onto the windowsill. Either from the remnants of the smell of fruit he is intoxicated, or from the wood of the box itself, but he has grown firmly into his rookery and greets with hysteria any attempts to move him from his beloved slum to a more decent property. And if you give away another new building to your acquaintances, they, you know, Felis Katus, immediately settle in and are beside themselves with delight. That's it.
Domestic cats need an individual corner where no one will disturb their sleep. The decision to equip a comfortable place to relax with your own hands is very practical. In this case, all the nuances of the situation are taken into account and characteristics animal. The proposed master classes with step-by-step instructions accompanied by photos will help you decide on the optimal model of a cat house.
Conditions for properly equipping a pet house
The initial stage of any creative process is planning. When designing a house for a cat, you should take into account a lot of nuances, which we will discuss in detail.
Shape, size and color
Among the variety of designs, the most common are beds and houses with a scratching post; the optimal solution is to combine both options. When arranging a closed model, preference is given to rectangular shapes, although round houses also appear in the photo from time to time. The choice of design dimensions is influenced by two factors: the size of the cat and the availability of free space in the room. If you are the owner of two or more animals, you cannot do without a play complex. Cats are hunters by nature, so they will appreciate a house with two exits, which is very convenient to keep an eye on a potential enemy.
A wide range of finishing materials allows you to choose a fabric that will harmonize with the overall interior and at the same time have sufficient strength so as not to tear when the cat uses the house.

Materials
The material for the house is selected depending on the planned model. Let's take a look at the most common solutions:
- The frame of a play complex or a single closed structure is usually made of chipboard. A detailed master class for this option will be offered below. Plywood, MDF or natural boards are also suitable for these purposes.
- If you have certain skills, you can weave original models of cozy houses with your own hands from wicker or newspaper tubes.
- Mastering a needle and thread will be enough to build a cozy bed for your cat or a soft house made of foam rubber.
- Closed and open houses for cats made from boxes are extremely simple to make.
- To decorate the scratching posts with your own hands, use jute or sisal rope. Avoid fixing the material with nails or staples; cats may be injured by such devices.
- The basis of a cat scratching post is usually PVC pipes; sometimes metal products or wooden beams are used.
- Sintepon, foam rubber, and artificial straw are suitable as fillers for pillows and sailors.
- The interior lining is made of soft fabrics: plush, fleece, and faux fur will come in handy for a cat.
- The exterior decoration of the house is selected taking into account the cat’s habit of tearing its claws. Therefore, in a capital structure, the material must be strong enough. The carpet fully satisfies the requirements provided there are no electrostatic properties.
Advice ! When studying any master class, please note that making a structure for a cat with your own hands is carried out using natural materials.
An important point is the choice of glue; it should not emit a pungent aroma that will scare away the cat. Give preference to products containing organic solvent.
The photos below clearly demonstrate the wide range of houses that you can design with your own hands:

Accommodation
The key condition for the correct placement of a cat house is the stability of the structure. Therefore, for gaming complexes it is advisable to take care of a fiberboard base. Another nuance is the level of installation of the house. Cats prefer to watch what is happening from above, so when designing it is better to plan its location at a height of 1.0-1.2 m from the shelf. It is also preferable to equip beds, hammocks and just stands at different levels.
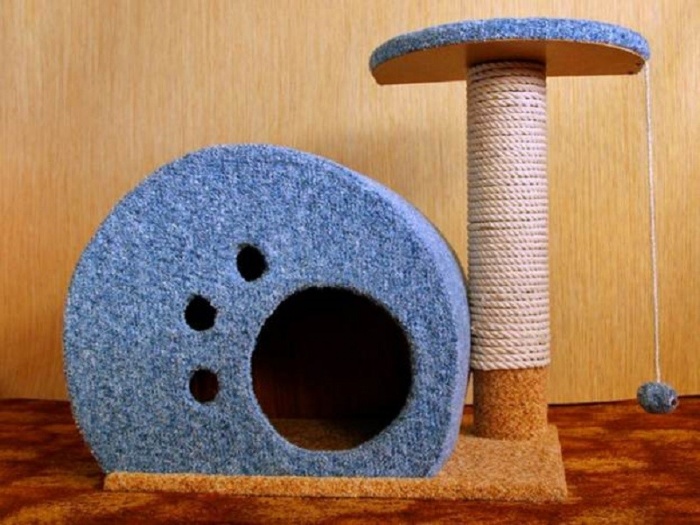
Arrangement of a compact design with a scratching post
The compact design of a house with a scratching post, a stand and a toy on a rope will harmoniously fit into the interior of a small room. Additional elements allow you to organize not only passive rest for your cat, but also active pastime. A photo of the finished structure will help you understand more specifically what it’s about. we'll talk in the future master class.
Preparatory stage
Before you start creating a comfortable mini complex with a cat house with your own hands, you should make sure you have the following materials:
- For the base of the house - fiberboard board measuring 40x120 cm.
- On the roof - chipboard 44x60 cm, walls - fiberboard 44x55 cm.
- The spacers for the walls of the house are made of 7 slats 38 cm long with a section of 3x4 cm.
- The basis of the scratching post is a PVC pipe Ø 110 mm, 60 cm long, the winding is made of jute rope.
- The inclined scratching post is made of 40x18 cm board.
- 2 wooden beams will help ensure the stability of the scratching post near the house.
- The base of the bed is made of fiberboard, chipboard and foam rubber measuring 44x30 cm.
- Upholstery fabric for decorating a house, a bed and an inclined scratching post.
Building a structure for a cat with your own hands is impossible without the following tools:
- Jigsaw (preferably electric) and saw.
- Screwdriver with drill.
- Scissors and sandpaper for sanding house parts.
- Hot glue gun and furniture stapler.
- Pencil, marker, chalk and tape measure.
Manufacturing process
A detailed master class will help you competently organize the workflow of creating a mini complex for a cat with a house, a scratching post and a bed with your own hands. So:
- Rectangular elements are initially cut from chipboard and fiberboard according to the dimensions indicated in the previous section. It is not necessary to strictly adhere to the proposed dimensions; you can independently determine the optimal outline of the cat’s house.
- On both parts, a circle with a radius of approximately 27 cm is outlined. It is better to do this with a compass; if you don’t have one, use a marker attached to a rope.
Note! The center of the circle is shifted down to ensure the stability of the cylindrical house structure.
- The back wall will remain solid; on the front wall they draw an entrance hole with a diameter of 22 cm and small windows Ø 5.5 cm, as shown in the following photo:
- The next stage is cutting out the holes yourself. For this you will need a jigsaw and a drill.
- Next, both parts of the future cat house are combined to make marks where the slats will be fixed. It is recommended to install about seven spacers. It is practical to make marks by drilling through them on two walls, as shown in the photo:
- In the holes, a drill is used to prepare recesses for the self-tapping screws that will secure the slats.
- The slats for the cat house require preliminary processing: after planing, the edges are smoothed and roughness is removed. Thickened bottom slats will provide the cat house with greater stability.
- The front and back parts of the cat structure are connected with slats using self-tapping screws, look at the photo to see what should happen in the end:
- The next stage is cutting out the material for decorative finishing of the structure.
Advice ! It is better to choose fabric for the house with cut pile, otherwise the cat will cling to it with its claws. Faux fur, plush or pile are also suitable for these purposes.
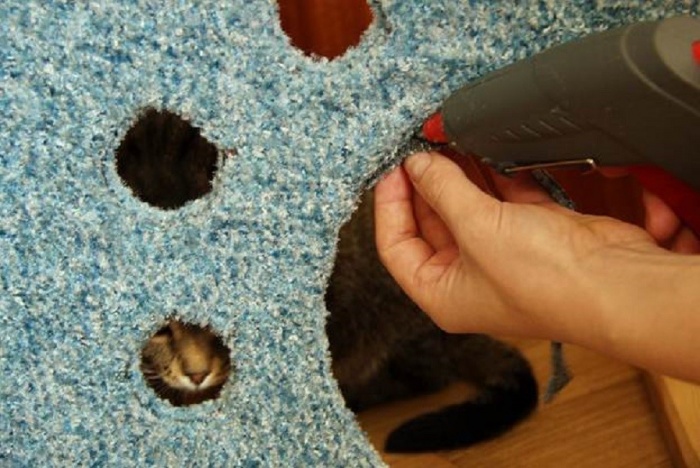
- The most practical way to attach decorative trim to a house blank is to use a heat gun filled with glue without a strong odor. On the front side you will need to carefully cut out the holes for the entrance and windows and process the edges.
- The place on the chipboard base where the house will be fixed is decorated with foam rubber. Its dimensions correspond to the dimensions of the cat rest structure. A circle is drawn nearby where the frame of the cat scratching post will be installed.
- The entire base is decorated with decorative material. This is convenient to do using a furniture stapler. Having wrapped the fabric, the bottom of the base is covered with a sheet of fiberboard.
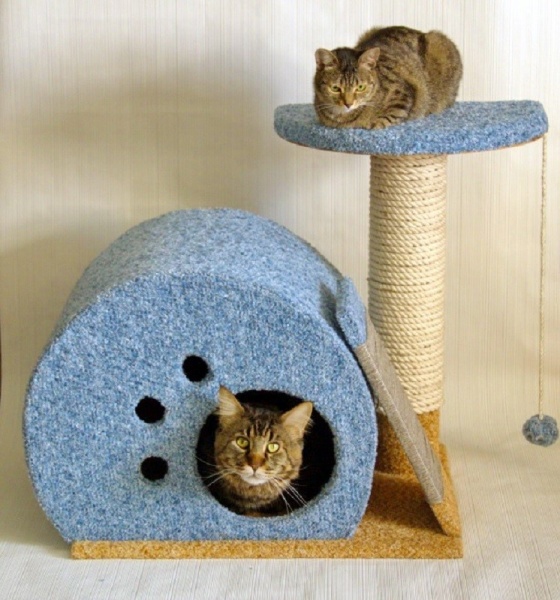
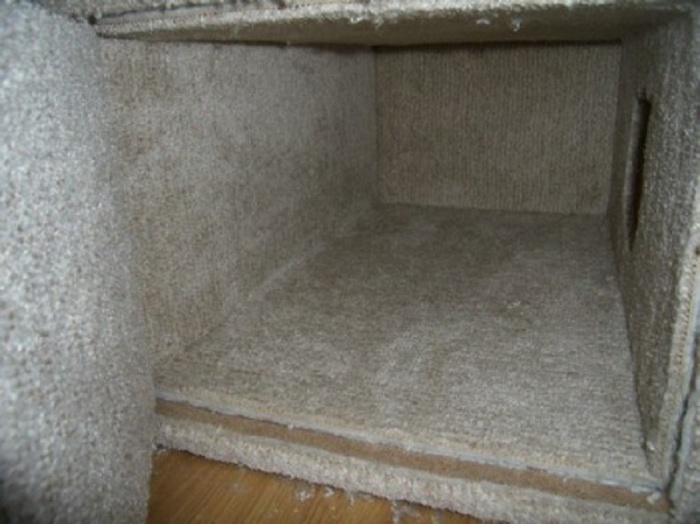
- Now you can proceed to processing the roof of the house. First pasted over top part, then the slats located at the bottom inside the structure are closed. After which the cat house can be attached to the base, having first selected the correct size of screws. The following photos clearly show interior design house and the cat’s satisfaction with the process according to the proposed master class.
There is very little left. To stabilize the plastic pipe, wooden blocks are placed inside on both sides. Depending on the materials used, they are secured with screws or glue. Semicircular elements are cut out of chipboard and fiberboard for a cat bed. First, a piece of fiberboard is strung onto the pipe (later it will cover the edges of the decorative trim).
Then a chipboard part is attached to the beam. Having given the design of the cat house a horizontal position, the location for fixing the scratching post is determined, as shown in the following photo:

After which the pipe is connected to the base of the cat house. Final touches:
- attach a cord for a hanging toy under the part of the chipboard bed;
- cover the cat bed with fabric, first adding foam rubber;
- connect with glue to the lower part made of fiberboard;
- decorate the pipe with jute or sisal rope with periodic fixation with glue;
- an interesting bubo made of soft fabric.
This is what a cat house with a stand looks like now, all that remains is to design an inclined scratching post with your own hands.
On one side, a diagonal cut is made on the board for stable fixation on the base of the cat structure. The edges of the board can be covered with cloth, and the middle can be wrapped with rope. After that, the upper edge of the scratching post is attached to the slats of the cat house, and the lower edge to the base. This completes the master class with step-by-step instructions for decorating a mini complex with a house. You can supplement it with your own elements or change the dimensions, the main thing is to ensure the strength and stability of all components.
Design of the gaming complex
Making a multi-level play complex will require a lot of time and effort, but everyone will experience positive emotions from the result obtained - both the cat owner and the animal for which it is intended. The step-by-step instructions offered in the master class and numerous photos will help you navigate in the right direction and create a practical corner for your cat without unnecessary difficulties. The materials for such products are standard; door hinges may seem like an innovation.

Assembly
Let's move on to the process:
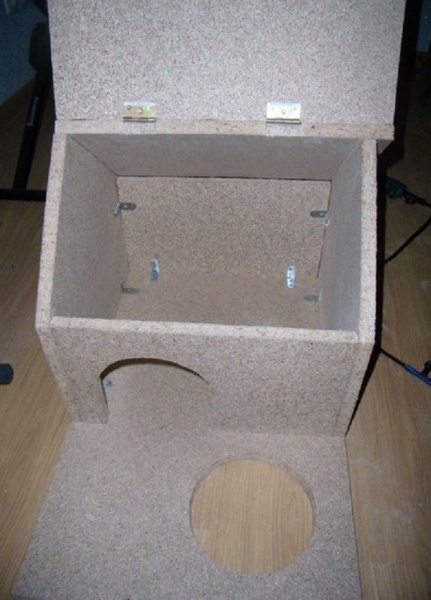
At the first stage, a box of arbitrary sizes (without one side wall) is assembled from sheets of chipboard; in our case, a spacious house for a cat is 80 cm long, 55 cm wide, and 30 cm high. The outline of the entrance can be any, if desired, give design with individual features, you can cut out the likeness of a cat's head. The assembled frame of the house is attached to the base, as shown in the photo:

Hinges are attached to the free side part and the door is fixed. The pipes are secured to the house with corners and screws.

By alternating pipes with chipboard panels, you can create a play complex of any design with a different number of levels for your cat with your own hands.
Note! For convenient movement of the cat, holes are formed in the panels.
The photo shows that above the house there is a bench between two pipes, then there is a solid ceiling.

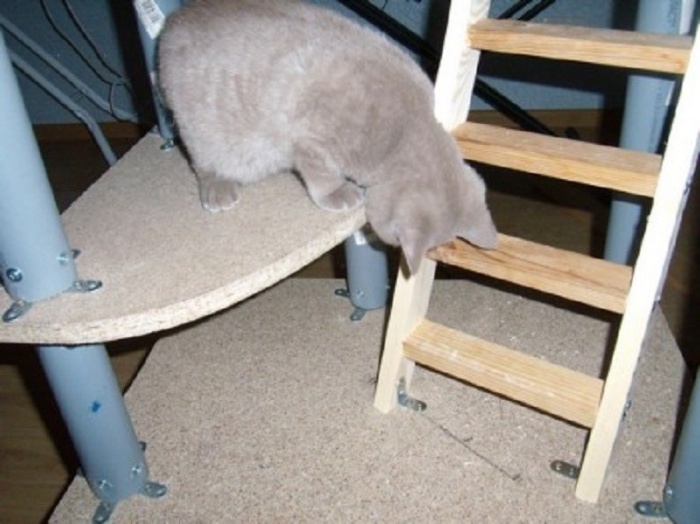
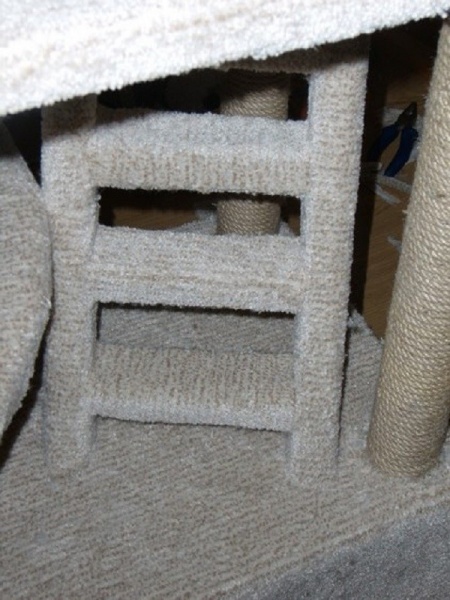
The next level is again a bed, but of a different shape. It will be interesting for the cat to move between the houses using the stairs, which can be installed on the side or directly inside the complex. Furniture corners are also used for its fastening.
It is better to design the upper house with a gable roof; it is installed symmetrically on four pipes.
Advice ! By securing one part of the roof on hinges, you will greatly facilitate the process of cleaning the house.
A transitional shelf between the house and the closet, which additionally secures the multi-level complex for the cat, will help to give greater stability to the structure.

Finishing
After the assembly process, decorative finishing begins. First, all pipes are wrapped with rope made from natural materials, and they are secured at the top with glue. Beds, ceilings and houses are covered with carpet. On individual elements you will need to make holes for pipes. It is recommended to fix corners and hard-to-reach areas with a furniture stapler.
DIY decoration can be done in one color or a combination of finishes. The processing of ends and joints requires a particularly careful approach. It is convenient to cover the hole area with furniture slats, which are easily deformed and provide a smooth surface that cannot injure the cat. At this point the master class can be considered complete. Despite the voluminous work, the step-by-step instructions will become reliable assistants in the noble impulse to create a play complex for your cat with your own hands.
Conclusion
The proposed master classes will not be complete without men's hands. If they do not want to participate in the process, it is better to stop at making models of houses with your own hands, which require exclusively female skills. For the most basic transformation of a cardboard box into a cat’s favorite resting place, you will need scissors and tape. You can sew a simple bed with your own hands from foam rubber and soft fabric in a couple of hours. Therefore, when choosing a design for a cat, consider your capabilities and availability of free time.
A cat must have personal space, its own corner in the owner’s house. The price of a purchased house is not encouraging - the cost of such items is usually greatly inflated. Don’t leave your beloved pet without a cozy corner! It is quite possible to sew a cat house with your own hands, using scrap materials, unnecessary things or old pillows and blankets.
This article will be devoted to how to make a house for your cat. Here you can also find useful recommendations and several of the most common homemade options cat houses.
Things to consider
Today there are a lot of different houses for domestic cats on sale; among this assortment you can find both practical and very original solutions. It is possible to bring any idea to life on your own.

Houses for cats are made from various materials, such as:
- tree;
- plastic;
- fabric or fur;
- cardboard.
There are even burrow houses carved into a foam ball or cube. Wigwam houses or hanging hammocks look very original, in which cats can swing and relax, while simultaneously watching what is happening in the room.

Having decided to independently build a house for a cat, first of all, you need to decide on the following factors:


Attention! Any cat house should be equipped with a scratching post. This part is also easy to make with your own hands.
How to sew a house for a cat with your own hands
You can build a cat's home from almost any materials - it all depends on the skill of the owner and his material capabilities. For some it is easier to work with wood, while the creative abilities of others are limited to cutting out a window in cardboard box. But almost anyone can try to sew a cat's home using a sewing machine or their own hands.

Materials for a sewn house
The cat's house should be soft, so the animal will not be injured, the cat will be warm and comfortable inside its home. The owner will need the following materials for work:
- soft fabric for interior decoration house (flock, fleece, faux fur, plush, velor or velvet, etc.);
- durable material for external walls and roofs that can withstand the test of cat's claws, and on which there are no puffs (this can be carpet, dense synthetic fabrics);
- soft filler for the lounger (sintepon, foam rubber, special granules that can retain heat);
- twine for a scratching post;
- various decorations, toys for cats, pompoms or buboes.

Advice! An old sweater is perfect for your first sewing experience. To build a house for a cat from it, you need to stuff the sleeves with soft filling and sew them in the form of sides (shown in the photo below).

Option 1: cat house
For beginners, simple designs are most suitable, so it is better to sew a cat house in the shape of an ordinary house with a triangular roof. The pattern for such a house is very simple, you can easily draw it yourself.

The whole process of making a house for a cat looks like this:
- Draw a rectangle on a piece of paper or an old newspaper, the sides of which are 40 and 30 cm. Now you need to draw a triangle above the rectangle - this will be the roof. The roof height is approximately 25-30 cm.
- The paper blank should be cut out to use as a pattern. Lay out the fabric for the interior walls of the house on the floor or other flat surface and transfer the pattern to the fabric. You should end up with four identical parts - the four sides of the house.
- Now they do the same with the material for external walls - the pattern is applied to thick fabric and copied four times. Be sure to leave seam allowances - about 2 cm on each side of the pattern.
- The bottom of the cat house is a soft pillow or bed. To cut it out, you need to measure a square with sides of 40x40 cm on the fabric. Also leave seam allowances. You will need two identical blanks for the lounger.
- Now you need to cut the foam rubber. For the walls of the house, foam rubber 1.5 cm thick is used, the lounger should be denser, so for the floor they take either two layers of 1.5 cm each, or foam rubber 2.5 cm thick. All foam rubber parts are cut without seam allowance.
- The three walls of the house are sewn together to create something like a sandwich: the inside should be foam rubber, the outside should be dense material, and the inside should be soft upholstery.
- In the fourth part, you need to cut out a window through which the cat can enter the house. First, a circle is drawn on the material; for this you can use a compass or a plate of a suitable diameter. Now two layers of fabric need to be stitched with a zigzag so that the edges of the window do not fray. After this, you can cut out the window with a blade or sharp scissors, being careful not to cut the zigzag threads.
- They also sew the bottom or bed for the cat. To keep all layers together, it is recommended to stitch them through at several points, capturing the outer fabric and inner foam. You can also use buttons for this, which are sewn to the mattress by hand.
- Starting from the front wall (which has a window), sew all the walls of the house together - this must be done from the wrong side. Now all that remains is to sew the bottom and turn the house onto its face.

Advice! It is recommended to place a scratching post near the house so that the cat does not sharpen its claws on the walls of the house. A scratching post can be made from a wooden beam or a plastic pipe, which is installed vertically and tightly wrapped with twine.

Option 2: open bed
For freedom-loving and sociable cats, an open-type house is more suitable - a kind of bed with sides. It’s not at all difficult to sew such a lounger with your own hands, and you can use an old pillow for this.
So, for work you need:
- flat synthetic padding pillow;
- fabric for exterior decoration of the house;
- needle and thread and scissors.

A cat house is made like this:
- The pillow is placed on a flat surface and thoroughly leveled, trying to give it a flatter appearance.
- Cut the pillow into three parts: cut off two narrow rectangles on the sides, leaving a wider piece inside.
- A large rectangle needs to have rounded corners - this can be easily done with scissors. This detail will be the bottom of the future lounger house.
- Each of the rectangles must be stitched along all edges so that the padding polyester does not delaminate and holds its shape well. It is recommended to sew long parts - the sides of the lounger - in the center to add rigidity to these parts.
- The fabric for covering the house is laid out on the floor or on a table. From it you need to cut a rectangle, inside of which all the parts for the house will be placed. The parts for the sides should be at the edges of the canvas. On top of this “pie” is covered with another layer of fabric and the details are stitched.
- Now you need to sew the ends of the long rectangles, enclosing the sides of the cat house in a circle. A mattress is placed inside the resulting circle, which is also covered with fabric.

Advice! There is no need to sew the mattress to the bed itself, this will make it more convenient to wash or clean it of wool.
Conclusion
A home-made cat house may be even better than a store-bought one. After all, firstly, it was made with love, and secondly, the owner took into account the characteristics of his pet.

In addition, toxic adhesives, strong-smelling fabrics and other hazardous materials will definitely not be used in the manufacture of a homemade house. The cat's home will be comfortable, safe and very cozy!
DIY cat beds – The best way make the life of the mustachioed purr more comfortable and enjoyable. Fluffy pets love to sleep sweetly and often choose their owner’s bed as their favorite place to sleep. But it is better to create for them their own quiet secluded corner, where the cat will hide from the hustle and bustle and rest peacefully.
You can buy a house for your pet and bedding at a pet store, but this requires considerable finances. Therefore, we suggest sewing a bed for a cat yourself, and using the saved money to buy gifts for purring sissies.
What you need for a bed
For a cozy bed for your pet, old things that are always found in every home are suitable. These include:
- Dresses with thick fabric;
- Sweaters;
- Jeans;
- Fur coats;
- Blankets;
- Blankets.
It can also be made from these things. The fabric for the bed must be durable, because the animal scratches its claws on it and bites.

There are a large number of photos and videos on the Internet that show and tell you how to make such a “cat bed” with your own hands. But we need to take into account some nuances:
- A cat bed should be practical and easy to wash and clean. Try to wash your pet’s bed at least once every 7 days to prevent fur and dust from accumulating in it;
- A lounger should always be convenient and comfortable. The place for the cat's home should be cozy, dry and warm. If your animal loves everything soft, then use a pillow as a base. But if your pet likes to sleep on a hard surface, the bottom of the bed should not be airy and soft;
- For a “cozy nest” you can purchase fabric similar to the color of your wallpaper and furniture; it will look attractive and stylish. In this way you will maintain the beautiful design of your interior.
Making a cat bed from an old sweater
Let's look at how to make a cat bed with your own hands. Such a process will not take much time, but will require limitless imagination. It is not necessary to use a sewing machine, which you may not have. Everything can be done by hand if you have sewing skills.

You will need:
- Small pad on padding polyester;
- Scissors;
- Large needle;
- Thick threads;
- Used sweater;
- Fabric (size 20x40 cm) of dense texture;
- For stuffing - padding polyester. You can pull it out of an old jacket or pillow.

Making a cat bed step by step:
- The high collar of the sweater needs to be cut off. To make the seams strong, take nylon or woolen threads;
- Sew over the chest in a circle. First fix it with special needles or pins;
- Place a pillow inside the sweater and sew it with a strong seam along the bottom of the product so that it does not fall out;
- Fill the sleeves with padding polyester until solid;
- We sew them in a circle to the body as we stuff them with material;
- Sew the sleeves at their junction;
- Wrap a thick cloth around the sewing area of the sleeves and carefully sew with threads in the color of the fabric;
- Let's make a bed out of a sweater and call the cat.

To interest the purr, the product should be sprinkled with a little catnip.
Cat bed with sides
Such models are not only the easiest to make, but also quite beautiful. They are made in several variations. You can make a cat bed with a short side on one edge and a soft pillow. The “crib” with a removable pillow is very easy to care for, because it can be pulled out and cleaned at any time.

First, let's determine the size of the future cat's place and the dimensions of the pet. Using these data, let’s take:
- Textile;
- Thick cardboard;
- Handle;
- Ruler;
- A piece of padding polyester or foam rubber;
- A needle and thread to match the color of the fabric.

Let's start the pattern making process:
- Cut out a long strip from cardboard (part A), then an oval (part B);
- The width of the strip is equal to the height of the side of the bed, and its length corresponds to the size of the circumference of the oval (do not forget to allow an allowance of 1-2 cm).
Now a master class on sewing a crib with sides:
- Let's prepare two patterns: A-side, B-bottom;
- We stitch the two elongated sides of the side, turn the part right out;
- Cut out a rectangle of the required shape and size from foam rubber and insert it into the side. Hand sew the edges of the side;
- We will select a strong thick fabric to make the bottom or put an oval shape cut from plywood or cardboard between the bottom blanks;
- Let's sew the bottom to the side;
- We sew a pillowcase: cut out 2 oval-shaped parts according to the pattern, connect their sides;
- We fill the pillowcase with foam rubber or synthetic padding, sew in a zipper or sew it by hand, and place the pillow in the crib.

You can also make an elegant cat bed in the shape of a heart.
If the animal is fluffy and does not like heat, the sides are made lower. If your pet is short-haired and often freezes, make the sides higher and fill the bottom more tightly with filler.
Making a cat bed for a radiator
Cats love to sleep on warm radiators in the cold season, despite the fact that they have an uncomfortable, hard surface. To facilitate the sweet sleep of the fluffy, we will make a “crib” using special fasteners.
Step-by-step master class for creating a lounger:
- Let's build a frame from wood. The design of the fasteners for its top depends on the design of your battery. The cat bed must be very durable so that the cat does not fall when jumping onto it from the floor. Otherwise, he will no longer approach this unsafe place;
- We will sew a bag in the shape of a rectangle from thick fabric, and cover the frame with wood;
- We insert padding polyester or foam rubber inside;
- Let's attach the sleeping place to the battery.

You cannot make a bed that is too large - it will not allow warm air to flow well into the room.
The second version of the “cat bed” on the battery:
- We buy a large diameter PVC pipe in a specialized store;
- Cut an old fur coat into two rectangles different sizes: place the small one inside the pipe, the large one outside;
- We sew two sides of the smaller rectangle and put the resulting fur pipe into a PVC pipe;
- Wrap the pipe with a large rectangle until you get a fur mink. We sew the edges of the outer and inner rectangles by hand.

In order to secure the bed very firmly to the radiator, you need to sew a reliable fastener along its edge and use it to fix the fur mink to the radiator.
A few more options for cat beds
- For observant pets who spend hours looking out the window, sew a bed in the form of a mattress or a pillow for the windowsill. To prevent the “crib” from falling on the floor, we attach it to the windowsill using double-sided tape. It can also be fixed with two clamps (this is suitable for narrow window sills);
- If the “mustache” likes to be alone, a bed-house with a roof is perfect for him. In it he can relax calmly and hide from prying eyes. If there are small children in the family, it is better to place such a cat’s home in a hard-to-reach place. If a cat has kittens, then they will feel great in such a cozy house, and the “mommy” will be grateful to her owner for this;

- In a vintage-style apartment, an old suitcase would be a good choice for a four-legged friend's sleeping place. One has only to put a soft, comfortable pillow there, and the purring sissy will immediately appreciate the new comfort zone;
- A kitten's bed can be made in a shoebox (without a lid). Or you can cut a circle-shaped window in a large closed box. The baby will sleep in perfect twilight. A frame, wicker or plastic carrier is also suitable for resting a kitten. In both cases, be sure to provide the fluffy with soft bedding for a sweet sleep.
A cat is a full member of the family and deserves a suitable resting place. Make the perfect “nest” for your furry pet, and he will certainly appreciate it.
Video: Original do-it-yourself cat bed


