If during battle the FPS on your laptop is always too low, we suggest following these steps:
I. Make sure that the computer meets the system requirements.
II. Set a high-performance energy plan.
III. Disable all system and Internet programs that reduce performance.
IV. Check how many video cards are installed in the laptop.
V. Switch the video card to discrete.
Va. Instructions for Nvidia video cards.
Vb. Instructions for AMD video cards.
VI. If all else fails, create a support ticket.
I. First, make sure your laptop is compatible.
II. High performance energy plan.
1. Click "Start".
2. Go to Control Panel > System and Security.
3. Select "Power Options".
4. Set to "High performance". Adjust your monitor brightness if necessary, as brightness may change when you switch performance.
III. Disable all performance-reducing systems and Internet programs
Antiviruses (as a last resort), clients for downloading files (for example: uTorrent, Download Master, Zona, FlashGet and others), programs that provide text and voice communication (for example: Skype, ICQ), close the browser and other unnecessary applications. Especially in this situation, it is worth highlighting the antivirus, since during the game it checks various files and this, to a certain extent, loads the system.
IV. To find out the number of video cards on your laptop, follow these steps:
1. Click the Start button, enter the word “device” (without quotes) into the search bar and select “Device Manager” from the list of results.


If two display adapters are listed, it means your laptop supports switching between graphics cards.
If there is only one display adapter in the list, most often the laptop does not support such switching.
V. Switching video cards
So, we have determined that the laptop meets the system requirements of the game, can switch between video cards, and has the correct power plan. Now you need to correctly configure the video card for the game, since, most likely, the laptop automatically uses the built-in Intel video card and this causes a decrease in FPS. To use a discrete graphics card, you must follow these instructions:
Va. Control PanelNvidia. For video cardsNvidiaGeForce
If your system has a video cardAMDRadeon or onlyIntel, then go to section Vb.
Make sure that the latest video card drivers are installed on your laptop Nvidia GeForce. To install/update drivers, the manufacturer recommends using the GeForce Experience program, which monitors the release of a new driver for your video card and automatically updates it. After installing the driver through GeForce Experience, be sure to restart your computer.
Nvidia GeForce video cards are configured through the Nvidia Control Panel.
To open this panel, right-click on the desktop and select “NVIDIA Control Panel” in the pop-up window.

1. In the Control Panel, go to the "Manage 3D Settings" tab. In Global Settings, set the Nvidia processor as your preferred processor and click Apply.

2. Go to the "Program Settings" tab. In the first item, click Add, then Browse. Locate Castle.exe (located in the game folder PrimeWorld\Castle\Castle.exe) and PW_Game.exe (located in the game folder PrimeWorld\PvP\Bin\PW_Game.exe), then click "Add selected program".
In the second option, select "Nvidia High-Performance Processor" from the drop-down menu.

Important! After adding Castle.exe, be sure to click "Apply", then add PW_Game.exe and also click "Apply".
Restart your computer and launch the game. If you do not notice an increase in FPS or it is not significant, then follow these steps:
Launch Nvidia Control Panel. Go to the "Adjust Preview Image Settings" tab, select "Custom Settings with Focus on:" and drag the slider all the way to the left until "Performance" appears. Click "Apply", restart your computer and launch the game.

Vb. ATI Catalyst Control Center. Forvideo cardsAMD Radeon
If your system only has a video cardIntel, then go to section VI.
Before starting the settings, make sure that the latest drivers for the AMD Radeon video card are installed on your laptop. To install\update drivers, download the utility to determine the most suitable drivers for your system AMD Driver Autodetect from the official AMD website. The utility does not require installation - just run it and it will automatically offer to download the necessary driver. After installing the driver, be sure to restart your computer.
To change video card switching settings in ATI Catalyst Control Center, follow these steps:
1. Click the Start button and enter the text CCC (in the English layout) in the search field, then select CCC - Advanced from the list of results:
2. From the Catalyst Control Center menu, select Switchable Graphics.
3. Select Browse to search for the executable file for the application you want to configure. In our case, these are the executable files Castle.exe (located in the folder with the installed game PrimeWorld\Castle\Castle.exe) and PW_Game.exe (located in the folder with the installed game PrimeWorld\PvP\Bin\PW_Game.exe).
The changes you make will be applied immediately. Restart your computer and launch the game.
Don't forget to close any unnecessary programs when you start the game.
If after following the suggested instructions the FPS level does not change, then switch the game to windowed mode and lower the graphics settings to minimum.
VI. If the instructions did not help increase FPS
Create a request with the support service, immediately attaching a file and a detailed description of the problem to the request (under what conditions does the loss usually occur, does the sound freeze along with the picture, and so on). Also indicate which instructions you have already completed.
Like
Like
Tweet
Preface
Progress is inexorable - every year the quality of graphics in games is closer to what we see in reality and in films.
Will we ever reach a point where games are completely indistinguishable from movies? Absolutely yes.
But what to do with old games? Remained on the sidelines of history, they can still, as they say, touch the soul. Graphics are not important if the game is interesting, but a feeling of regret creeps into the heart. Luckily, there are ways to make older games look better.

No, this is not a photograph. Craftsmen modified the game GTA IV (released in 2008, by the way!). A significant role played the ENBSeries add-on.
Developers rarely update their old games. If this does happen, then the changes are minimal: they add the buzzword “HD” or “Enhanced Edition” to the name, put clearer textures and... that’s it. For example, this is what Resident Evil 4 Ultimate HD Edition looks like compared to the regular version:

Improved textures (left), of course, are good, but the implementation is so-so. The textures are still not clear enough to hide the flaws.
Even this modification is for the better. What if there is no HD version of your favorite game? Fortunately, this is fixable.
Ways to improve graphics in games
There are several ways to improve the game's graphics.
1. Own game settings
In the style of Captain Obvious, I inform you: every computer game has its own graphics settings. This is done so that you can comfortably play on low-performance computers. Who wants to see beautiful rays of light from the sky at dawn, reflected on the dew drops of roadside grasses on the roads of Tamriel, realistic shadows and glare from the fire, and so that all this does not slow down, take a more powerful computer or go outside. If your computer is “office” level, you will have to give up the beauties and set the settings to minimum - everything is blurry and primitive, but the game works without freezing.
Doesn't the game slow down at maximum graphics settings? Congratulations - the video card and processor can cope with the load, you can improve the graphics using third-party tools.
2. Video card driver settings
By using nVidia Control Panel(in Russian “nVidia Control Panel”), Catalyst Control Center or Intel Graphics and Media Control Panels(it all depends on the video card manufacturer) you can force some game settings if they do not change in the game itself or there are no such options at all. Unfortunately, the options are limited. We have access to settings for pixel smoothing, anisotropic filtering (clearness of distant textures) and mip bias (also responsible for the clarity of textures and objects), and some others. In practice, the only useful thing is to force antialiasing on if the game does not have such an option.
3. SweetFX - filter set
Imagine that the game image is a video recording on which you can apply effects. This is roughly how SweetFX works.
Most amateur graphics patches for games end up just being tweaked by this thing.
SweetFX(FXAA Post Process Injector, alternative - FXAA Tool) - a set of filters (so-called shaders) applied on top pictures of the game. With SweetFX you can't make water more realistic or make characters cast normal shadows, no. But you can apply a number of effects that improve the picture in general:
- Enable pixel anti-aliasing even in games that generally do not support it (FXAA and more advanced SMAA methods). The pixels on the screen will no longer be noticeable.
- Make the picture clearer with the sharpening filter.
- Add a “vignette” effect - darkening the picture at the edges of the screen. This technique concentrates the gaze on the center of the screen and adds a volume effect.
- Adjust brightness, contrast, color scheme Pictures. If the game annoys you with some shade, just remove it.
- Add a “bloom” effect - a glow around bright light sources.
- Make a pseudo-HDR picture - when the dark and light areas of the picture are equally detailed, which is more natural for our vision.
- Using a combination of different filters, you can achieve the same effects as, for example, photos on Instagram.
The most important thing is that all this does not slow down! That is, in principle, this puts a load on the processor and video card, but it is insignificant if everything is configured correctly.
Update from 08/06/2018: Now instead of SweetFX they use . There are more possibilities, it’s easier to configure (right in the game).
4.ENBSeries
- high-quality pixel smoothing,
- realistic reflections,
- believable shadows,
- lighting effects (beautiful light halos around lamps, the sun, high-quality bloom, rays of light in foliage, and so on),
- the effect of adaptation to light, imitating the reaction of our eyes - when leaving a dark room into the light, the picture will be bright for a few seconds and vice versa,
- focusing effect - when looking at close objects, the background will be blurred.
All effects are customizable in detail. You can add your own if you know how to create shaders.
ENBSeries has a capacity of a wagon and one hundred trolleys. Unfortunately, ENB heavily loads the computer’s video card, so all effects can be enabled at once only on a modern computer with an expensive video card.
5. Patches for games and manual editing of settings
Sometimes developers themselves turn off some effects. For example, the popular game Watch Dogs caused a real stir at E3 in 2012 with its revolutionary graphics. At E3-2013, the game got rid of some of the effects, and in 2014, players were in for an unpleasant surprise - the game looked even more faded. Here's a year-by-year comparison of the game, from exhibitions to the final version on modern game consoles:
True, there is another opinion - they say that the most impressive moments of the game were shown at exhibitions, in the final version in exactly the same situations (coincidence of time of day, weather, location) the game looks exactly the same as in 2012.
Be that as it may, enthusiasts find disabled options in the game code and enable them, making the graphics more realistic. I won’t provide a link to the patch for Watch Dogs for obvious reasons, I’ll just say its name: TheWorse Mod for Watch_Dogs.
You can always use Google to find patches and tips to improve graphics for your games. I also draw your attention to the site WideScreen Gaming, dedicated to ways to run games on modern widescreen monitors and multi-monitor configurations. Simply put, there is a database of patches that allow you to run old games in modern screen resolution.
SweetFX
The simplest and most interesting method for improving game graphics is to use SweetFX.
Install SweetFX
Let's start improving the graphics. Let's start with something simple - installing SweetFX.
Perhaps since this article was written, it has come out a new version, so you can look at the official website.
Step 1. Unpack the downloaded archive SweetFX-Configurator_standalone_with_SweetFX_1.5.1.7z to any folder. The easiest way is in the “Documents” folder.
If the archive does not open, it means that you do not have an archiver program installed. I recommend 7-zip.
Step 2. In the unpacked folder we find the program SweetFX_config.exe.Create a shortcut for it on the Desktop so that you don’t have to open the folder every time.
 Right-click on the program - Properties. On the tab Compatibility put a check mark next to the item Run this program as administrator:

Step 3. To implement effects into the game, finally launch SweetFX_config and click Add new game:
 Using the window that opens, select the exe file of the game. If you do not know where the game folder and its executable file are located, you can select the corresponding shortcut on the Desktop. However, this may not work if the game is installed via Steam, Origin or Uplay - the shortcut may not lead to what we need.
In which folders can you find games:
Steam: C:\Program Files (x86)\Steam\SteamApps\common\ or C:\Program Files\Steam\SteamApps\common\
Origin: C:\Program Files (x86)\Origin Games\ or C:\Program Files\Origin Games\
Uplay: C:\Program Files (x86)\Ubisoft\Ubisoft Game Launcher\games or C:\Program Files\Ubisoft\Ubisoft Game Launcher\games
These are just speculative locations. You may have different folders, especially if you haven't changed your settings. As a last resort, there is a search using Windows. If you can't find the game folder, put this instruction aside for later, because... Now you don’t have enough knowledge.
Step 4. After selecting the game executable file, a line will appear in the SweetFX configurator list:

For clarity, I decided to refine an old but interesting game GTA: San Andreas . After adding it to the list, install SweetFX using the “ Add SweetFX". All necessary files will be copied to the game folder, and the following settings will appear in the window:

To save settings automatically, check the box " Automatically save on changes«.
Each effect is enabled by checking the box. Everything is customizable in detail: just select the filter with the mouse - a list of its settings will appear below.
Some tips for setting up each effect:
- The description contains the minimum and maximum values of the parameter.
- The description in square brackets shows the standard value of the parameter.
- The value is set manually, and you can also enter a fractional value using period (not comma!).
You do not need to restart the game to view the changes. You can collapse it, edit the settings in SweetFX Configurator and expand it again - the effect is applied immediately. If something is wrong, the keyboard's Pause/Break button will manually reset the settings. And “Scroll Lock” turns SweetFX on and off.
Description of SweetFX filters
If you know English, great. If not, below you will find the translation of each name.
1.SMAA Anti-Aliasing: image smoothing using the SMAA method.
To show what pixel smoothing is, I have prepared a visual animation for you using the example GTA games San Andreas (by the way, SweetFX also works with GTA 5):

Individual pixels are almost invisible, sharp lines are smoothed out.
The standard (and popular) MSAA anti-aliasing method works clumsily, but efficiently: the game image is calculated by the video card at a resolution several times higher than the resolution of your monitor, and then reduced. High quality - pixels are not visible, the picture is clear - is achieved through a huge number of calculations, which not every video card is capable of performing.
In order not to overload the video card once again, they came up with methods for smoothing the image without scaling - FXAA and the more advanced SMAA. Unfortunately, SweetFX smooths out the entire image on the screen at once, so all the inscriptions are slightly distorted. If you select the SMAA line and set the SMAA_CORNER_ROUNDING parameter (corner smoothing strength) to the maximum value of 100, this distortion will be very noticeable, but the picture will become very “smooth”.
For those who don’t care about the clarity of fonts in games (like me), I recommend the following recipe: turn off standard anti-aliasing in the game (to reduce the load on the video card and increase the frame rate), turn on SMAA, set the effect parameters to maximum:
- SMAA_THRESHOLD: 0.05
- SMAA_MAX_SEARCH_STEPS: 98
- SMAA_MAX_SEARCH_STEPS_DIAG: 16
- SMAA_CORNER_ROUNDING: 100
This will save our eyes from contemplating sharp lines and pixels sticking out everywhere, but will make the picture a little blurry. Turn on the sharpening effect LumaSharpen- excessive blur will disappear.
To be fair, I note that immediately after installing SweetFX, these effects are enabled. I only recommend setting the anti-aliasing settings to maximum and turning off the built-in anti-aliasing in the game so that the frame rate remains high.
2. FXAA Anti-aliasing: ancestor of SMAA smoothing. Blurs the image more, smooths edges less effectively. Forget about this point.
3. Explosion:“explodes pixels.” The effect's only parameter, Explosion_Radius, controls the strength of the effect.

Why it is needed - I don’t know.
4.Cartoon: hand-drawn picture effect. The final result is highly dependent on other effects (SMAA, CRT, Bloom, HDR and Lumasharpen):
 If desired, you can give any game a “hand-drawn” style. The effect has two settings - the strength of the effect and the intensity of the black stroke.
5. Advanced CRT: SweetFX effect for those who are nostalgic for old tube TVs:
 The filter has many settings, but I won’t translate their descriptions - it’s unlikely that anyone will tinker with it.
6.Bloom: all light areas of the image begin to glow. With the default settings the effect is not noticeable; for the example we had to increase the BloomPower parameter to 5:

The SweetFX Bloom effect has three parameters:
- BloomThreshold - than less value, the darker areas are captured by the effect. At zero the screen is almost entirely white.
- BloomPower (from 0 to 8) - glow strength.
- BloomWidth (from 0 to 1) - glow width.
I most often set the values to 40, 8 and 1 - the picture becomes bright and “juicy” in overly dark games.
7. HDR: pseudo-HDR effect. The effect allows you to see the outlines of very bright and very dark objects. The default settings barely change the image:

To enhance the effect, I increased the HDRPower parameter by one:

Theoretically, light areas should become darker, dark areas lighter. But since this is pseudo-HDR, the picture simply becomes more contrasty. This effect is useful in games with low contrast images.
8. LumaSharpen- sharpening effect. Enabled by default. It has two parameters - sharp_strength and sharp_clamp. The first is the strength of the effect, the second is the limiter of the effect. The standard values are quite optimal - a little clarity without fanaticism.
9.Levels- an effect that adjusts the brightness of the image. It is useless because it works clumsily, unlike the same effect in Photoshop.
10. Technicolor- an effect that allows you to simulate shooting with an old camera. Useful if you need to add some color to the image. At default settings, it slightly reduces color and gives black a blue tint.
11. Cineon DPX- an effect similar to the previous one simulating camera shooting, but implemented differently. You can also give any shade to the image, but there are more settings.
12. Monochrome- makes the picture black and white.
13. Lift Gamma Gain- a useful filter that allows you to separately adjust the brightness of light, dark and intermediate tones of an image. If you want to add some color to your image, try this tool first.
14. Tonemap- a set of filters for adjusting gamma, exposure, color, bleach and defog.
15.Vibrance- SweetFX filter, enhancing the color of faded tones:

The Vibrance filter can be enabled in almost all games by setting the Vibrance parameter (the effect and its parameter at the bottom of the SweetFX Configurator window are named the same) to “0.70”. This is enough to make the game shine with new colors without going overboard with bright colors.
16.Curves- curves. Those who use Photoshop will understand what it is. In short, this is a powerful tool for adjusting brightness and contrast.
17. Sepia- by default gives the image a brown tint (sepia). You can choose any other shade and adjust its strength.
18. Vignette- vignette effect. Darkens or lightens the edges of the image.
19. Dither- judging by the description, the effect allows you to show more shades on the monitor than it can show. In practice, no difference is noticeable.
20. Border- adding black stripes along the edges of the screen to give a “cinematic” effect. In practice it is useless, because the player needs to see as much of the playing space as possible; an embrasure gap is not needed here.
21. Splitscreen- split screen to compare pictures without effects and with them. For example:
 22.Custom- if you know how to create shaders, this item enables them.
Storing different SweetFX effect settings for one game
It's easy to apply settings to see them in game: just press a button Save new config(unless you checked the “Automatically save on changes” box).
But what if you want to have several sets for one game? There is a button for this Save / Load configuration, which will open the presets window:

To transfer settings to another game, you need to create settings in this window (enter a name in the field Name and press New preset), select it in the list at the top and click Export preset- settings will be saved as usual Text Document. Button Import preset will allow you to load such a settings file.
Where can I get ready-made SweetFX settings?
In the settings window described above, using the button Import preset You can load the settings of other players.
ENBSeries - a graphics revolution
Unlike SweetFX, ENB does not always work. But the result is impressive:


Please note: a shadow has appeared from the central palm tree, the sidewalk has begun to shine a little.
Depending on the ENB settings and game capabilities, the effects will vary. For example, for the game Skyrim they came up with many ENB options. Some of them:
You don’t have to mess around with the settings, but just turn on everything and adjust the color scheme - even this improves the quality of graphics:
ENBSeries, unlike SweetFX, improves graphics by adding high-quality reflections, realistic shadows and generally improves the picture by changing the algorithms for working with lighting.
How to install ENB
How to install this miracle?
2. The archive is unpacked into the game folder.
3. After starting the game, information about the ENB version should appear in the upper left corner.
How to set up ENB
How to set up this cool thing?
The first versions of ENBSeries were configured by editing the file enbseries.ini using a text editor (standard Notepad will do). The file is located in the game folder. You can do this now, but you will have to restart the game to see the changes.
A more modern way - after installing ENB and starting the game, click Shift+Enter- Settings will appear on the left side of the screen. Using the checkboxes you can both enable the effects themselves and their options in the corresponding sections.
The universal version of ENB for all games and special ones have different sets of settings. Therefore, do not be surprised if you do not see any items in the .ini file or menu.
Information about all settings:
- ENBseries for GTA 4. Documentation - here there is information about setting up ENB for GTA4. In my opinion, everything is chewed there in as much detail as possible.
- How to configure ENBSeries: part 1, part 2, part 3 - here we talk about the old version of ENB, with settings through editing enbseries.ini.
Ready-made ENB builds that improve graphics:
- The largest repository of modifications for games - the Nexus mods website - has an “ENB Presets” section for a number of games. Follow this link, select your game (if it is there, of course), then menu Files - Categories and look for the item ENB Presets. If there are normal ENB builds for the game, then they are there. For example, from there I tried about fifty ENB assemblies for the game Skyrim.
- Also, no one canceled Google. I don’t think I need to tell you how to use the search. For example, on the Internet there are a lot of ENB assemblies for games in the GTA series.
- For fans of GTA IV and The Elder Scrolls: Skyrim, pay attention to the A State of Trance website - where the author talks (in English) about the best mods for improving the graphics of these games.
Advice: often the archive with ENB settings does not contain the actual ENB files (and this is correct - the author of ENB prohibits the distribution of his creation in the form of assemblies). Therefore, you will have to first download and install the ENB version for your game from the official website (or the universal one, if there is no special one), then unpack the settings for ENB there. Read the instructions!
How to combine SweetFX and ENB
Both modifications work by replacing the same file - d3d9.dll. Making them work together is quite simple:
Step 1. Install SweetFX.
Step 2. In the game folder, rename the file " d3d9.dll" in, for example, " d3d9-sweetfx.dll«.
Step 3. Install ENB (SweetFX will not work yet).
Step 4. Open the file with Notepad enblocal.ini in the game folder, correct the beginning of the file like this:
EnableProxyLibrary= true InitProxyFunctions= true ProxyLibrary= d3d9-sweetfx.dll
I've highlighted what you need to fix.
Step 5. You can customize ENB and SweetFX.
ENB and SweetFX will work together.
Which games can improve graphics?
Unfortunately, SweetFX and ENB do not work with all games. To explain why this happens, we need to explain a little theory.
The image from the game that we see on the screen can be drawn in different ways. Most Popular:
1. GDI- a graphics output method that first appeared in Windows 95. It practically does not use the resources of the video card, so outputting three-dimensional graphics is impossible. SweetFX and ENB are not supported for a simple reason - games that use this method are primitive in terms of graphics (for example cards, checkers, chess). SweetFX and ENB do not work with GDI.
2.GDI+- a more modern method of outputting two-dimensional graphics, used in modern programs. For 3D it is still not practical to use because... Using GDI+, any complex graphics will take a long time to draw. SweetFX and ENB do not work with GDI+.
3.OpenGL- a method for displaying three-dimensional graphics, used not only by games, but also by professional programs such as 3DS Max. There are quite a few games that use OpenGL, especially older ones. SweetFX and ENB do not know how to improve graphics in OpenGL games, but you can cheat by transferring graphics to DirectX “rails” using QindieGL or GLDirect. UPD: It seems like they have already learned how to work with OpenGL.
4.DirectDraw- another method for displaying graphics. Many good old games work through DirectDraw. Unfortunately, SweetFX or ENB will not be able to improve the graphics in them.
5.DirectX- what is this, I’ll already cover it in another article. In short, this is a set of functions and algorithms that allow you to use the capabilities of a video card as efficiently as possible for rendering graphics. OpenGL solves a similar problem, but no one has yet developed SweetFX and ENB for OpenGL.
Games work with DirectX primarily through the d3d9.dll software library located in the system Windows folder. Both SweetFX and ENB need to monitor rendering functions in order to work, changing them according to their algorithms. To do this, the d3d9.dll file is placed in the game folder, which contains functions for improving graphics and further redirecting commands to the original d3d9.dll file. Therefore, if you suddenly decide to replace d3d9.dll in the Windows folder with such a file, instead of improving graphics in games, you will get, at best, a set of glitches, and at worst, an inoperable operating system.
So can SweetFX and ENB work with DirectX games? DirectX comes in different versions - from 1 to 11.1 on this moment(not counting intermediate ones). SweetFX and ENB can work with DirectX version 9. There is a DirectX 8 -> DirectX 9 converter from the author of ENB, but it does not always work. So many games that use an older version of DirectX remain in the dust (for example, the Mech Commander strategy series).
There is also no converter from DirectDraw to DirectX 9. But there are converters from OpenGL to DirectX. I recommend using QindieGL and
If you don't know English and/or don't want to read the instructions, don't try to download the above-mentioned converters, you'll just waste your time.
In the future, they will probably add support for 10-11 versions of DirectX, as there are more and more games supporting these technologies.
Graphics improvement - myths and reality
Myth one: animation and other features of old games
Ennoble appearance games are possible. It’s especially great when the game officially supports modifications (for example, TES4: Oblivion, Skyrim, MineCraft) - this can significantly improve graphics and gameplay.
But the graphics are a beautiful wrapper, nothing more. Inside, the game will remain old, no matter how you look at it. Characters will have constrained animations, you will not be able to kick/move objects where it was not intended, you will not be able to break through walls where they were not supposed to be broken through, and so on.

Does this mean SweetFX and ENB are useless? My opinion is that they provide the opportunity to get the most out of games that they are capable of, so their use is justified. Just don't expect miracles. Interactivity they won't add.
Myth two: modern games have the coolest graphics at the moment
Every year, developers use more and more technologies to attract the player's attention. The wrapper must be beautiful to be purchased. Accordingly, sales increase and game publishers get richer.
However, truly impressive innovations are extremely rare. Why? Firstly, these are unnecessary expenses - by the time the technology is implemented, the game will become obsolete. Secondly, the players they still buy games, even if their graphic design is quiet horror (for example, the Call of Duty series of games is famous for this).
To understand what technologies have been invented to enhance realism in games, I advise you to read some very interesting articles:
After the knowledge gained, you will understand that today's games are not nearly as good as they could be in terms of graphics. Moreover, it becomes obvious that the developers are lazy. They promise something unimaginable without using even a tenth of what can actually be achieved.
Myth three: good game must have cool graphics
If you like to play games purely for realistic graphics, I have for you bad news- you missed the release of a simply amazing game called Life.
Games are not films. They captivate with their plot, features, and gameplay. Graphics play an important role, but often sloppy sketches are better than realism ( shining example- Another World).
Bottom line
We don't play old games because of the graphics. Strong feeling of nostalgia, pleasant memories of that time, an interesting plot or some little thing that will stay with a person through the years - graphics here do not occupy the most prominent place.
Advice: when trying to fit an old wardrobe into a modern interior, do not forget about Narnia in it.
Related posts:
Like
Like
In version 9.0, new graphic effects have been introduced into the game, designed to make tank battles even more beautiful and spectacular.
However, it is important to understand that these innovations will also affect the performance of the game. For this reason, the first time you launch the game after installing update 9.0, the graphics settings will be automatically determined on each account.
In most cases, this is enough for a comfortable game, but if after installing the update you experience a drop in performance, we recommend taking a few minutes to fine-tune the client manually.
- Select the graphics quality from those offered in the drop-down menu or use the “Recommended” button - the system will automatically select the most suitable graphics quality for the game, based on the parameters of your computer. Graphics Quality settings affect the settings in the Advanced tab. Select a value in the Graphics Quality field if you do not want to configure every option on the Advanced tab.
- 3D render resolution. Decreasing the parameter value can improve game performance on computers with weak graphics cards.
- Selecting the size of the game window. If “Full Screen Mode” is enabled, the field name changes to “Screen Resolution”. If the set resolution in full screen mode does not match the current monitor resolution, the image may be distorted. Increasing the parameter increases the load on the video card and can reduce the performance of the game. You can reduce the load on the video card by adjusting the 3D rendering resolution.
- Enabling full screen mode expands the game to the entire monitor of your computer.
- Limit frame rate to 60 frames per second. Used when the image on the bottom of the screen is shaking or lags relative to the top.
- When this setting is enabled, the edges and edges of objects become smoother.
- Vision angle. The normal viewing angle for humans is about 95°. The smaller the angle, the closer objects become, but the peripheral view is reduced. Does not affect game performance.
- A mechanism for adapting the color palette for people with color blindness.
- Monitor refresh rate. You can view the monitor's refresh rate in the settings of the monitor or its driver. Please note that the displayed values depend on the current monitor resolution. Install monitor drivers to display supported values.
- If the set aspect ratio does not match the current aspect ratio of the monitor, the image may stretch or shrink horizontally. The setting allows you to equalize the proportions on monitors with non-square pixels.
- Here you can select a monitor for the game if you have several connected to your computer.
- Change the brightness of the image. Works only in full screen mode. Windowed mode uses the current operating system settings.
- The color filter allows you to select the visual design of the game from the proposed options.
- Moving the slider changes the visibility of the selected color filter in the interface. The picture above shows the changes.
If you need more advanced graphics settings, go to the "Advanced" tab. Please note: Most of the settings below are only available for the Enhanced Graphics renderer.
Some settings and their values are not available for standard graphics.
Settings that significantly affect the performance/performance of the game are placed in a separate block “Significantly affecting performance”. In the image they are indicated by numbers 3–7 and 12–16.
Lowering or disabling these settings can significantly improve game performance.

It is important to pay attention to some points here:
- By choosing from the two proposed graphics quality options, you predetermine the choice in the remaining categories in this tab.
- The quality of textures does not depend on the performance of the card, but it is demanding on video memory.
- Game performance with this setting depends on the power of the video card.
- Shadow quality is highly dependent on overall system performance, affecting both the video card and the CPU.
- It is recommended to disable this option if performance decreases in sniper mode.
- Here you can adjust the display of smoke, dust, sparks, flames, explosions, etc. All these objects depend not so much on the video card, but on the central processor.
- Various additional graphic effects: air refraction, bloom effect, etc. Strongly depends on the performance of the video card and moderately on the amount of video memory.
Points 8–19, 21 slightly affect the performance of the game, which means that when setting values, you should be guided by your own wishes for the quality of each element (water, trees, landscape, etc.).
Many users will find it useful in paragraph 20 “Dynamically changing the quality of effects” - automatic simplification of effects when system performance drops.
Enabling the option will allow the game to adapt to the speed of your computer.
Modern games use more and more graphic effects and technologies that improve the picture. However, developers usually don’t bother explaining what exactly they are doing. When you don't have the most powerful computer, you have to sacrifice some of the capabilities. Let's try to look at what the most common graphics options mean to better understand how to free up PC resources with minimal impact on graphics.
Anisotropic filtering
When any texture is displayed on the monitor not in its original size, it is necessary to insert additional pixels into it or, conversely, remove the extra ones. To do this, a technique called filtering is used.
Bilinear filtering is the simplest algorithm and requires less computing power, but also produces the worst results. Trilinear adds clarity, but still generates artifacts. Anisotropic filtering is considered the most advanced method for eliminating noticeable distortions on objects that are strongly inclined relative to the camera. Unlike the two previous methods, it successfully combats the gradation effect (when some parts of the texture are blurred more than others, and the boundary between them becomes clearly visible). When using bilinear or trilinear filtering, the texture becomes more and more blurry as the distance increases, but anisotropic filtering does not have this drawback.
Given the amount of data being processed (and there may be many high-resolution 32-bit textures in the scene), anisotropic filtering is especially demanding on memory bandwidth. Traffic can be reduced primarily through texture compression, which is now used everywhere. Previously, when it was not practiced so often, and the throughput of video memory was much lower, anisotropic filtering significantly reduced the number of frames. On modern video cards, it has almost no effect on fps.
Anisotropic filtering has only one setting - filter factor (2x, 4x, 8x, 16x). The higher it is, the clearer and more natural the textures look. Typically, with a high value, small artifacts are visible only on the outermost pixels of tilted textures. Values of 4x and 8x are usually quite sufficient to get rid of lion's share visual distortions. Interestingly, when moving from 8x to 16x, the performance penalty will be quite small even in theory, since additional processing will only be needed for a small number of previously unfiltered pixels.
Shaders
Shaders are small programs that can perform certain manipulations with a 3D scene, for example, changing lighting, applying texture, adding post-processing and other effects.
Shaders are divided into three types: vertex shaders operate with coordinates, geometry shaders can process not only individual vertices, but also entire geometric shapes consisting of a maximum of 6 vertices, pixel shaders work with individual pixels and their parameters .
Shaders are mainly used to create new effects. Without them, the set of operations that developers could use in games is very limited. In other words, adding shaders made it possible to obtain new effects that were not included in the video card by default.
Shaders work very productively in parallel mode, and that is why modern graphics adapters have so many stream processors, which are also called shaders. For example, the GeForce GTX 580 has as many as 512 of them.
Parallax mapping
Parallax mapping is a modified version of the well-known bumpmapping technique, used to add relief to textures. Parallax mapping does not create 3D objects in the usual sense of the word. For example, a floor or wall in a game scene will appear rough while actually being completely flat. The relief effect here is achieved only through manipulation of textures.

The source object does not have to be flat. The method works on various game objects, but its use is desirable only in cases where the height of the surface changes smoothly. Sudden changes are processed incorrectly and artifacts appear on the object.
Parallax mapping significantly saves computer computing resources, since when using analogue objects with an equally detailed 3D structure, the performance of video adapters would not be enough to render scenes in real time.
The effect is most often used on stone pavements, walls, bricks and tiles.
Anti-Aliasing
Before DirectX 8, anti-aliasing in games was done using SuperSampling Anti-Aliasing (SSAA), also known as Full-Scene Anti-Aliasing (FSAA). Its use led to a significant decrease in performance, so with the release of DX8 it was immediately abandoned and replaced with Multisample Anti-Aliasing (MSAA). Despite the fact that this method gave worse results, it was much more productive than its predecessor. Since then, more advanced algorithms have appeared, such as CSAA.
Considering that over the past few years the performance of video cards has noticeably increased, both AMD and NVIDIA have again returned support for SSAA technology to their accelerators. However, it will not be possible to use it even now in modern games, since the number of frames/s will be very low. SSAA will be effective only in projects from previous years, or in current ones, but with modest settings for other graphic parameters. AMD has implemented SSAA support only for DX9 games, but in NVIDIA SSAA also functions in DX10 and DX11 modes.
The principle of smoothing is very simple. Before the frame is displayed on the screen, certain information is calculated not in its native resolution, but in an enlarged one and a multiple of two. Then the result is reduced to the required size, and then the “ladder” along the edges of the object becomes less noticeable. The higher the original image and the smoothing factor (2x, 4x, 8x, 16x, 32x), the less jaggies there will be on the models. MSAA, unlike FSAA, smoothes only the edges of objects, which significantly saves video card resources, however, this technique can leave artifacts inside polygons.
Previously, Anti-Aliasing always significantly reduced fps in games, but now it affects the number of frames only slightly, and sometimes has no effect at all.
Tessellation
Using tessellation in a computer model, the number of polygons increases by an arbitrary number of times. To do this, each polygon is divided into several new ones, which are located approximately the same as the original surface. This method allows you to easily increase the detail of simple 3D objects. At the same time, however, the load on the computer will also increase, and in some cases small artifacts cannot be ruled out.
At first glance, tessellation can be confused with Parallax mapping. Although it's perfect different effects, since tessellation actually changes the geometric shape of an object, and does not just simulate relief. In addition, it can be used for almost any object, while the use of Parallax mapping is very limited.
Tessellation technology has been known in cinema since the 80s, but it began to be supported in games only recently, or rather after graphics accelerators finally reached the required level of performance at which it can be performed in real time.
For the game to use tessellation, it requires a video card that supports DirectX 11.
Vertical Sync
V-Sync is the synchronization of game frames with the vertical scan frequency of the monitor. Its essence lies in the fact that a fully calculated game frame is displayed on the screen at the moment the image is updated on it. It is important that the next frame (if it is already ready) will also appear no later and no earlier than the output of the previous one ends and the next one begins.

If the monitor refresh rate is 60 Hz, and the video card has time to render the 3D scene with at least the same number of frames, then each monitor refresh will display a new frame. In other words, at an interval of 16.66 ms, the user will see a complete update of the game scene on the screen.
It should be understood that when vertical synchronization is enabled, the fps in the game cannot exceed the vertical scan frequency of the monitor. If the number of frames is lower than this value (in our case, less than 60 Hz), then in order to avoid performance losses it is necessary to activate triple buffering, in which frames are calculated in advance and stored in three separate buffers, which allows them to be sent to the screen more often.
The main purpose of vertical sync is to eliminate the frame shift effect that occurs when Bottom part The display is filled with one frame, and the top one is filled with another, shifted relative to the previous one.
Post-processing
This is the general name for all the effects that are superimposed on a ready-made frame of a fully rendered 3D scene (in other words, on a two-dimensional image) to improve the quality of the final picture. Post-processing uses pixel shaders and is used in cases where additional effects require complete information about the entire scene. Such techniques cannot be applied in isolation to individual 3D objects without causing artifacts to appear in the frame.
High dynamic range (HDR)
An effect often used in game scenes with contrasting lighting. If one area of the screen is very bright and another is very dark, a lot of the detail in each area is lost and they look monotonous. HDR adds more gradation to the frame and allows for more detail in the scene. To use it, you usually have to work with a wider range of colors than standard 24-bit precision can provide. Preliminary calculations occur in high precision (64 or 96 bits), and only at the final stage the image is adjusted to 24 bits.
HDR is often used to realize the effect of vision adaptation when a hero in games emerges from a dark tunnel onto a well-lit surface.
Bloom
Bloom is often used in conjunction with HDR, and it also has a fairly close relative - Glow, which is why these three techniques are often confused.

Bloom simulates the effect that can be seen when shooting very bright scenes with conventional cameras. In the resulting image, the intense light appears to take up more volume than it should and to “climb” onto objects even though it is behind them. When using Bloom, additional artifacts in the form of colored lines may appear on the borders of objects.
Film Grain
Grain is an artifact that occurs in analog TV with a poor signal, on old magnetic videotapes or photographs (in particular, digital images taken in low light). Players often disable this effect because it somewhat spoils the picture rather than improves it. To understand this, you can run Mass Effect in each mode. In some horror films, such as Silent Hill, noise on the screen, on the contrary, adds atmosphere.
Motion Blur
Motion Blur - the effect of blurring the image when the camera moves quickly. It can be successfully used when the scene needs to be given more dynamics and speed, therefore it is especially in demand in racing games. In shooters, the use of blur is not always perceived unambiguously. Correct Application Motion Blur can add a cinematic feel to what's happening on the screen.
The effect will also help, if necessary, to disguise the low frame rate and add smoothness to the gameplay.
SSAO
Ambient occlusion is a technique used to make a scene photorealistic by creating more believable lighting of the objects in it, which takes into account the presence of other objects nearby with their own characteristics of light absorption and reflection.
Screen Space Ambient Occlusion is a modified version of Ambient Occlusion and also simulates indirect lighting and shading. The appearance of SSAO was due to the fact that, at the current level of GPU performance, Ambient Occlusion could not be used to render scenes in real time. The increased performance in SSAO comes at the cost of lower quality, but even this is enough to improve the realism of the picture.
SSAO works according to a simplified scheme, but it has many advantages: the method does not depend on the complexity of the scene, does not use RAM, can function in dynamic scenes, does not require frame pre-processing and loads only the graphics adapter without consuming CPU resources.
Cel shading
Games with the Cel shading effect began to be made in 2000, and first of all they appeared on consoles. Truly popular on PC this technique became only a couple of years later, after the release of the acclaimed shooter XIII. With the help of Cel shading, each frame practically turns into a hand-drawn drawing or a fragment from a children's cartoon.

IN similar style create comics, so the technique is often used in games related to them. Among the latest well-known releases is the shooter Borderlands, where Cel shading is visible to the naked eye.
Features of the technology are the use of a limited set of colors, as well as the absence of smooth gradients. The name of the effect comes from the word Cel (Celluloid), i.e. the transparent material (film) on which animated films are drawn.
Depth of field
Depth of field is the distance between the near and far edges of space within which all objects will be in focus, while the rest of the scene will be blurry.

To a certain extent, depth of field can be observed simply by focusing on an object close in front of your eyes. Anything behind it will be blurred. The opposite is also true: if you focus on distant objects, everything in front of them will turn out blurry.
You can see the effect of depth of field in an exaggerated form in some photographs. This is the degree of blur that is often attempted to be simulated in 3D scenes.
In games using Depth of field, the gamer usually feels a stronger sense of presence. For example, when looking somewhere through the grass or bushes, he sees only small fragments of the scene in focus, which creates the illusion of presence.
Performance Impact
To find out how enabling certain options affects performance, we used the gaming benchmark Heaven DX11 Benchmark 2.5. All tests were carried out on an Intel Core2 Duo e6300, GeForce GTX460 system at a resolution of 1280x800 pixels (with the exception of vertical synchronization, where the resolution was 1680x1050).
As already mentioned, anisotropic filtering has virtually no effect on the number of frames. The difference between anisotropy disabled and 16x is only 2 frames, so we always recommend setting it to maximum.
Anti-aliasing in Heaven Benchmark reduced fps more significantly than we expected, especially in the heaviest 8x mode. However, since 2x is enough to noticeably improve the picture, we recommend choosing this option if playing at higher levels is uncomfortable.
Tessellation, unlike the previous parameters, can take on an arbitrary value in each individual game. In Heaven Benchmark, the picture without it deteriorates significantly, and at the maximum level, on the contrary, it becomes a little unrealistic. Therefore, you should set intermediate values - moderate or normal.
A higher resolution was chosen for vertical sync so that fps is not limited by the vertical refresh rate of the screen. As expected, the number of frames throughout almost the entire test with synchronization turned on remained firmly at around 20 or 30 fps. This is due to the fact that they are displayed simultaneously with the screen refresh, and with a scanning frequency of 60 Hz this can be done not with every pulse, but only with every second (60/2 = 30 frames/s) or third (60/3 = 20 frames/s). When V-Sync was turned off, the number of frames increased, but characteristic artifacts appeared on the screen. Triple buffering did not have any positive effect on the smoothness of the scene. This may be due to the fact that there is no option in the video card driver settings to force buffering to be disabled, and normal deactivation is ignored by the benchmark, and it still uses this function.
If Heaven Benchmark were a game, then at maximum settings (1280x800; AA - 8x; AF - 16x; Tessellation Extreme) it would be uncomfortable to play, since 24 frames is clearly not enough for this. With minimal quality loss (1280×800; AA - 2x; AF - 16x, Tessellation Normal) you can achieve a more acceptable 45 fps.

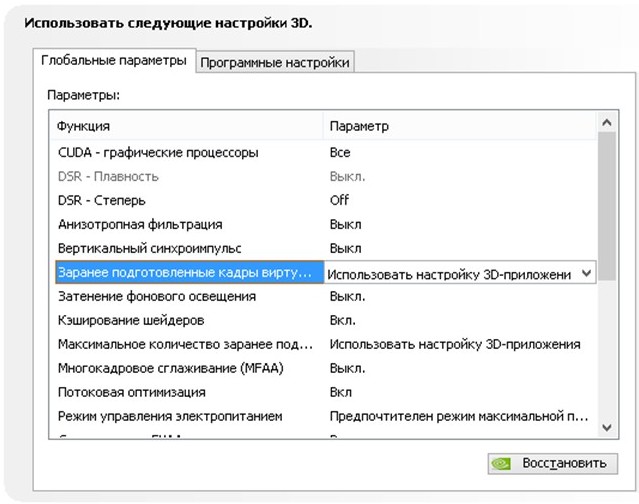
Hi all! Today is very interesting article about fine-tuning the video card for high performance in computer games. Friends, agree that after installing the video card driver, you once opened the “Nvidia Control Panel” and saw unfamiliar words there: DSR, shaders, CUDA, clock pulse, SSAA, FXAA, and so on, and decided not to go there anymore. But nevertheless, it is possible and even necessary to understand all this, because performance directly depends on these settings. There is a misconception that everything in this sophisticated panel is configured correctly by default, unfortunately this is far from the case and experiments show that correct setting rewarded with a significant increaseframe rate.So get ready, we will understand streaming optimization, anisotropic filtering and triple buffering. In the end, you will not regret it and you will be rewarded in the formincreasing FPS in games.
Setting up an Nvidia graphics card for gaming
The pace of development of game production is gaining more and more momentum every day, as is the exchange rate of the main currency in Russia, and therefore the relevance of optimizing the operation of hardware, software and operating systems has increased sharply. It is not always possible to keep your steel stallion in good shape through constant financial injections, so today we will talk about increasing the performance of a video card through its detailed tuning. In my articles, I have repeatedly written about the importance of installing a video driver, so , I think you can skip it. I'm sure you all know perfectly well how to do this, and all of you have already had it installed for a long time.
So, in order to get to the video driver management menu, right-click anywhere on the desktop and select “Nvidia Control Panel” from the menu that opens.
Then, in the window that opens, go to the “Manage 3D parameters” tab.

Here we will configure various parameters that affect the display of 3D images in games. It is not difficult to understand that in order to get maximum performance from the video card you will have to significantly reduce the image quality, so be prepared for this.
So, the first point " CUDA - GPUs" Here is a list of video processors from which you can select and it will be used by CUDA applications. CUDA (Compute Unified Device Architecture) is a parallel computing architecture used by all modern GPUs to increase computing performance.

Next point " DSR - Smoothness“We skip it because it is part of the “DSR - Degree” item settings, and it, in turn, needs to be disabled and now I will explain why.

DSR (Dynamic Super Resolution)– a technology that allows you to calculate images in games at a higher resolution, and then scale the resulting result to the resolution of your monitor. In order for you to understand why this technology was even invented and why we don’t need it to get maximum performance, I’ll try to give an example. Surely you have often noticed in games that small details such as grass and foliage very often flicker or ripple when moving. This is due to the fact that the lower the resolution, the smaller the number of sampling points for displaying fine details. DSR technology can correct this by increasing the number of points (the higher the resolution, the greater the number of sampling points). I hope this will be clear. In conditions of maximum performance, this technology is not interesting to us as it consumes quite a lot of system resources. Well, with DSR technology disabled, adjusting the smoothness, which I wrote about just above, becomes impossible. In general, we turn it off and move on.
Next comes anisotropic filtering. Anisotropic filtering is a computer graphics algorithm created to improve the quality of textures that are tilted relative to the camera. That is, when using this technology, textures in games become clearer. If we compare antisotropic filtering with its predecessors, namely bilinear and trilinear filtering, then anisotropic filtering is the most voracious in terms of video card memory consumption. This item has only one setting - selecting a filter coefficient. It's not hard to guess that this function must be disabled.

Next point - vertical sync pulse. This is synchronizing the image with the monitor's refresh rate. If you enable this option, you can achieve the smoothest possible gameplay (image tearing is eliminated when the camera turns sharply), however, frame drops often occur below the monitor’s refresh rate. To get the maximum number of frames per second, it is better to disable this option.

Pre-prepared virtual reality footage. The function for virtual reality glasses is not interesting to us, since VR is still far from everyday use by ordinary gamers. We leave it at the default - use the 3D application setting.
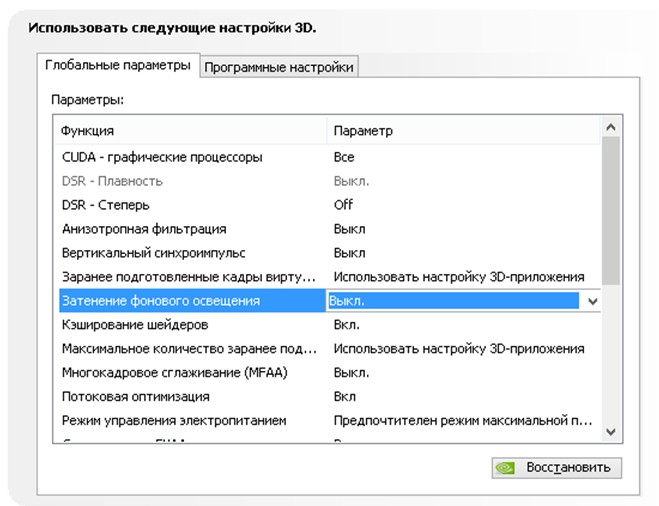
Background lighting shading. Makes scenes appear more realistic by softening the ambient light intensity of surfaces that are obscured by nearby objects. The function does not work in all games and is very resource intensive. Therefore, we take her to the digital mother.
Shader caching. When this feature is enabled, the CPU saves shaders compiled for the GPU to disk. If this shader is needed again, the GPU will take it directly from disk, without forcing the CPU to recompile this shader. It's not hard to guess that if you disable this option, performance will drop.

Maximum number of pre-prepared frames. The number of frames that the CPU can prepare before they are processed by the GPU. The higher the value, the better.

Multi-frame anti-aliasing (MFAA). One of the anti-aliasing technologies used to eliminate “jaggedness” at the edges of images. Any anti-aliasing technology (SSAA, FXAA) is very demanding GPU(the only question is the degree of gluttony). Turn it off.

Stream optimization. By enabling this feature, an application can use multiple CPUs at once. If the old application does not work correctly, try setting the “Auto” mode or disabling this function altogether.

Power management mode. There are two options available - adaptive mode and maximum performance mode. During adaptive mode, power consumption depends directly on the GPU load. This mode is mainly needed to reduce power consumption. During maximum performance mode, as you might guess, the highest possible level of performance and power consumption is maintained, regardless of the GPU load. Let's put the second one.

Anti-aliasing – FXAA, Anti-aliasing – gamma correction, Anti-aliasing – parameters, Anti-aliasing – transparency, Anti-aliasing – mode. I already wrote about smoothing a little higher. Turn everything off.

Triple buffering. A type of double buffering; an image output method that avoids or reduces artifacts (image distortion). In simple terms, it increases productivity. BUT! This thing only works in conjunction with vertical sync, which, as you remember, we disabled before. Therefore, we also disable this parameter; it is useless for us.


: “I pray that the Lord will grant me love Jerome Shurygin biography")

