Cat lovers are often interested in the question of how to make a comfortable soft house for their pet with their own hands. Of course, you can buy ready-made products, but it is much more interesting to make them yourself, taking into account the cat’s character and preferences.
Peculiarities
When looking at the assortment of specialized stores, one can only admire the products for pets. But they are not cheap, and spending money on it is not always wise. After studying, you can try to make a soft shelter for the cat yourself. Please note pay attention to the following details:
- Form– it must correspond to the character and habits of the pet. Some cats like to be visible - an open bed is suitable for them, others prefer to rest in a secluded place - a closed structure like a booth is better for them.
- Next, it is important to decide sizes house. The cat must fit freely in its shelter. If this is a cat, then you will need to take care of future kittens.
- Material for finishing it should not absorb dust and dirt, be easy to wash, meet all safety requirements - have no sharp corners or partitions, no pungent odor.
- The cat must comfortable feel like you are in your hiding place.
It is best to sew a house that will suit the overall interior of the room.
Possibility of design and configuration with other elements
All materials used to construct a soft house are classified into the following groups:

- To create a structure frame - or chipboard. They should not have a pungent odor.
- Plastic is suitable for the base of the bed.
- For soft upholstery - plush or carpet. Soft structural parts are also sewn from them - bedding, pillows, partitions, etc. Cases made of material are filled with foam rubber or synthetic padding; there are also artificial granular fillers that can retain heat.
- The structural connections can be made of metal. This will increase the operating time of the product. Also, the parts are held together with glue, which should not have any odor. A stapler should not be used; its staples may cause injury to the animal.
When making a soft house with your own hands, you need to think about decorating it. Proper decoration of the product helps to organically use it in the interior. The main rule is safety so that the cat does not chew or swallow the parts.
Soft houses are the easiest to decorate. From fabric of a contrasting shade you can sew:
- Imitation of curtains.
- Small pads.
- Animal faces.
- Footprints, etc.
Decorative elements are fixed to the base and you get a cozy soft house for your pet. For the roof, you can make an imitation of tiles, the sun, flowers or bows.
Tools and materials for finishing
You can customize a soft house to your taste, give it different shapes. To create a classic model you will need the following tools:
- Foam rubber to hold the shape with side walls, at least 1.5 cm thick.
- It is recommended to lay foam rubber at least 2.5 cm thick on the bottom.
- Dense fabric for decoration, interior and external design house.
Installation and Security
During construction, you should not use sharp fasteners, paper clips, or a stapler so that the animal does not get hurt.
Also, in accordance with the breed of the cat - fluffy or smooth-haired, you need to select fabrics, with or without insulation.
Important!
The material must be natural and not electrified. You need durable fabric so that it does not get damaged by your pet's claws.
Options
Exists great amount different options soft houses, you can design your own model to suit your taste and the needs of your pet. She may have additional elements - scratching posts, toys on mounts, etc. The most popular options are:
- Beds (you can see how to design a bed from boxes).
- Booth houses with a round entrance.
- Game complexes.
Soft bed: how to sew?
Not every cat will like a closed house. Many people prefer a comfortable open soft bed to be able to observe what is happening around them.
It is very easy to sew such models.
To create a lounger with sides, you will need a small flat pillow, suitable for a cat, having a synthetic filler, as well as material for decoration. Creation includes the following steps:
- The pillow is cut to make 2 elongated elements for the sides and one larger one for the bottom. Each piece is tightly sewn, and an additional seam is made in the middle on the sides.
- The decorative fabric is laid out so that all the details of the structure can be covered later.
- Then a bed with sides is formed, a pillow or soft blanket is placed in the middle, which can be washed when it gets dirty.
Useful video
In the video you can find instructions on how to create a bed yourself.
We sew a round house
You can knit a soft house for a cat even from simple strips of knitted fabric.
The work is done with a thick crochet hook. Strips from unwanted T-shirts are pre-cut. Most optimal size house - 48 cm with a window 10 by 20 cm, but first of all you should focus on the cat. Knitting a round bottom starts from the center; it is enough to knit 20 rows.
Sheathing of “hard” material
To finish the hard plywood from which the house is made with a soft cloth, you can use a glue gun. Preference should be given to fabrics with short piles, because long piles become clogged with dust and dirt over time, and the upholstery cannot be removed and washed.
Attention!
If you need to finish a scratching post, then jute, hemp or linen rope is most suitable for this. It is better to take a thicker one so that it is more convenient for the cat to sharpen his nails.
Hammock
Anyone can make the simplest hammock. First, a frame is made of wood, which is sheathed with decorative material, then the roof is installed and the hammock is fixed according to the size of the pet. More complex models are complexes of structures with platforms, shelves, deck chairs, and columns.
You can often find hammocks for cats under a chair; it is easily attached to the legs. The product can be quickly knitted or sewn from fabric.
Useful video
You can watch the video for more details on how to create a hammock for a cat.
From a T-shirt or sweater


 The simplest design of a soft house is made from a T-shirt (if you want something warmer? Use an old sweater). This requires a box the size of the cat. One of the ends is removed, a T-shirt is pulled over the house so that its neck matches the place where there is no wall. This house with a round entrance is very comfortable and easy to design.

Useful video
To learn how to create a cat house from a T-shirt, watch the video below.
The shape of the wigwam is a cone with 6 sides, one of which has an inlet hole. To create a house, first a pattern is drawn on cardboard and then fastened together.
A fabric is attached to the bottom of the wigwam or a flat, comfortable pillow is placed on which the cat will be comfortable to lie on. The outside of the wigwam is covered with textiles.
Useful video
You can see how to make a wigwam for a cat in the video below.
Built-in
Built-in soft houses for pets in Lately very popular. They don't take up any space at all. For example, a bedside table with a soft sleeping place for a cat inside. The inside of these houses is upholstered with plush or other pleasant materials, complemented by a bed or pillow. This option is easy to apply in quality.
From foam rubber
A sleeping place for a cat made of foam rubber turns out to be very cozy and comfortable. To create a house you will need:

- Foam rubber.
- Thick fabric.
- Pencil and paper for pattern.
- Threads.
- Needles.
- Sewing machine.
- Safety pins.
House for pet It doesn't take long and is easy to do. The work consists of the following stages:
- Pattern. The result should be 8 blanks and 2 templates for the bottom.
- The blanks are transferred to the fabric. There must be 2 cm left on the material.
When transferring blanks to fabric, 4 out of 8 fragments are transferred to the front fabric. This will allow you to sew parts along the contours faster later. - The blanks are transferred to foam rubber. 4 parts are made for the walls and 1 for the base.
- The fabric is processed with a zigzag along the entire perimeter.
- Then each piece of foam rubber is covered with 2 pieces of fabric.
- A hole for entry is made in one of the 4 walls and the 4 walls are fastened together.
- The blanks are stitched in the process of fastening from the inside out.
It’s so easy to design a soft foam house for your pet.
Conclusion
A soft house for a cat, made with your own hands in accordance with the habits of the pet, will become a real place of relaxation for him. Also, self-design will save money, since such products are quite expensive in pet stores. Want to see all types of houses? Read this one.
Any domestic cat, regardless of its age and breed, needs a separate living space where it can feel protected and calm.
When thinking about how to make a cat house with your own hands, you should start with planning and drawings.

When building such a house with your own hands, it is necessary to take into account some features and nuances.

Dimensions and shapes of the home
The variety of cat house designs is amazing. However, the most optimal designs are in the form of beds and houses equipped with a scratching post. It's better if everything is connected together.
The size of a cat’s future apartments is influenced by two factors:
- animal size,
- free area for installation of the structure.

If there are several furry ones in the family, then the play complex is simply necessary. Photos of a cat house show that the variety of modern finishing materials allows you to create designs that can harmoniously fit into interior compositions of any style.

Construction materials
Most often used for construction cat's home the following materials:
- for the manufacture of the frame, chipboard, MDF and plywood sheets, boards made of natural wood are suitable;
- it is possible to sew a soft house for your beloved cat in the form of a comfortable bed from fabric and foam filling;
- simply create cat houses from ordinary boxes;

- To decorate a scratching post for a furry one, you should stock up on jute or sisal rope. Just do not need to secure them with staples or nails, since the animal can damage its limbs;
- PVC pipes or metal and wood products are suitable for the base of the scratching post;
- synthetic winterizer and foam pieces are chosen as filler for pillows and mattresses;
- the interior is decorated with fur, plush or fleece;
- to cover the external facade, the material is selected based on the animal’s habit of tearing its claws: carpet would be a good option;
- adhesive compositions for work should be purchased without a pungent odor, which can scare away the cat.
Installation of cat housing
The main condition when placing cat apartments is the stability of the structure.

The level of installation is also important, because cats like to watch what is happening from above. Therefore, the optimal height for the house will be 1-1.2 meters from the ceiling.

But the beds and platforms should be distributed on different levels designs.

Preparing to build a house
Before starting construction, you should acquire the following materials:
- Fiberboard board 40 by 120 cm (base) and 44 by 55 cm (walls), chipboard 44 by 60 cm (roof);
- Seven slats (spacers) about 40 cm long, 3 by 4 cross-section;
- PVC pipe with a diameter of 11 cm and a length of 60 cm and a jute rope (scratching post) and a board 40 by 20 cm (inclined scratching post);
- Fibreboard and chipboard with foam rubber 44 by 30 cm (bed);
- Upholstery fabric fabric.
Design process
The instructions on how to make a cat house with your own hands are quite simple.

First of all, rectangular parts are cut out from chipboard and chipboard panels according to size. Circles with a diameter of 27 cm are drawn on two parts.

The rear wall plane remains blank, and several holes are marked on the front: one with a diameter of 22 cm is the entrance, and several small ones in the form of windows. Next, holes are cut out using a jigsaw or drill according to the indicated marks.

After this, the two resulting elements are combined in order to mark the places where the vertical slats will be installed. It's better to take 7 pieces. The marks will be through drilled holes on both walls.

The slats for the cat's home must be pre-processed: planed, leveled and sanded. The front and the same rear elements of the house are connected with slats using self-tapping screws.

Note!


On a chipboard base in the place where the house will be attached, foam rubber should be placed and a circle should be drawn where the scratching post will be installed. The entire surface of the base is covered with decorative material, which is convenient to attach to a stapler.
Roof of the house
For this top part pasted over, and the slats, which are located in the lower part inside the structure, are closed. Afterwards, the finished house is attached to the base, selecting the screws of the required size.

To ensure that the pipe placed inside is stable, it is fixed on both sides with wooden blocks. They are attached with screws or glue.

To arrange the bed, semicircular parts are cut out of chipboard and strung onto a pipe. After in vertical position a place will be determined to place the scratching post; the pipe can be connected to the base of the house.

At the end of construction, a string with a favorite cat toy is attached under the bed.
Note!


The bed itself is covered with foam elements and the selected fabric. The pipe is wrapped with jute or sisal rope, which is attached with glue.

The edges of the cat scratching post are upholstered with fabric, and it is better to wrap the middle with rope. Next, the board is attached at the top to the frame of the house, and at the bottom to the base of the building.

Cat play area
At the beginning of construction, a box of suitable dimensions is made. The entrance to the interior can have any shape and form. The assembled box is attached to the base of the complex. The pipes are attached to the house using angles and screws.
The next level of the gaming complex is represented by a couch. To make it interesting for the animal to move around its home, you can install a ladder on the side or inside the building, securing it with corners.

The upper level is designed in the form of a gable roof installed on 4 pipes.

Note!

After collecting the entire complex, you can begin decorating.

All pipes should be wrapped with suitable ropes; beds and other floors can be covered with carpet sheets. All cuts and walls of openings must be covered with furniture slats to ensure safe movement for the animal inside the complex.

DIY photo of a cat house


For each of us, home is a cozy room, a warm home, tasty food, sincere atmosphere, and for many also a favorite domestic cat, who, just like us, needs his own nook. Certainly, beautiful house can be purchased at a pet store, but it’s better to do it yourself, especially since we have 13 wonderful options with detailed instructions on the picture.
Solar tent
Anyone can make such a tent for a cat. All you need is a bright T-shirt, a couple of wire hangers and cardboard.
Materials
So, prepare: a T-shirt, thick square cardboard, two wire hangers, adhesive tape, pins, pliers.

Cut off the ends (hooks) of the hangers.

We make stands from hangers. To ensure density and smoothness, tape the cardboard around the edges.

We make small holes (to hold the wire tightly) in each corner.

We cross the wires and secure the top with tape. Make sure the legs of the stand are touching the corners of the cardboard. Insert them into the holes.


Bend the ends of the wire on the reverse side. 
To make it easier to move the tent, cover any protruding bends with tape.

The frame is ready. Make sure the wire posts are symmetrical. If necessary, trim them with pliers.

We cover the frame with a T-shirt, folding it as shown in the photo below. The T-shirt should be pulled tight enough.


Place a soft pillow or blanket inside and present the new thing to your cat!


Cardboard tower
A structure made of layers of corrugated cardboard for a cat looks very aesthetically pleasing and unusual. Repeat after us and you will get the same thing!
Materials
Prepare corrugated cardboard, cutter, pencil, compass, glue, brush.


Drawing circles
First of all, let's draw layouts of our cardboard disks, located one above the other. The result will be 8 groups of 4 or 5 disks of a certain size. The dimensions will depend on the size of your pet, but in our example the radii are as follows:
- 21.5 cm
- 21 cm
- 20.5 cm
- 20 cm
- 19.5 cm
- 19 cm
- 18.5 cm
- 18 cm


Cut along the drawn circles.


Basic circles for the bottom
Now we form the base of our house. We cut out a solid disk with a radius of 21.5 cm (without a hole inside), then draw exactly the same 6 disks, but with a hole (we measure 4 cm from the edge in the same way).

We place the discs on a solid base.

Assembling a pyramid.


Drawing the entrance opening
We measure the height of the opening and remove the excess top. Draw the boundaries of the door. You can draw any shape.


On each disk we mark the boundaries of the opening.

Cutting out the door
Using the marked signs, we draw straight cutting lines on the disks. It is important to determine their correct angle of inclination.


Putting the circles back together 


Glue the disks into a pyramid


Let's call the cat!
After the structure is completely dry, we arrange a soft place inside and delight our beloved pet.


Luxurious sofa for an important cat
How long can you occupy your cat’s favorite spot on the couch? Finally, sew him your own. And don't forget about the bows!


For work, prepare:warm fabric (in our example corduroy), material for the bottom of the sofa, material for interior decoration, padding polyester, scissors, threads, needles and sewing machine.
Let's draw a layout. Dimensions are determined by the size of the animal. The optimal width of the side panel is 20 cm.

The bottom consists of dense fabric on the bottom, padding polyester and corduroy on top.

Sew the layers together.


We cut the side. Sew along the edges, leaving one side unsewn.


We first attach the side panel to the bottom with pins.

We fill it with synthetic fluff.

Sew up the hole.

Now it’s the turn of the sofa cushions. We also fill it with synthetic fluff. If desired, add a patterned stitch along the edges.

We decorate the crib with bows or other accessories, for example, fish. We admire it!

Cat in the chimney

Materials
To make such an original house for a cat, prepare: a wooden tube of the required size (can be purchased at a hardware store), acrylic paint, sandpaper, wood glue, ruler (or measuring tape), piece of foam rubber or soft fabric for interior decoration.


We measure and cut the tube to the required size.


Cutting out the stand
We draw two straight lines along the tube at a short distance from each other.

We cut along the marked lines.

Thus, we will get a rounded piece that will serve as a stand for our house. Sand the rough edges with sandpaper.

Glue and paint
We paint the main structure and the outside of the stand. After the paint has completely dried, thoroughly glue the stand to the house. Turn the structure upside down and tightly clamp our stand to the base. Wait for the glue to dry (this will take about 30 minutes).

Glue a piece of foam rubber for softness.


Cozy details
Cover the bed with a blanket and place a small decorative pillow. You can also decorate it with curtains on the sides or hang a funny toy for the kitten.


Hanging cat house and shelves - original composition
Such an unusual project will become a real highlight in your home. Now cat house imitates a hanging shelf, and real small bookshelves serve as steps for it.

We build the house from ordinary wood plywood, cutting out a doorway and a small window in the shape of a cat's face.
 But the most creative element of the composition is the cable bridge! It is made from cut strips of birch plywood and grommets connected to a cable. We buy it at a hardware store. Cable ties and fastening clips are also useful. We use a laser cutter for cutting.
The final touch is rugs on the roof of the house and on the steps-shelves. We fasten them with construction glue.

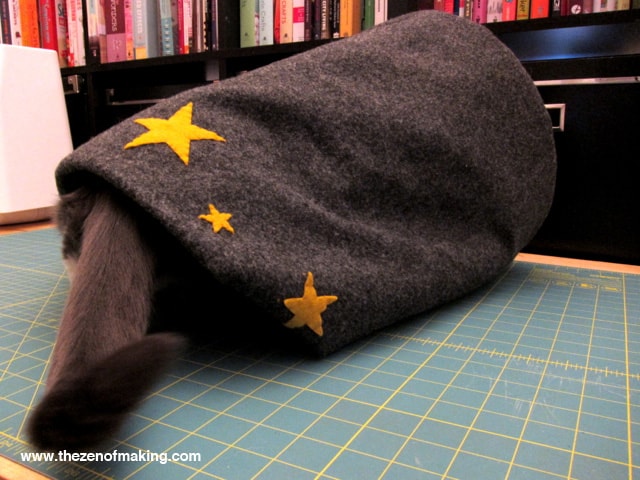
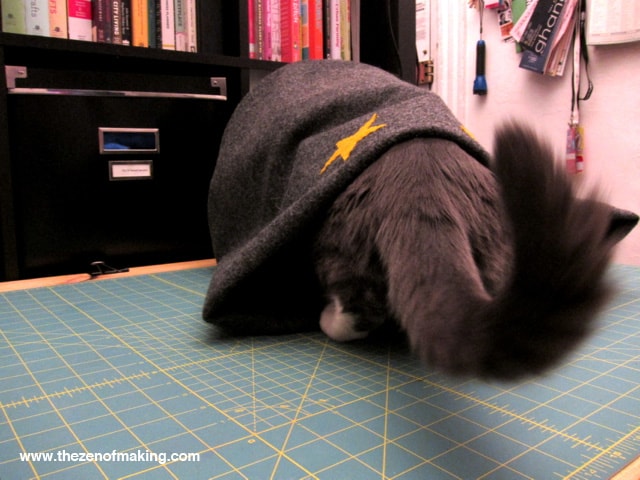
A cat in a poke!
And this project will show an interesting version of a cozy bed that can be used in different ways.

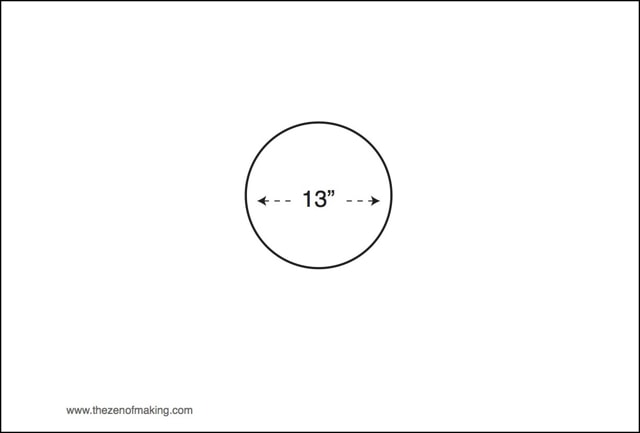
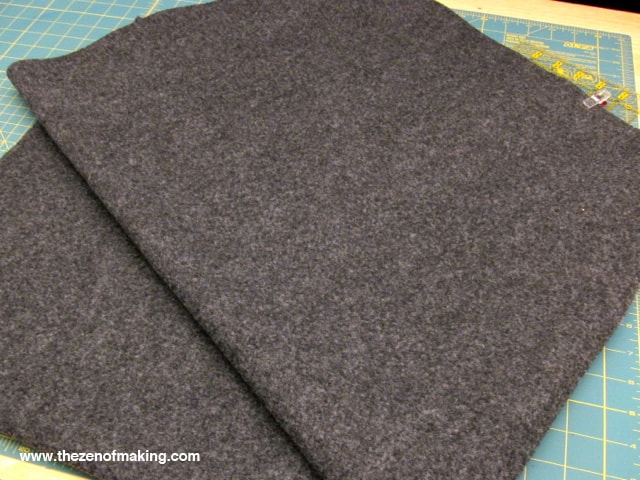
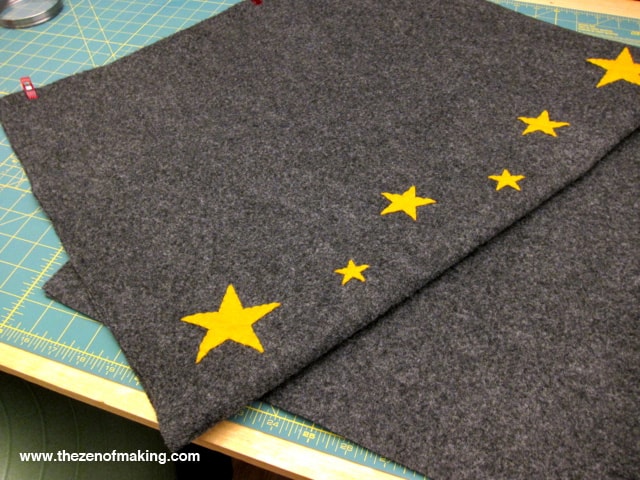
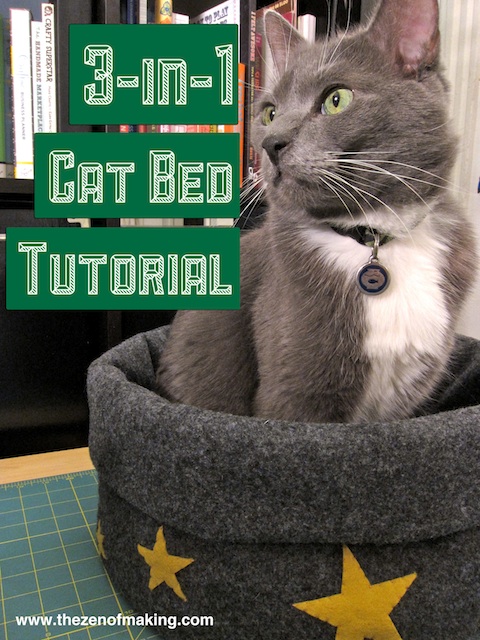
Materials: thick felt fabric, bright fabric for decorative stars, 2 colors of thread - to match the stars and the bag itself, filler, sewing machine, scissors, needle, measuring tape, fabric clips, compass or round shape, pencil, paper, chalk for fabrics.
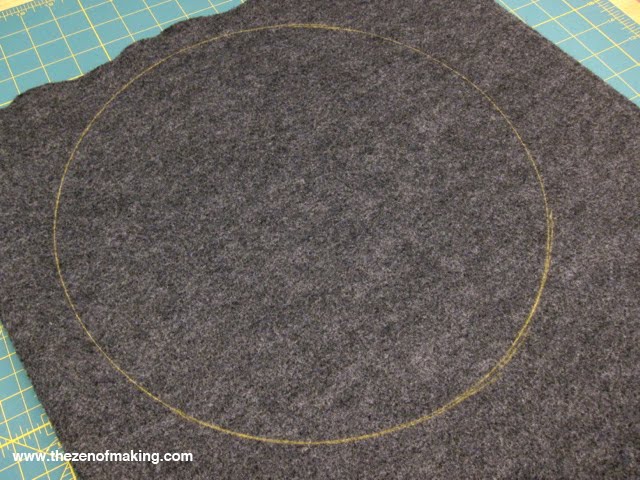
Cut out two circles for the bottom of the bag.
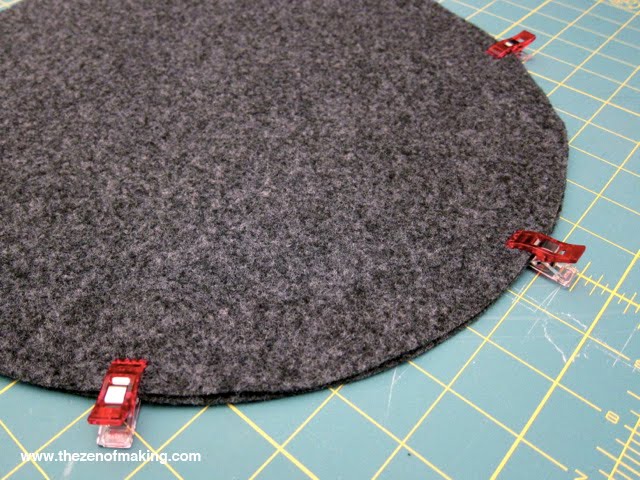
Sew the circles together, leaving a small hole for filling.
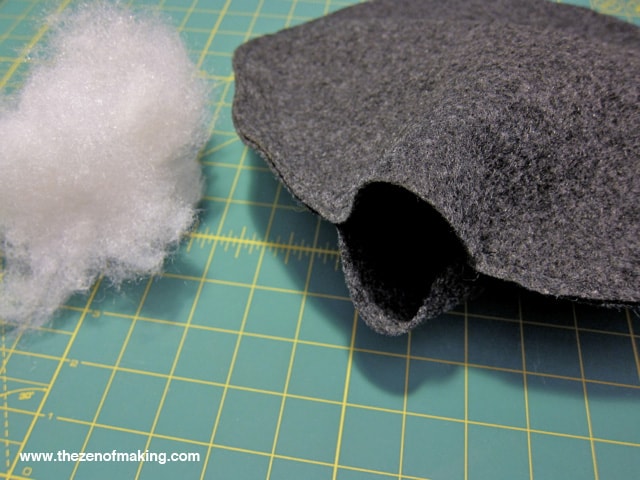
Fill the bottom evenly with filler and sew the hole.
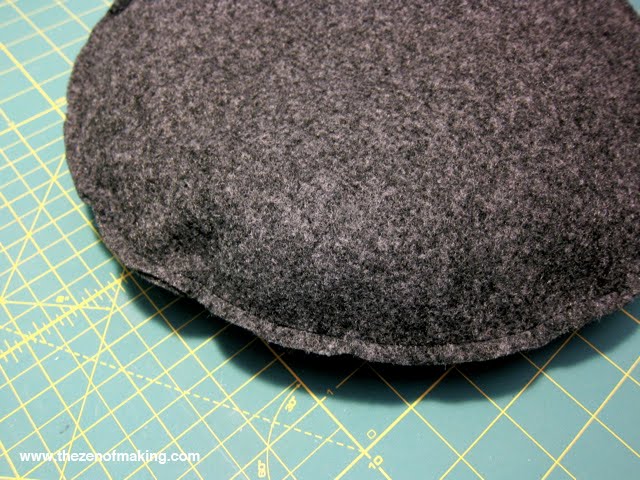
We form the side walls. We take measurements.

Cut out a large rectangular piece.
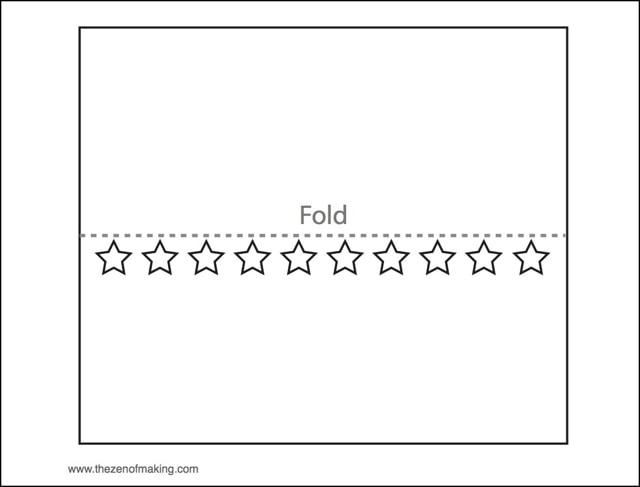
Fold the rectangle in half, and glue decorative stars on the outside just below the bend.
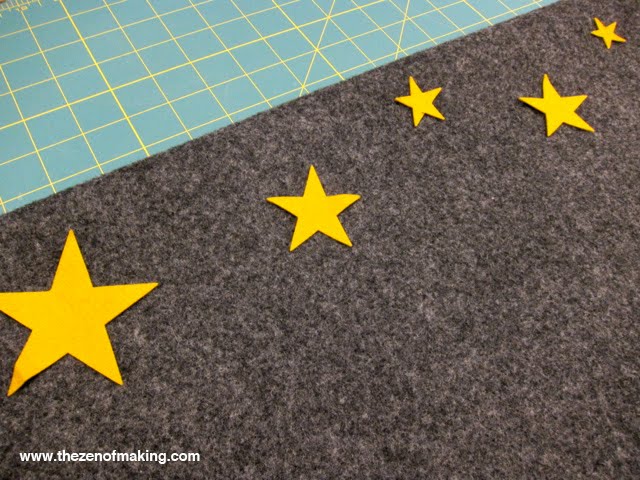
Using three-layer thread, sew the stars to only one side (try not to sew both!)
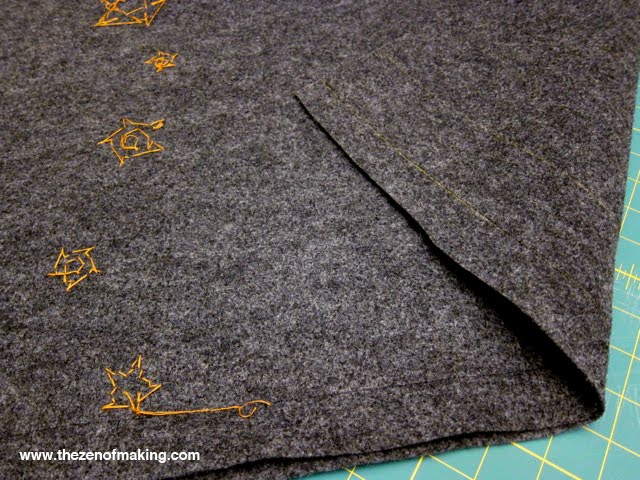
Fold the rectangle in half and sew the edges along the length. Turn the bag inside out reverse side, hiding the seam.
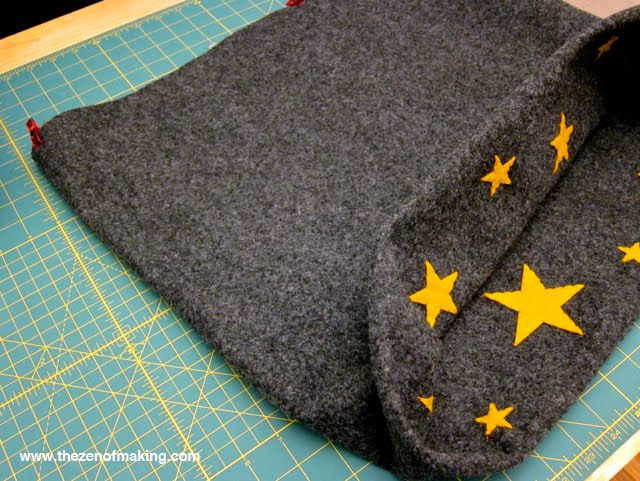
We fasten the pillow to the bottom with clamps.

Sew it to the sides.
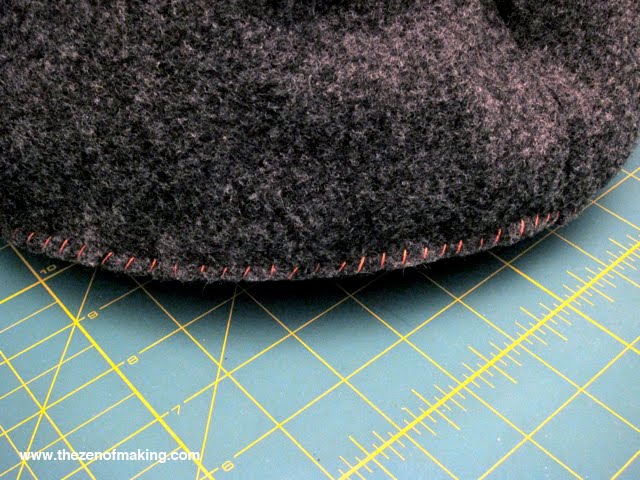
The sleeping bag for the cat is ready. But the most interesting thing is yet to come – the use cases!
Option 1 – cave
Option 2 – cozy high sleeping bag
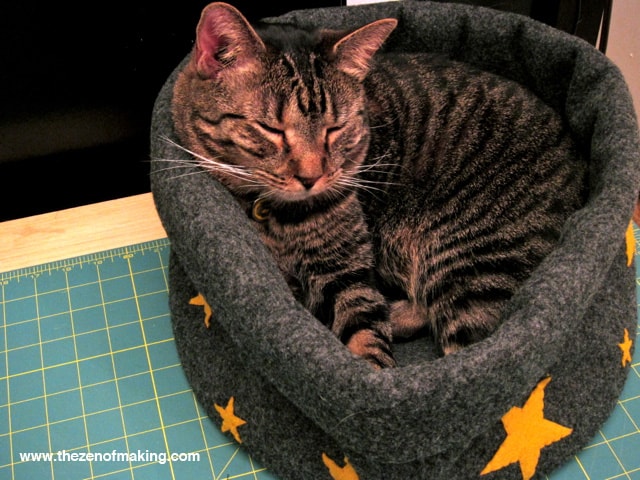
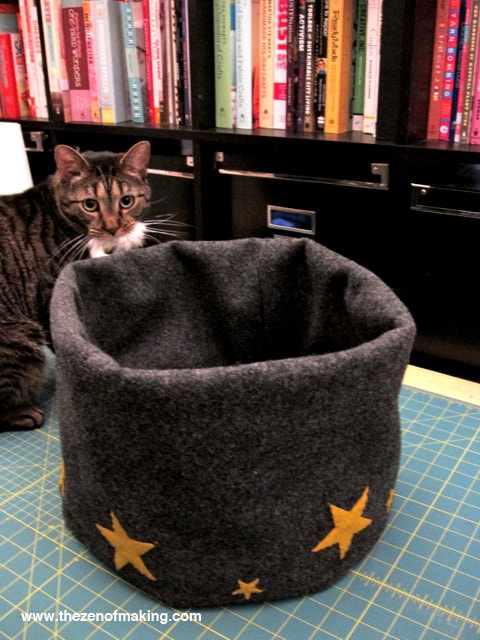
Option 3 – compact chair
Luxurious crib with columns

Let's start with this ordinary table...

... which we will turn into a luxurious cat bed.

Preparatory work
The headboard for the crib will be a finishing plinth, which we will cut to the required size.

We will make the ends of the columns from antique curly handles.

We will make the legs of the crib from wooden pine blocks.

We fasten them with screws and wood glue.

The frame is ready for finishing!


Let's add more beauty using pink marker paint.

We lay out a beautiful mattress and call the main expert!

Tent for a cat
It's no secret that cats love boxes! Why not try making a real tent out of it for your pet? The principle is the same as that of the “solar tent”.

Materials

We collect the box.

We disassemble wire hangers.

We attach the wires obtained from the hangers to the box.

For strength, glue the edges to the box with hot glue.

We fix the top by wrapping it with wire.

All that remains is to put on the T-shirt.

Transforming an old sweater
You can make a cozy and warm cat bed from an old sweater. Prepare pins, stuffing (eg polyester), pillow, needle, thread and scissors.
Main source material

We sew up the neckline, sew a transverse line between the sleeves (this way we separate the back of the future bed).

We fill the back and sides with polyester.


Sew the cuffs. 
We put the pillow inside.

Sew up the hole and fasten the sleeves to the base with pins.

Sew and remove the pins.

You can brag about the end result!

Two-story building
A full two-story house can also be an excellent design for a cat's home. A minimum of drawing skills, good imagination and carton boxes You will definitely need them in this matter. And a few more details - a knife (or scissors), a ruler, a pencil.
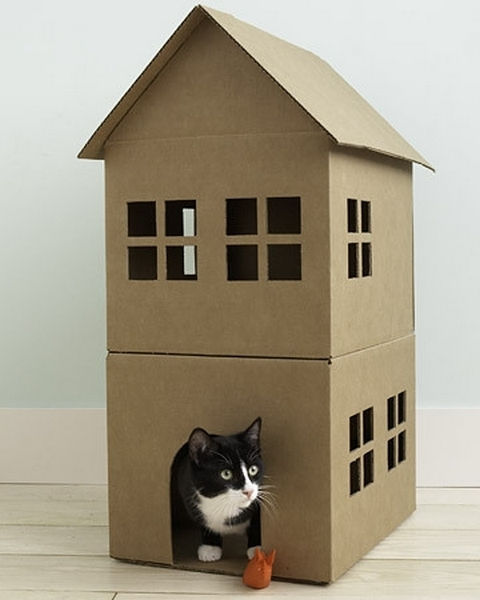
First of all, we cut out the door and windows, then we construct the roof. Glue it to the frame and you can decorate!

Another idea for a funny cardboard house for a cat
Striped tent
If you have a cat “Matroskin” at home, make him such a tent. And then for sure she and your minke will be like two boots.
Comfort cube
This cube house is made of foam rubber, covered with beautiful fabric. The work is not fun, but the result is amazing!
More creative cat house ideas:


Feel free to experiment and implement unusual ideas in such an important project as a cat house. Believe me, not only the main owner will be delighted, but also all the surrounding guests and family members!
In every pet supply department there are always several types of houses for cats. You can pass them by, considering the very thought of a separate home for an animal that is already at home as a whim. You can buy a bright and expensive product, which for some reason your mustachioed and striped one will not want to live in for a long time. You can also build your own version, unique, quite affordable, convenient and loved by your cat.
Why build a “cat house”? After all, the cat is already domestic
The house in which a cat lives is for it a whole vast territory, hunting grounds, running and acrobatic spaces with places for feeding and stroking.
However, she needs something else... The mustache-tailed creature cannot say what exactly it is looking for.
It only gives obvious signs, climbing onto a chair pushed under the table, nesting in the depths of cabinets and bedside tables that were carelessly left open, settling in boxes that are more or less suitable in size.
A personal shelter is what a cat without a home lacks. This need is strong and deep - it goes back to those distant times when the wild ancestors of domestic purrs lurked in solitary ambushes at night and made themselves a safe den for daytime sleep.
An attentive and caring owner (a huge two-legged giver of food, drink and affection) will naturally take upon himself to provide the cat with a suitable home.


An original solution could be a cat house made from a suitcase.
Isn't it better to buy?
Specialized departments and stores offer a wide range of cat houses - with cat beds, beds, and shelves.
However, making such a home with your own hands has significant advantages.
Firstly, you can select materials yourself, including from home supplies. The result: savings in price and confidence in the required quality.
In addition, you can build a house, the size, shape and strength of which will ideally match the character and dimensions of your pet.
A personal, creative approach to business will allow you to create a truly unique “cat house”, which, by the way, will fit into your interior if you think about it in advance.


Above are photos of do-it-yourself cat houses.
Cat and cat: different needs
Cat can lie directly on the roof of the house, which has only one hole. After all, all he, a constantly lonely hunter, needs is a personal safe shelter and the ability to see.
To the cat it is more comfortable if her home is equipped with an additional entrance and exit, and the “observation platform” is not on the roof, but on a separate stand. Such features are due to the fact that a cat’s home is, in principle, also a place for possible shelter for kittens. Therefore, the family should be kept away from the viewing area, and in the event of an attack on the nest, the offspring will escape through an additional hole, while the cat, with its claws extended and teeth sharpened, defends the main entrance.


A simple and easy solution on how to make a house for a cat from a pipe.
Typical project: what to choose?
Options for solving the cat's housing issue depend on the nature and size of the pet, as well as on the future use of the house.
Stationary or mobile
If you plan on long-term placement in a permanent place, you also need to choose solid materials - wood and metal.
In the event that moves are expected (for example, to the country and back) and replacement of cat housing, choose softer materials - cardboard, papier-mâché, wire frames, paper tubes, thick fabric, covered with foam rubber.


You can also make a house for a cat out of boxes.
Standard or exclusive
Most often, a standard box-shaped form is used, which is convenient for manufacturing and easy to assemble.
Some breeds of cats whose ancestors settled in tree hollows - the Siamese and - like to stretch vertically upward. They make taller dwellings - cylindrical, imitating a hollow tree trunk or the original "wigwams".
Wigwam for cats “comes from a hollow”:


“Soft” solutions, not designed for a long time, gravitate toward rounded and ribbed shapes.
Frame shelter from an old T-shirt:


Separate housing or communal apartment
For several cats, you can build a structure from individual houses, fixed at different heights. The leader of the cat hierarchy will certainly occupy the most profitable, top floor.
Taking measurements
The interior space of the house is created on the basis that the occupant will be able to lie comfortably on his side. Therefore, the average dimensions of the house are 40x60x40 cm. For large breeds need a larger scale.
The diameter of the hole should be sufficient for the purr to pass through it freely. At the same time, an opening that is too spacious is a “leaky”, bad shelter. As a result, the average entrance-exit diameter is 15-20 cm. For well-fed specimens, it increases accordingly.
A separate observation platform should be at such a height that the animal can easily climb onto it, standing on its hind legs.


You can even make a house for a cat out of newspaper tubes, look at the photo above.
Materials: control by fine scent and soft fur
The coloring of the house and its upholstery does not matter to the resident: cats have little ability to distinguish colors. Therefore, the shade can be chosen in complete harmony with the interior or the color of the cat itself.
Smell, on the contrary, plays a primary role. The shelter should smell only of your own, your family, your acquaintances - home, owners.
This is where homemade plywood scraps come in handy!
For soft upholstery, it is better to use used material, even old foam rubber left over from reupholstering furniture or an old owner’s T-shirt - remember about saving?
If new building material is purchased to build a cat house, it should initially not have its own smell - at least not one that can be detected by the human nose. The purchase needs to be kept for another week: first on the balcony, then in the apartment, and only after that used.
In the video above you can watch one of the options on how to build a house for a cat.
The subtlety of a cat's sense of smell is determined by the only type of glue that can be used: PVA.
Synthetic material or natural does not matter fundamentally, the only important thing is that there should be no electrified elements in the design. For this reason, for example, silk and silk threads are unsuitable.
Exposed metal parts are also unacceptable: through them a discharge of fur electrified by friction can occur. In addition, exposed metal fasteners - furniture corners, for example - often have narrow gaps that pinch the hairs of a cat's fur coat.
As a result, the ideal kit for making a house includes:
- plywood with a thickness of 6 to 12 mm, dry, well-weathered wooden boards;
- natural fiber spiral rope;
- wooden stick with a diameter of 5-10cm;
- furniture foam rubber;
- furniture fabric or carpet;
- padding polyester or similar material;
- PVA glue;
- small nails, wood screws.


You can make a cat house out of an old monitor.
Tools
You will need to work with wood, fabric, glue and nails, so the set of tools is simple and accessible:
- wood hacksaw, jigsaw;
- hammer;
- scissors and knife;
- screwdriver;
- awl;
- pliers;
- glue brush;
- ruler.
General scheme
One of the fairly easy-to-make houses with two round holes, a scratching post and a lounger-observation platform in the sketch looks like this:


Drawing of a house for a cat.
Uncover
Using a wood hacksaw and jigsaw, the common base, plywood parts of the house and platform are cut out.
Round wooden sticks of the required height are sawed off.
It’s good if part of the roof is removable - this will make sanitary care of the inside of the house easier.
Pieces of padding polyester, foam rubber, and furniture fabric are cut out according to the size of the walls and platforms for finishing surfaces.
Softness and comfort is our motto. Fastening and assembly
Plywood and wooden parts are placed on glue, fastened with nails and self-tapping screws.
Fabric and foam parts are carefully glued, applying PVA around the perimeter of the piece of fabric and fan lines from its center
The sequence of assembly operations is as follows:
- prepare the base and attach a post with a deck chair to it
- assemble a house from parts covered with fabric from the inside
- cover the outside of the house and the lounger with decorative fabric
- install the house on the base, securing it with glue
After a day or two, the assembled and dried house is ready to move in. A replaceable mat is placed inside.


The photo above shows do-it-yourself cat houses.
Housewarming: where to find the fifth corner?
Indeed, where to put an additional, ready-made cat corner?
From the general needs of all furry and clawed animals, it follows: they will happily settle where there is heating and a promising view from above of the surrounding area. Therefore, an informed decision arises: to celebrate a housewarming party not far from the radiator (stove) and the window with a window sill.
You can approach it individually.
Sociable cats will be happy with the open layout of their new nest.
An animal that turns its back on society and likes to snooze in a closet will prefer a secluded corner
If your purr likes to greet and examine incoming guests, it will barely open Entrance door– it is better to position the house so that the hallway is visible from it.
In the event that the appearance of a stranger is stress and the domestic animal waits out the invasion of a stranger in the safest, in his opinion, part of the house - that is where the most the best place for the home you made.
Video instructions on how to build a house for a cat.
Happiness is within
When your pet examines your product, tries it by smell and claw, and then blissfully stretches out in a serene rest, looking contentedly out of the hole-window, do not doubt: his little fluffy feline happiness has come to him.
Be happy, too, you, a reasonable person who understood the desire of the dumb little brother.
Representatives of the cat family tend to return to their favorite places and need personal space where no one will disturb them. It’s easy to create such a corner for your cat with your own hands using available materials. This article discusses what and how can be made from plywood.
Tools
A furniture stapler, electric jigsaw and drill can greatly simplify the task and speed up its completion. But their absence is not critical and will not affect the quality of the result.
What you can't do without:
- hammer;
- ruler or tape measure;
- marker or pencil;
- screwdriver;
- hacksaw or jigsaw.
Materials
Most suitable look wood boards for the task - FC plywood. Its lack of moisture resistance is compensated by its environmental friendliness and affordable price. The width is not of fundamental importance; it is more convenient to work in the range of 8–10 mm. For the floor or base, it is advisable to choose a thicker sheet.
You will also need:
- Fabric not subject to electrification. Hard carpet and soft trimmings will also come in handy.
- Pillow filling, such as old clothes. You should not use stuffing balls or other synthetic bulk products. This is dangerous for the animal's health.
- Non-toxic glue without a pungent odor. Water-based PVA is suitable.
- Sisal, jute, or hemp twine with a diameter of 4–8 mm for a scratching post.
Design
It is believed that a square box with sides of 40 cm is sufficient area for a cat's house. It is better to focus on the actual size of the pet. In his future home, he should have room to sit comfortably on his side and stand up to his full height, but bigger is not always better.
Other important aspects:
- structural stability;
- hygiene and ease of care;
- position in the apartment;
- prevention of scratches, splinters;
- absence of toxic substances and pungent odors.
The provided scratching post will make the future project more practical.
Examples
Below are several options for cat houses with detailed instructions. You can implement any of these models with your own hands, or take them as the basis for your own project.
Triangular prism scratching post
Materials:
- plywood 8–10 mm sheet 58×120 cm;
- a piece of carpet 40×80 cm;
- pillow 38×38, or fabric for sewing it;
- pillow filling.
Instructions:
- We mark the plywood and cut it according to the marks. You should get 3 parts: a 40×40 square and two 58×40 rectangles.
- At a distance of 12–12.5 cm from the edge, you need to make a rectangular cut of 4.5 × 21 cm (Fig. 2).
- The parts are connected cutout to cutout.
- The bottom is secured with nails or self-tapping screws.
- Carpet is glued to the outside of the resulting wigwam. If desired, the structure can be completely draped with fabric.
- A soft pillow is placed on the floor.

Such a house suitable for sociable cats, unwilling to hide in secluded corners. Compact and suitable for a small apartment. Does not require large amounts of material. To avoid scratching the floor covering, You can glue pieces of felt onto the legs of the structure.
House-booth with scratching post and observation deck
Materials:
- 2 skeins of twine;
- wooden post 70–90 cm high, cross-section 8–12 cm;
- the column can be replaced with a pipe of the appropriate size;
- plywood:
- 44.6*300 cm 2 pcs. for side walls;
- 64*54 cm 1 pc. for the base;
- 60*50 cm 2 pcs. for the back wall and entrance;
- 14*50 cm 1 pc. for the top of the roof;
- 33.5*50 cm 2 pcs. for the sides of the roof;
- 44.6*40 cm 1 pc. for support;
- 40*40 cm for the platform.
Instructions:
- At the top of the front and rear walls bevels are provided. The place where you will need to attach the roof plane = 14 cm and is located in the center. The intersection point of the bevel and the edge of the part is 30 cm from the bottom. Before sawing off the corners, it is better to draw the cutting lines with chalk. Based on the finished part, we make a second identical one.
- In one of them you will need a passage 15–20 cm in size. A round hole can be made using a block and two screws.
- To do this, self-tapping screws are screwed into the rail at a distance equal to the diameter of the future opening.
- For a cat, having a back entrance is not important. For the cat at this stage, it is advisable to make another opening in one of the walls of the structure.
- The finished parts, excluding the roof, are knocked together and attached to the base. For fastening, you can use wooden slats and metal mounting profiles.
- It is appropriate to cover the resulting frame with fabric. If an adhesive was used, it needs time to harden.
- To make a scratching post, the tip of the twine is glued to the bottom of the post. You should wrap the base tightly, gradually coating it with glue. At one edge of the pipe, 25 cm of surface should remain untreated; they will not be visible.
- In a part 14*50 cm, a hole is cut in the center to the diameter of the claw post. The workpiece is fixed 25 cm from the edge.
- The scratching post is fixed in the center of the insert 44.6*40 cm.
- The board for the observation deck is covered with carpet, or covered with the same twine and installed on the top of the scratching post.
- The side parts of the roof are connected to the resulting structure.
- The roof is fixed to the frame.
- The bottom is covered with soft material and insulated with unnecessary clothing or a pillow.
You can simplify the task and make the roof for the house flat, and the scratching post will be attached directly to it, without a base hidden inside.
Unlike cats, cats prefer viewing platforms not directly above the home, but a little further away. This can be achieved by increasing the size of the base. In such cases, the scratching post is attached directly to the foundation plywood; its height may have to be reconsidered.
Round house with scratching post and observation deck
Materials:
- 2 pieces of plywood;
- 7 wooden slats;
- nails;
- furniture fabric;
- raw materials for scratching posts (see previous section).
Instructions for vertical cylinder
In this option, round plywood parts will be used as the floor and ceiling of the future home.
- 2 identical round blanks are cut out.
- They are connected into a kind of wheel, fastened together with wooden slats.
- For interior and exterior upholstery you will need a cover. At this stage, it is better to draw a pattern that includes one or more entrance openings.
- If desired, you can seal the entrance openings by sewing wooden or plastic hoops of a suitable size into them.
- The frame is sheathed.
- The design can be supplemented with a scratching post and platforms, from the examples above.
 rice. 7
Instructions for horizontal cylinder
If the house (Fig. 7) is not subsequently attached to the supports at a height, one of the sides of the circle must be flat. You can draw this right away by moving the center closer to one side of the sheet. Unlike the vertical option, the entrance passage will need to be cut out in plywood. For example, according to the markings from the photo (Fig. 6).
House is a hollow
The imitation of this shelter may please your pet.
It is carried out according to the principles described in the instructions for the vertical cylinder.
Residential complex
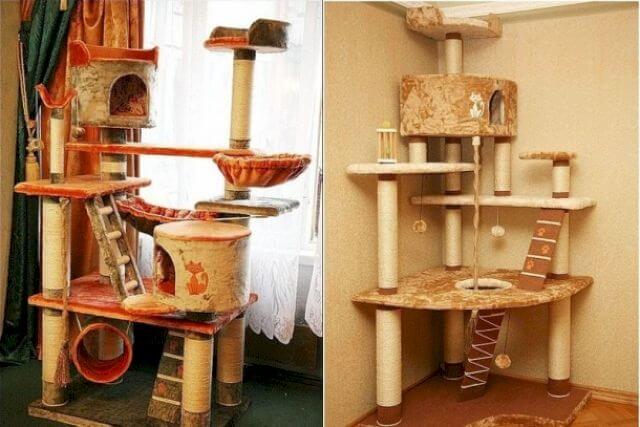
Based on the methods above, more complex structures can be assembled. This structure helps to realize energy in an apartment.
Sun loungers, hammocks and pipes will fit harmoniously into the scheme. For a better understanding of the execution technology, a video with detailed description process.
If the question is how to make a home for several animals, it is worth considering the social foundations of the cat family. Most often, one of the residents takes the position of a leader, and the second a subordinate. It is useless to fight this, so you will have to reckon with it.
The one who is older in the hierarchy occupies a higher position.
Features of the building for several cats:
- The levels of a multi-tiered structure should be approximately equal in functionality. Each floor will need a separate house and observation deck.
- Housing on the same level can cause conflict among animals
- It is advisable to equip the tier below with a covered sunbed with good review, they can replace the observation deck. It is convenient to use a piece of wide pipe for these purposes.
- Between the two tiers a common spacious area is useful.
Wall houses
Plywood structures can be attached to the wall using special anchors. This system allows you to make the living and playing space for your pet more compact and harmoniously integrates into any interior.


