Having looked at how to make a house for a cat with your own hands from a sweater, T-shirt, foam rubber. Make a sofa, a bed, or a scratching post for your beloved pet.
How to make a bed with your own hands?
It’s better to start simple, make a sleeping place for your beloved pet from an unnecessary sweater. See how this can be done. You will need:
- sweater;
- padding polyester;
- needle with a large eye;
- scissors;
- threads
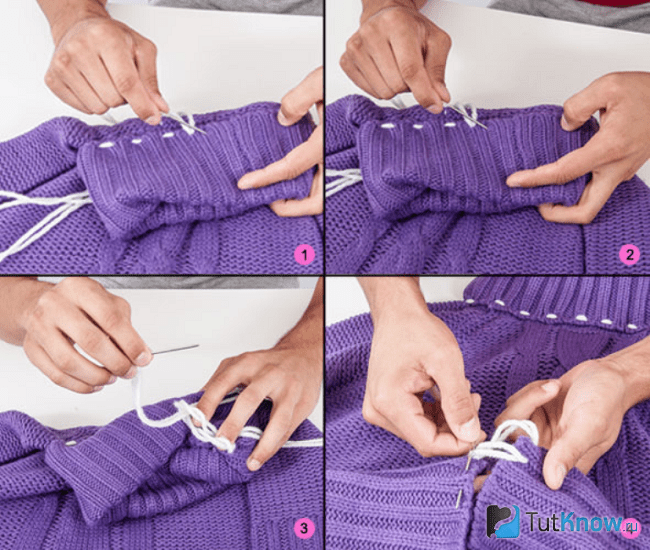
Stuff the sleeves and top of the sweater with padding polyester. Sew the sleeves together to create a round edge piece. Make stitches under the breastbone as well to continue this circle.
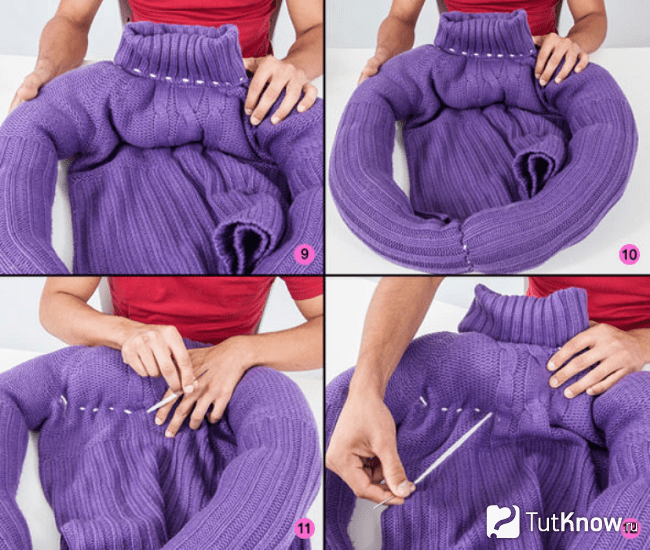
Sew the sleeves to the sides of the sweater. To make it easier for your cat to sleep, you can put a little padding polyester between the shelf and the back of this knitted item. Only then sew the bottom of the sweater to the bottom of the sewn sleeves.
Here's how to make a pet bed and look how great it turned out.
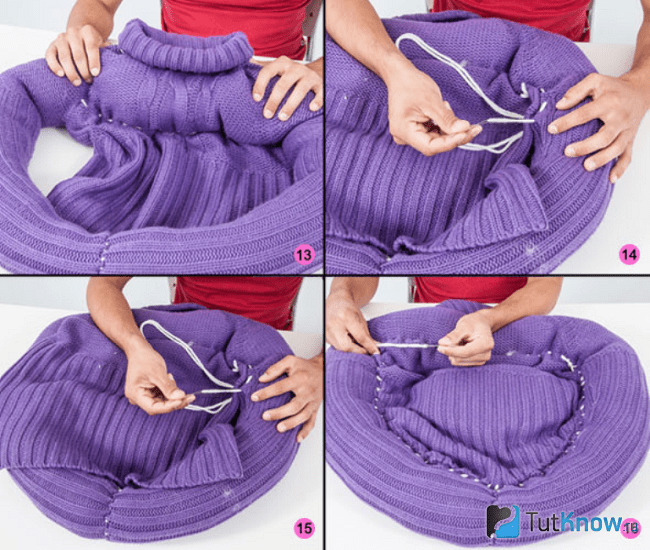
If you don't want the collar of the sweater to be visible, then tuck it in, then sew along the edge of the neckline.
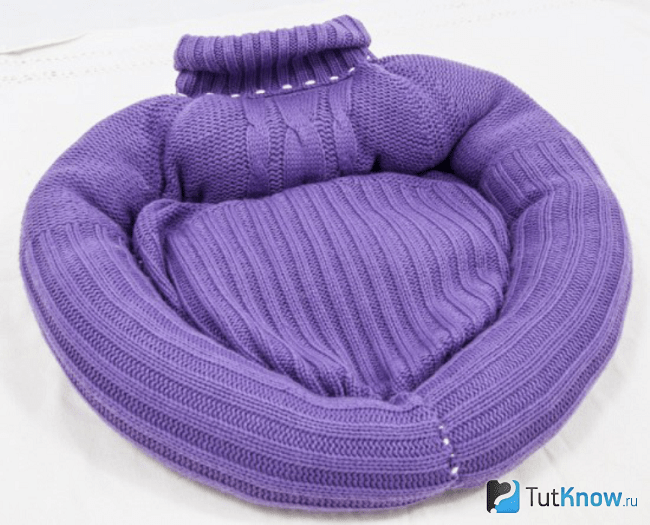
See what this design will look like if you tuck the collar inside. Step-by-step photographs allow you to see the manufacturing process in detail.

It is important to make a cat bed so that your pet can feel comfortable and free in it.
If you want to sew a sleeping place for an animal, then take:
- a small pillow filled with synthetic material;
- scissors;
- thick fabric;
- sewing machine
On the unfolded fabric on the right and left, place the prepared strips of filler, which will soon become sides. Topstitch them to indicate.
On the free part of the fabric, between these two strips, place the oval piece from the pillow. Sew sides 1 and 2 to form sides, giving the workpiece a rounded shape.
To fit the bottom, cut out the fabric with a seam allowance and stitch it inward to the bottom of the sides. Here's how to make a cat bed.

If you know how to knit, then create a sleeping place for your beloved pet from thick roving.

You can do it even simpler, quickly make a hammock-type cat bed. For this you will need:
- thick fabric;
- 4 straps and fastening fasteners for them;
- needle with strong thread.

If you have a wicker mat, thread pieces of wire into it from four sides at the corners and tie them to the table legs. She will definitely like this cat bed.

You can fix 2 straps on the 1st and 2nd sides of the fabric rectangle and tie them to a vertical support. This is how you can quickly make a hammock for your pet.

In winter, they will happily bask near a warm radiator, so you can make them these beds.

Of course, you can make real beds and sofas for your pets. Pets will surely like such sleeping places and will look wonderful in the apartment.
How to make a sofa, a bed for a cat?
First, you need to measure your cat so that the future bed will fit her properly. Now place the following materials next to you:
- thick foam;
- furniture fabric;
- glue.
You can immediately glue these foam pieces together, then cover them with fabric and glue it down. Or you can first cover each piece with fabric, then glue the resulting parts together to make a sofa.
There is another option: sew a cover to the size of the bed, then you can put it on the bed and, if necessary, remove it to wash it. Sew a zipper or Velcro on the bottom side.
Don't forget that after washing they are new. natural fabrics sit down a little. Therefore, it is better to wash the fabric first and then sew a cover for the sofa.
Here's how to make a bed for a cat. For this original creation you will need:
- unnecessary table;
- decorative elements made of wood;
- sandpaper;
- baseboard;
- foam;
- textile;
- braid;
- dye;
- saw.
Use scraps of wooden baseboard to make a headboard for your bed. Then paint the entire structure in the desired color. Mark a piece of foam to size on the bed. Sew a cover for it from fabric, sew decorative braid at the corners of the sides. This is such a wonderful cat bed in the form of a bed.

If you have a jigsaw and plywood, then draw the details of the future bed on a wooden blank and glue them together with wood glue. If you have several pets, then make them a bed consisting of several tiers. The photo on the right is a bed for three cats, on which they can easily fit.

If you have a wicker basket at home, attach its bottom to the wall and place a towel or small pillow inside.

If you know how to use rattan, then make a rectangular house like this in the form of a chest with a window and an arched door. Place a pillow on top so your pet can lie down here.

See how to make a couch in the form of a spacious bed with your own hands using a suitcase. If you have 2 cats, then remove the lid from the bottom. At the bottom of each of these bases you need to attach legs. To do this it is necessary with inside screw in the self-tapping screw so that its tip comes out, here it will stick into the upper part of the leg, connecting this element to the bed.

If the pet is alone, then leave the suitcase lid in place, securing it so that it does not close at the wrong time. Place a soft, flat pillow on the bottom, tying it with straps.

And if you have a round suitcase, then it is enough to attach three legs to it, placing them at the same distance from each other.

In this case, the legs can be very different, which are available. If there are only door handles, use them. Drill 4 holes in the bottom corners of the suitcase with a drill, insert the upper metal parts of the threaded handles here, and tighten with screws.

Here's how you can arrange the lid of a suitcase and its bottom to save space and create 2 cat beds. You need to attach high legs to the top lid to give the lower animal more room. We attach small legs to the suitcase itself.

How to sew a house for a cat with your own hands?
It will be warm and cozy. This home looks great. To make it, take:
- sheet synthetic filler;
- cardboard;
- stapler;
- ruler;
- pencil;
- textile;
- scissors;
- sewing machine
- Cut 5 blanks from a cardboard box. Four of them will be of the same shape, made in the shape of an equilateral triangle. Their sizes should be based on the size of the cat. You can make triangles with sides of 45 cm. A hole is cut in one of them in the middle so that the cat can freely get out and go inside the house. Fifth detail? This is also a square with a side of 45 cm.
- Each of these parts must be covered with synthetic sheet insulation and secured with a stapler.
- Place the triangle on the fabric folded in half, cut two such blanks from the fabric with extra space for seams. Sew the part on one side, insert insulated cardboard here, fold the sides of the triangle inward, sew the edge on a machine or sew it by hand.
- In the same way, decorate all the triangular sides of the house. Where the entrance will be, you need to tuck the edges of the canvas over the cardboard hole and also sew it up with a thread and a needle.
- Cut the bottom out of cardboard, attach synthetic insulation to it, and cover it with fabric. All that remains is to sew all four triangles together to create a roof and sides at the same time, then sew the bottom at the bottom of these elements. This is best done on the hands, using a hidden seam.

This type of cat house also consists of four walls and roof elements; the master class will tell you step by step how to make it.

Here's what you'll need:
- newspaper;
- marker;
- scissors;
- textile;
- foam;
- braid;
- optional? cardboard.

- Using the same template, cut out four blanks from foam rubber, 1 cm smaller than the fabric ones on all sides. If you want to give the house rigidity, then you will also need cardboard parts identical in size to the foam ones.
- For each side you will need 2 identical pieces of fabric, fold them with their right sides facing each other and stitch them on the top and sides. Through bottom hole Turn the workpiece inside out, insert parts made of foam rubber and, if you wish, also from cardboard.
- In the wall where the entrance will be, make a hole for it using a wide braid that stretches well or bias tape.
- Also make the bottom layered by placing foam rubber between two pieces of fabric. Connect the roof wall pieces together, then sew them to the bottom of the cat house.
If you want to make it in 15 minutes, then prepare:
- pliers;
- small T-shirt;
- cardboard square with sides 40 cm;
- pins;
- hangers made of strong wire;
- scotch.

You can decorate a cardboard rectangle a little and make it stronger by covering it with paper tape. Make holes in the corners, but not very close to the edge, so that pieces of wire can pass through here.

Here's how to make a cat house next. Using tape, connect two wires in the center crosswise, thread their ends into the holes, with reverse side bend them using pliers.


Cover the pieces of wire on the reverse side with tape.

Place a T-shirt on top so that the neck becomes the entry hole.
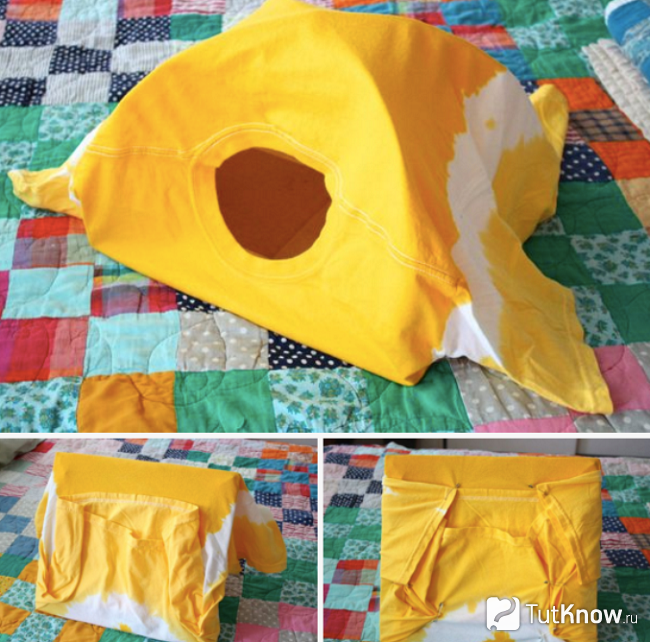
Fold the bottom of this garment, as well as the sleeves, inward, fasten it here with pins, but you can also hem it with a thread and a needle. If you want to finish this work as quickly as possible, you don’t have pins at hand and you don’t have time to sew, then just tie a couple of knots on the back of the T-shirt.

This tent is easy to clean. You simply remove the piece of clothing, when it’s time to wash it, pull the clean one back onto the frame. Your favorite animal will happily relax in such a house.
It is better to lay something soft on the cardboard, for example, a terry towel. Then the cat will be even more comfortable in its new home.

If cardboard and tape are not available, you have a small rectangular pillow, then make holes in it in the corners. Insert the wire here, then also pull the T-shirt.

Some pet lovers make a cat house out of an old TV. To do this, the kinescope and other parts are removed from it. The outside of the building needs to be painted, a small mattress laid inside, and a wonderful home for your pet is ready for housewarming.

Here's how else you can make a house for a cat with your own hands. Photos will help with this. Take:
- foam;
- compass;
- thread and needle;
- thick fabric;
- artificial fur.

On paper, draw patterns of the following parts:
- oval bottom;
- a rounded part consisting of four wedges, which will become both walls and roof;
- rectangle with a semicircular cutout in the center.

The following diagram will simplify the task of precise cutting.

Now the parts need to be connected in the correct order, secure the roof with clothespins, and sew with a thread and a needle. It is better to fix the knot so that it does not slip through the foam. To do this, make a double thread, insert a needle into the foam rubber, make one turn and insert its tip into the resulting loop, tighten.

Using the same pattern, you need to cut out a piece of fabric and fur from each part, but for the bottom it is done differently. An oval mattress made of fabric, fur and foam rubber is sewn to size for it.

Sheathe all the blanks with the materials presented, and the cat’s home is ready. You can sew 2 buttons on the top of the house, and in the same place sew loops on both sides of the lid to secure it to the bed.
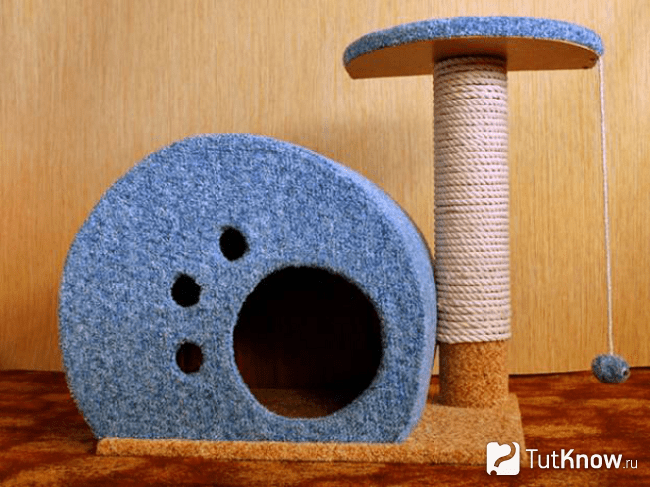
House scratching post for cats
After you have mastered so much useful material, you will be able to make a whole complex for your beloved cat.
To make this you will need:
- plywood or MDF;
- glue gun;
- nails;
- furniture fabric;
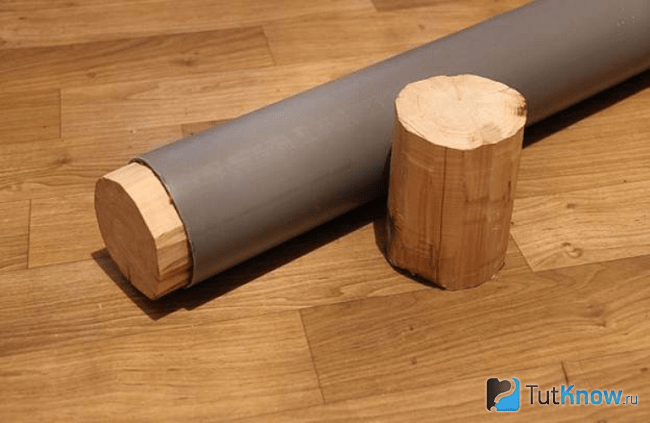
- plastic pipe;
- bar;
- 7 slats;
- rope;
- pencil;
- tools.

Find the middle of the board and mark it. Place the end of the rope here, with a pencil attached to the reverse side. Draw a circle.
Now on it, a little to the right, you need to draw another one, but of a smaller diameter; to the left of this we draw three small circles.

The following diagram contains the required dimensions for these recesses.

After cutting out all these holes with a jigsaw, mark the places where you will attach the slats. Drill holes on this part and on the second one, which will become back wall, that one is solid.
You have already prepared the slats; their sharp edges need to be trimmed off. Now place each strip between the back and front walls, thread the self-tapping screws into the holes made with a drill, and tighten them. In this way, fasten the entire structure.

According to the size of the back and front walls, you need to cut out parts from furniture or other dense fabric. Don't forget to cut notches for the front wall blank. As you may have guessed, they resemble a cat's paw. Using a glue gun, secure the material to the wooden parts of the house.

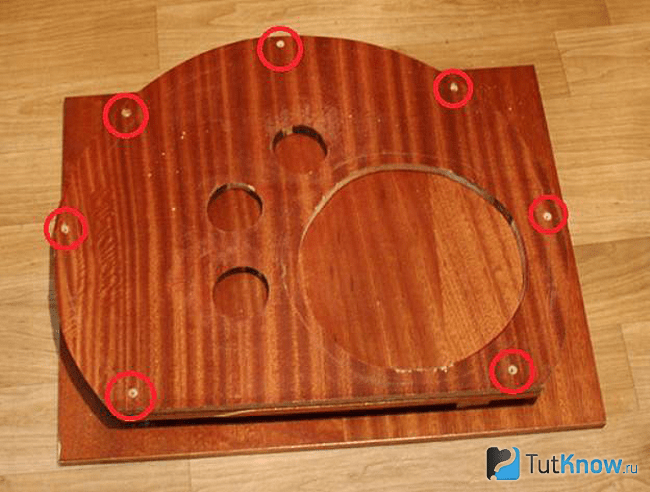
The base of the structure will be made from the same wooden material that you chose at the beginning. Attach the house to this part, draw where you need to glue the foam rubber, and what size it is. Also mark where the pipe will be located, because this is a scratching post house.

Glue the foam rubber, and use glue to attach a rectangle of furniture fabric on top, cut to fit the size of the base.

Now cut the canvas to the size of the roof of the house, attach it to the wooden slats using a furniture stapler. Attach the floor to the base using self-tapping screws.

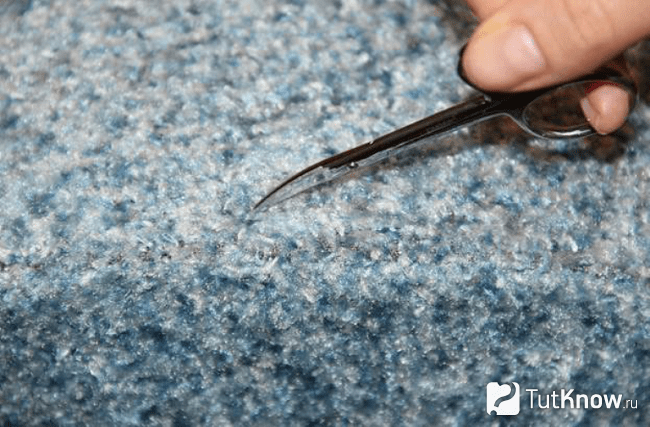
To make the fleecy fabric look beautiful, use nail scissors to remove its elements from under the staples.
The back wall can be left the same on the inside as it was, but the side wall inside also needs to be covered with fabric.

This is what kind of scratching post house you will get at this stage.

Now you need to take 2 rounded bars or give a rectangular one this shape. Insert these blanks on sides 1 and 2 inside the pipe. Its diameter is 11 and its height is 60 cm.
There will be a bed at the top of the house; you need to cut out a semicircular wooden base with a jigsaw. You will need two such parts, the first one you will close the pipe.
Place foam rubber of the same shape on top, glue the fabric onto it, bring its edges to the sides of the bed, gluing them here.

Using self-tapping screws, screw the pipe from below to the base, and cover this area with a strip of fabric.

Wrap a rope around the scratching post and glue its top and bottom ends. Attach the thread with the toy with the mouse.

This is such a wonderful scratching post house.
If you want to build a whole complex for your beloved pet, then study the diagram below with structural elements and their sizes.

Such a palace is being built from plywood, which is peeled off on all sides with carpet.
Fasteners will help connect the parts. See how the individual elements are attached to the timber that connects the structure.
Plastic pipes with wooden blocks inserted at the end can also be used as connecting elements.
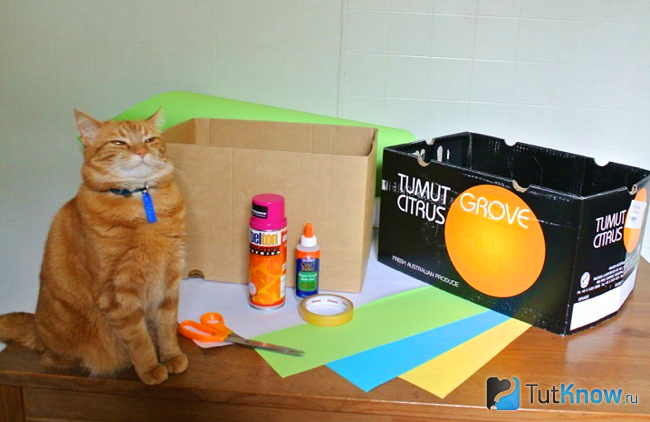
A building with such an openwork roof will surely please your four-legged pet and will decorate your apartment. To create such a house you will need:
- 2 cardboard boxes;
- scissors;
- animal-friendly paint in a can;
- colored paper;
- scotch;
- glue.
For one cardboard box you need to cut off the bottom and top, leaving one frame.
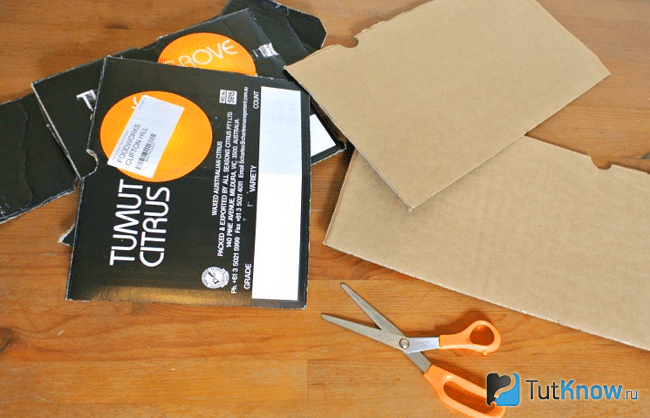
Paint these pieces as well as the inside of the second box.

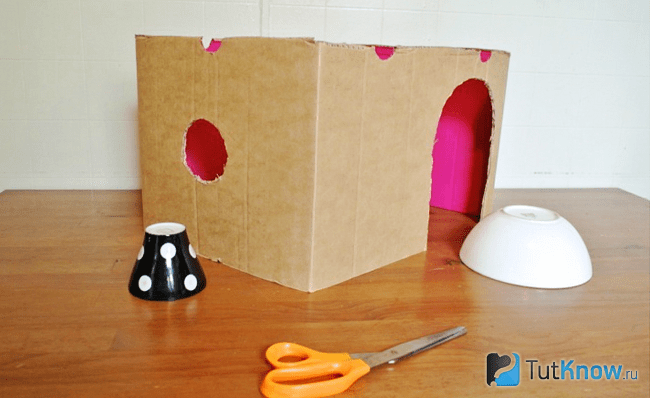
Place the cup against the wall of the house. Another item of similar shape, but bigger size place it where you want to make an arch. Trace with a pencil and cut out these structural details.
Using tape, connect the first two elements to form the roof of the house. Also, using this adhesive tape, you need to attach it in place.
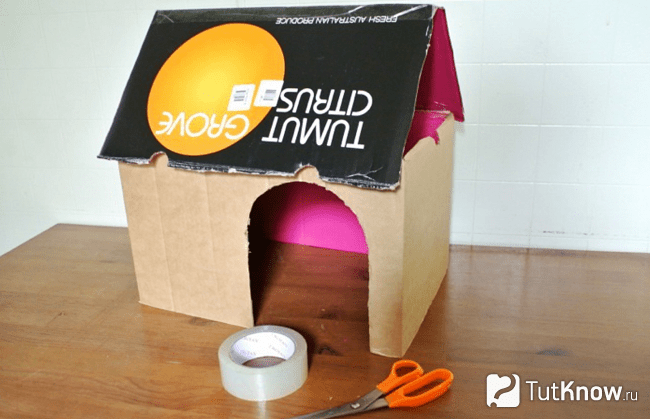
To decorate the roof, cut out identical tile elements from colored paper using a template, glue them onto the roof, starting from the bottom, gradually moving up to the ridge. Arrange these parts in a checkerboard pattern.

Cut out the chimney from leftover cardboard, glue this piece together, and attach it to the top of the cat house. You can move in a new resident and see how much he likes the structure.
Today you learned about houses for cats that you can make with your own hands. Of course, there are many more ideas and materials for making a cozy home. For example, the following.

Felt house? This is another fashion trend that goes deep into the past. See, our ancestors also made felt boots and various household items from wool. Now this craft is very profitable, so you can make houses for cats from felt for sale. We invite you to watch a video that tells you how to make such a home for a pet using the wet felting technique.
The next review will tell you how to make a scratching post house.
These are the nests. It’s quite easy to make, 2 circles of fur, a foam rubber circle, pulled together a string threaded around the edge, and you got a nest! Kitties love to sit in them.
Cut out 2 circles (thick fabric and fur) 80 cm in diameter, and a circle of foam rubber 40 cm in diameter! Sew 2 large circles on the wrong side, turn them right side out, insert foam rubber, and sew on the right side around the foam rubber. From the edge great circle, retreating 1 cm, stitched, inserted a lace there, and pulled it off. Well, there’s decoration: pompons, etc. already to taste! 

HOW DO YOU LIKE THE CAP?
Cap tip. Source materials: 2-centimeter foam rubber, better elastic fabric such as stretch velvet, fleece (in my case), but flannel and even cotton or linen will do just fine. For naked people I take fleece, it’s warm. How I made the pattern. Take an orange, cut it into 6 slices, remove the peel, cut it in half crosswise, and here in front of you is a mini pattern of one part. The size of my cap is 50 cm in diameter excluding the visor and 30 cm in height. Let's remember the math - the circumference of a circle is 2Р=2 x 3.14 x 25cm=157cm. This is the circumference. Divide by 6 = 26cm. Here are the finished dimensions of one triangular cap wedge - base 26 cm, height 35. Cut 6 parts from foam rubber. Cut the parts from the fabric with an allowance of 2.5 cm. In one, cut out the entrance arch. Next, take the foam rubber, place the fabric on both sides, face outward, and baste both fabrics together, leaving the foam rubber between them. The elasticity of the house depends on how tightly you wrap the foam rubber. Sew the pieces together along the sides of the triangles.
Further. You have a dome without a bottom. Cut the bottom, diameter 50cm, from foam rubber and also cover it with fabric, the seams facing out. Turn the dome inside out, sew the bottom, the seams don’t need to be processed, cut off the excess, turn the house inside out. Sew a 1cm foam rubber canopy separately to the house. I do everything by hand. Thick foam rubber will not allow you to make an even stitch on a machine. Although... That's it. Math will come in handy if you need a smaller or larger house. Another tip. To prevent the foam from bunching up when washing, baste the inner fabric to the foam without grabbing the outer fabric randomly, like the back of a sofa, or in separate lines. Verified. Good luck, everything will work out if you do it with love for your cat.

Materials:
Tapestry fabric, 2 m
Plain dense rep to match the tapestry, 1.1 m
Foam rubber 3.5 cm thick, 1 sheet measuring 1 x 2 m
Clothesline, 2 m
Tools:
Long needle, breadboard knife (or scissors)

1. Transfer the patterns onto graph paper. Prick the corresponding roof piece onto the foam rubber and cut it out with a breadboard knife. Make the second part mirror symmetrical. Also cover the foam bottom with a diameter of 55 cm.

2. Hand sew the darts over the edge. Also make the back seam, aligning the sides with the number 1.

3. Place the bottom into the foam “roof” and connect the parts at the front, sewing the sides with the number 2.

4. Cut out two pieces each of the exterior and interior decoration of the house from tapestry and plain fabric (see diagram). Make them mirror symmetrical. Cover the bottom round bottom with a diameter of 66 cm from tapestry fabric. The bottom for internal processing with a diameter of 55 cm is made of plain finishing fabric. Open out all the details with an allowance of 1.2 cm. Sew darts on the details of the external and internal processing of the house (they are marked with crosses). Sew the back seams 1 cm from the edge.

5. Connect the numbered sides of 4 pieces of a single-color facing (top seam). Sew this part along the sides with the numbers 5 with the blank for the interior decoration of the house. Sweep the blanks for the interior and exterior trim along the sides with the numbers 6, aligning the same icons (see diagram). Make sure that the pieces meet along the long sides of the front of the house, and sew the sections with numbers 2 together with a seam 1 cm from the edge. Also connect the sides with number 3. Sew the basted seam (with a seam 1 cm from the edge).

6. Sew decorative piping to finish the bottom of the house. To do this, cut out a 3 cm wide bias tape from a plain fabric. Place the cord in the fold of the tape and stitch as close as possible to the resulting roll. Use a special zipper foot for this, moving the needle to the far left position. Sew the piping to the bottom edge of the outer trim of the house (along the edges with numbers 7). To the bottom edge of the interior trim (along the sections with numbers), sew a bottom made of plain fabric (55 cm in diameter), having previously basted it. Make the seams 1 cm from the edge.

7. Place the cover on the foam frame and straighten the facing piece made of finishing plain fabric. The stitch seam should run along the outer corner of the foam roof. Align all fabric parts with foam parts, eliminating distortions. Secure interior decoration with securing stitches, piercing the needle right through the foam out and back.

8. Place a round tapestry piece (66 cm in diameter) onto the foam bottom. Fold the seam allowance inward and pin the edge to the piping. Connect the pieces by hand using an over-the-edge stitch using threads to match the tapestry.

Advice:
The end of the dart forms a bulge. Iron it in steam mode.
Do not sew the inner bottom to the foam base, but simply tuck the fabric between the bottom and roof pieces (in a circle). Then you can take it out when necessary and shake off any accumulated fur and debris.
If you do not find foam rubber 3.5 cm thick, adjust the pattern. If the material is thicker, add the difference to the allowance on the number 5 side (or reduce the allowance if it is thinner). In this case, the radius of the bottom parts made of foam rubber and finishing fabric will change accordingly. Be sure to first sweep out the parts and try on the cover.
Cat house.
Healthy sleep without drafts, in a soft, cozy bedroom... Isn’t this what all living creatures on earth dream of? What about the cat? She is also a “person”!

Like everyone else living in the house, the cat should have a place where it can retire and sleep peacefully. Our Vika chose a suitcase for this purpose, lying on the very top shelf of her wardrobe. And everything would be fine, but firstly: she climbs in there using our clothes, and secondly: she is not visible there and, in order to make sure that the cat is at home, she has to be disturbed. Besides, the suitcase is not the best place rest of the young lady.
The thought of a sleeping place has been in the air for a long time. I even made an attempt to kill two birds with one stone by building a cat house - a kind of entertainment center with a bedroom. But Vika appreciated the building only as an entertainment center, and the house as a large and comfortable scratching post. Perhaps if I had placed the house under the ceiling and not on the floor, it would have become the cat’s favorite bedroom...
To start work, I bought a sheet of foam rubber 2cm thick, faux fur and padding polyester. Foam rubber is the frame of our structure, and let’s start with it. It’s worth stopping here and warning - all this is pure improvisation - the dimensions were taken from the ceiling, there were no preliminary drawings and everything was drawn on foam rubber with whatever came into play. I made the base of the bedroom almost oval in shape, namely: I drew two circles with a radius of 20 cm with a space of 10 cm between the centers. The side must correspond to the length of the “oval”, namely: the length of a circle with a radius of 20 cm plus 20 cm (two distances between the circles). The formula for the length of a circle is =2pR. In our case, 2x3.1415x20+20=145.66cm. I got 150cm (it happened that way). I made the side 20cm high with a 10cm deep cutout for the entrance, and I made the same cutout in the roof. To create the roof, I made almost the same “oval” as for the base, but with circles with a radius of 30cm. The perimeter of this “oval” is 2x3.1415x30+20=208.49. Plus/minus the error I got ~60cm difference between the roof and the base. This difference will make our roof convex. 60/4=15cm - I cut 4 wedges from the roof, the base length of which was 15cm. All that remains is to cover the frame with fabric.
I'm not much of a tailor. Therefore, I transferred this part of the work to my mother. We don't have a sewing machine at home, so everything is done by hand. The interior lining of the bedroom consists of faux fur, and the exterior is made of an almost new, but hopelessly damaged, satin bedspread.
The pattern for the pillow was made according to the external size of the bottom. Thick padding polyester folded into four was used as filler (thin padding polyester, I think, should be folded 8 times). To prevent the padding polyester from falling off inside, it was secured with several stitches around the perimeter of the pillow. A couple of days passed from the moment of sewing the house to sewing the pillow, during which time the cat managed to get used to it and the beginning of fussing around the pillow aroused the cat’s wild interest. To fill the pillow with padding polyester, I had to fight with a wild animal for the pillowcase. And when the pillow was ready and put in the basket for fitting, the cat immediately jumped inside, tucked her paws and narrowed her eyes, saying with all her appearance: “I’ve been sleeping here for half a day, and you’re walking around and disturbing me.”
The roof should be attached to the side with tape, but this is not ready yet, since the cat liked to sleep without a roof, and the inverted roof became an alternative basket.
Vika happily sleeps in her new bedroom and dozes in the upside-down roof. For two days I didn’t remember at all about the suitcase I slept on before, but now I sometimes climb into it, out of old memory. I'll try to wean it off.
I'll share my idea. The bed is made very simply and quickly. If I was able to build it with my crooked hands, then anyone can do it.
The bed requires 1.5 cm thick foam rubber and covering fabric. I took fleece.
Cut 2 circles from foam rubber, the diameter is equal to the size of the couch. Put them together. Cut 2 circles from the fabric: the first is the diameter of the bed + 0.5 cm for the seam, the second is the diameter of the bed + thickness (3 cm) + 0.5 cm for the seam. Place the foam bottom on the larger circle and cover with the smaller one, sewing the edges.
Many people have a cat living in their house, and often not even one. The pet becomes part of the family and you want to do something nice for it. It is best to build a house in which the cat would feel comfortable and protected.
However, some owners do not think about this, and the animal independently looks for a secluded corner to rest. This can lead to damage to upholstered furniture, which cats often use as a scratching post. In addition, a lot of hair may remain on the chair and will require cleaning.
It is better to make a house for a cat with your own hands, because the animal smells the smell of the master’s hands. There are often situations when the animal does not recognize the purchased house and continues to sleep on its favorite sofa. Feeling a familiar smell, the pet will quickly get used to the new housing.
Peculiarities
Making a house from wood is a little more difficult than making it from cardboard and other materials. However, it will be stronger and more durable, and will also fit perfectly into the interior.
Material selection
The choice of material depends on the wishes of the master. The sleeping area can be constructed from any boards, such as chipboard, plywood, MDF and natural wood.
Important!
The main thing to consider when choosing a material is the absence of a strong odor. If the material still smells a little, let it air out and only then get to work. Non-compliance of this rule will lead to the cat refusing to live in the new house.
Plywood
To make housing out of plywood you will need the following materials:
- Plywood, density from 10 to 20 mm.
- Hammer and nails or screwdriver and screws.
- PVA glue.
- Foam rubber.
- Ruler, compass, scissors.
- Jigsaw.
Depending on the area of the room and the size of the animal, we make a drawing for the house. After that, we cut out the base, top, back, front and side sections with a jigsaw.
Important!
Neglecting the drawing can lead to inaccurate calculations in plywood processing, and, consequently, to damage to the material.
The entrance to the shelter should be larger than the cat's head. Using a ruler, we find the center on the front section, draw a circle with a compass and cut out a hole. Before assembling all sections, it is necessary to line all surfaces with dense foam rubber. To do this, apply PVA glue to the material and glue it to the plywood sheets.
Advice!
We use only PVA glue, it dries quickly, does not emit odor and harmful substances. There should be no superglue in production.
Lubricate the edge of each section of the future house with glue and connect it. To secure the structure, we use nails or screws. Using wire cutters, we snip off the heads of the nails so that they become invisible and hammer them into the structure.
Useful video
Video instructions on how to make a cat house from plywood.
How to make from chipboard
Materials, which are necessary for making a cat house from chipboard:
- Chipboard board.
- Carpet or other similar material.
- Foam rubber.
- Scissors.
- Wood saw.
- Screwdriver and screws.
We draw a plan for the future home; it can be simple or multi-level. In accordance with the plan, we cut the chipboard into pieces. We cover all sections with carpet. At the base where the cat sleeps, we place foam rubber under the carpet. If the structure is multi-tiered, we do this under each top shelf where the cat sits.
Cut an inlet hole anywhere in the front section. Using a screwdriver and self-tapping screws, we connect all parts of the structure. To make the self-tapping screw easier to screw in, you need to pre-drill a hole of a smaller diameter in this place. You can add a scratching post and play sections to the finished house.


Tree
The advantage of a house made of natural wood is its high environmental friendliness. For example, a chipboard contains formaldehyde resins, so best choice Natural wood will be used for production.
Tools that will be useful in your work:
- Boards made of natural wood, thickness 10-15 mm.
- Natural fabric for upholstery.
- Fasteners.
- Wood saw.
- Sandpaper.
- Screwdriver.
- Insulation (foam or synthetic winterizer).
- Ruler and scissors.
Useful video
One of the options for a wooden house is in the video below.
Design, safety, dimensions
In order for a cat to live comfortably in a house, when designing it is necessary to observe a few rules:
- You need to take a closer look at what height the animal likes to spend time and take this into account when creating a home.
- The size of the structure should be slightly larger than the dimensions of the pet.
- To prevent the cat from getting injured, after finishing work on the house, check it for sharp corners and protruding nails.
- The structure must be stable and not tip over when the cat jumps on it.
Options
There are many types of cat house design. The choice of option depends primarily on the interior design.
Wigwam
 Some short-haired cats such as Siamese, Bengal and Abyssinian often stand on their hind legs. Therefore, it is better for them to build a shelter in the form of a wigwam.
Required materials and tools:
- Three wooden boards.
- A screwdriver and four self-tapping screws.
- Jigsaw.
- Roulette.
We make markings on the board. Using a drill and jigsaw, we cut grooves in the upper part to align the boards. In the lower part of the side boards we drill two holes at a distance of 9 cm from the edge. We fix the base between the boards using self-tapping screws. The house can be decorated with upholstery or varnished.
Useful video
You can see how to make a wigwam for a cat in the video below.
Cube house
To make a cubic house you will need a standard set of tools and materials:
- Sheet of plywood, chipboard or natural wood.
- Jigsaw.
- Screwdriver with self-tapping screws.
- Foam rubber.
- Plastic or cardboard tube, about 12 cm in diameter.
- Jute rope.
- Furniture corners.
- Ruler.
We cut out the walls of the house the right size, a total of six identical parts are obtained. A round hole for entry is cut in one section. Using furniture corners, we assemble the structure and cover the inside with foam rubber. We wrap the pipe tightly with jute rope and secure it to the roof of the house.
To make the house stable, it needs to be screwed to the floor. If this is not possible, then we attach a board larger than the cube itself to the bottom of the house. By the way, a cubic house is easy to make from.
How to make a house “without a roof”?
Most popular options sunbeds:
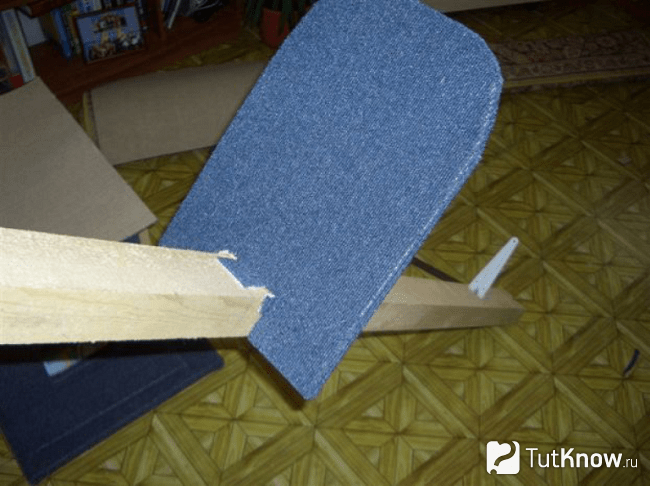
- Sun lounger with sides.
- A lounger attached to a battery.
Materials for production cat beds:
- Chipboards or plywood.
- Natural fabric.
- Sintepon or foam rubber.
- Fastening elements.
- Screwdriver with self-tapping screws.
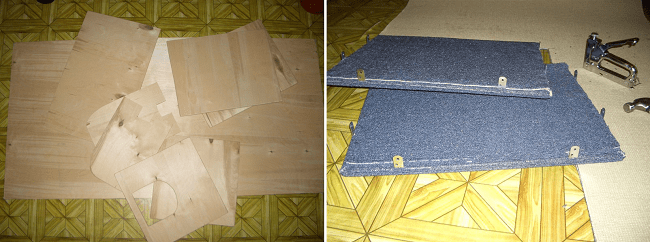
Let's prepare a wooden frame. Cut 2 boards to the required size and fasten them at an angle of 90 degrees using self-tapping screws. This will be the sleeping place. Attach foam rubber or padding polyester to the frame and cover it with fabric. The upper part must be firmly secured to the battery so that the cat does not fall while jumping.
Reference!
A bed with sides is made in the same way. We cut out the base of the bed and four sides from the board. We fasten them together using a screwdriver and self-tapping screws. Then fill it with soft material or place a soft pillow on the lounger. Do you want to create just a soft bed? This is a different type of house that is made much simpler, believe me - read.
Fairytale houses
 Fairytale houses require more work and imagination than ordinary ones. To do wooden house small logs will require perseverance and a lot of time. Each log needs to be cut and fastened to the previous one. If you try, the resulting result will certainly please you.
There are also more complex versions of a fairy-tale home, for example, a hobbit house. Great desire, imagination and hard work will help you make a real fairy-tale house for a cat.
Plywood house
Pick up material for cat house necessary taking into account the special principles to which plywood corresponds:
- Safety– the house should not have sharp edges or corners, too small parts or protruding threads. You need to make sure that the cat does not injure its paw or swallow anything.
- Quality– the house should be built from natural materials, use only non-toxic paints and glue.
- Hygiene– the pet’s resting place must be constantly washed and disinfected.
- Additional insulation– allows it to be used as a .
Complex
Plywood is a fairly durable and environmentally friendly material, from it you can create a whole complex for a cat, where there will be a place to rest, play, etc.
It is necessary to design the building in advance and calculate the costs, prepare necessary tools, carry out calculations. The height of the structure can be as large as possible, since the cat will like such entertainment. But you can create a beautiful two-story building or an entire castle not only from plywood, but also from boxes - you can read more about this in this article.
Simple version with drawing

- Take a sheet of plywood and make 3 sides of the house, the floor is square.
- For the roof you will need 2 squares of material, which are twisted with furniture corners.
- The roof and walls are fastened with self-tapping screws.
- The front sides of the roof and the front wall with the entrance are prepared from polystyrene foam. Ventilation holes are made in the roof parts.
- It is good to cover the inside of the house with fleece and put a pillow underneath.
Scheme of a house with a roof

We draw a house with a roof on paper, dimensions whom:
- height – 40 cm;
- width – 42 cm;
- depth – 54 cm.
If desired, these parameters can be changed according to the size of the animal.
Using a hacksaw, cut the boards to the desired size. On the front part we cut a passage into the house. We sand its edge with sandpaper so that the animal does not get hurt when entering and exiting.
We fix the padding polyester and cover the base and side walls inside the house with natural fabric. Next, using fasteners, we connect all the parts together. We fix the roof as a second level and make a fence. For decoration, you can cut a staircase from a board and place it near the house.
Advice!
For upholstery it is necessary to use natural fabrics. Synthetic fabric is allowed only if it is not electrified. For example, silk is not suitable for upholstery.
Useful video
Another video on how to build a house for a cat.
Options from old things
You can make many original pet houses from old wooden things.
From old furniture

Conclusion
As you can see, creating a house for a cat is a fascinating process, which is actually not as scary as it might seem. Experiment, don't be afraid! The main thing is that the materials are natural and the entire structure is well secured. If you didn’t find the option you were looking for, look at the general information on this topic.
Every conscientious owner should take care of the comfort of their pets, guided by the famous quote from “ Little Prince": "We are responsible for those we have tamed." All our pets should feel affection from their owner: dogs, parrots, pet rats and hamsters. Cats are no exception.
Today we will talk about how to make a cat house with your own hands. In addition to step-by-step instructions with a video, we will also look at many photo examples of how such structures might look. First, let's find out what types of homemade cat houses are the most common.

Houses for cats: options
First of all, I would like to remind you that a cat house can be either homemade or purchased. The fact is that many specialized online stores sell such products, as well as pet stores where you can buy ready house for your pet.

The price of such a product can be different and vary significantly, depending on the materials used, size, configuration and even additional decor. Wherein, appearance such a “dwelling” can be completely different, often very vaguely reminiscent of what purpose it should serve and for whom exactly it is intended.

Let's look at the most common types:
- Basic products include beds. Surely that's enough a budget option, which almost every owner can afford. They may have different shapes. The simplest beds are made from a rug, which is trimmed around the perimeter with a border-edging, which can be made in one or several different colors. In addition, bed options can be beds and even original sofas that copy real large furniture, the only difference being that they were originally intended for pets.
- A slightly more complex variation are hammocks. Although, on the other hand, you can make such a house yourself, since there is nothing complicated about it. The difference between hammocks is that they can be hung using special ropes with certain fasteners.
- A more substantial option is a booth. This type The cat house is equipped with a full-fledged small roof and is also upholstered with special upholstery. As a rule, this is a soft fabric. You can also make such a cat house with your own hands at home. By the way, for greater practicality, this design can be supplemented with a scratching post.
- A slightly simpler option is cardboard cat houses made from a box. Of course, they are short-lived, but there are no problems in making a new house like this. Plus, this way you can get rid of unnecessary boxes. By the way, you can also make a bird feeder from cardboard boxes, the manufacture of which is described in more detail in this article.
- More complex structures are play complexes. This cat house is a kind of mini-residential complex with everything your pet needs, including toys, a scratching post, a hanging hammock, crawl spaces and passages, a small staircase, and, of course, the cat house itself.
- Combined furniture that is suitable for both the owners and their pets. As a rule, these are small poufs or bedside tables that can be used both for sitting or storing household items, and for keeping your cat, who can sleep in a specially designated niche for him.

In addition, there are more complex options on sale, which are often not so easy to make yourself. As a rule, they are made to order and take into account numerous requirements, including the features of the home’s interior.
Popular materials

Felt is an excellent material
Let's look at what materials can be used in the manufacture of this or that part of the cat house.
| Detail | Material and its characteristics |
| The basis | Beds, baskets and hammocks can be made of fabric. As a rule, the frames of more substantial booths are made of wood, in one form or another. This could be MDF, chipboard plywood or just boards if we are talking about making it yourself. The cat's house should be such that there is no lingering odor of materials or glue. |
| Exterior finishing | In most cases, fabric or other decorative material is used as upholstery. Filled fabric is also used to make small pillows. Try to make sure that almost all structural elements are upholstered with something soft. |
| Litter | You can add foam rubber, straw, padding polyester or special granules, as well as other soft fillers for bedding. |
| Nail sharpener | In most cases, a special winding made of thick, coarse ropes is used. The base of the scratching post can be made of plastic, wood or metal. |
| Fastening and other elements | The glue should not have a pungent or pungent odor. If necessary, use hardware (screws, nails), as well as staples for a stapler, and so on. All these elements are usually metal. |

In addition, other materials can be used, especially when it comes to individual production of cat houses.
Best options for your pet

As a rule, houses are bought or made for small kittens, and for already quite adult cats, both young and old. In this case, it is necessary to pay special attention to such points as:
- It is necessary to ensure that the house is of sufficient length. Its size should be such that your cat can stretch out to its full height.
- Different koshams may have different temperaments. So, for more sociable pets, it is better to buy an open crib or bed, and also install the house in the middle of the room, or in a visible place. For more modest cats, especially in cases where they do not perceive strangers well, it is better to choose a closed type home, placing it further away, for example, in a corner.
- If you have a mother cat with kittens, or you are the owner of an entire pride of cats, we advise you to opt for the so-called “residential complexes” that have several interior spaces, which were described just above. At the same time, this design can serve as a kind of playroom for small kittens.
- In addition, before purchasing or self-production For a cat house, you need to watch your pet and see where he likes to sleep: lower or higher. If he prefers high places, it is advisable to opt for a multi-level structure with several “floors”; if he prefers low places, feel free to choose a one-level cat house or an ordinary bed.
- If possible, buy a bunch of dried catnip, also known as catnip. Cats love this plant and its smell, which will quickly attract your pet to its new home.
- Please ensure that the house is strong and stable, given that many cats prefer an active lifestyle.

A suitcase is also a great idea.
Attention! Try to choose materials (both for manufacturing and in the finished product) that do not have an unpleasant chemical odor.
How to make a cat house with your own hands

You can make almost every type of cat housing yourself: sew it using patterns, assemble it by studying the drawings and step-by-step photos, as well as video instructions. Moreover: as a rule, most of us, in apartments or houses, have many things that are unnecessary at first glance:
- Old boxes.
- Scraps and scraps of fabric.
- Remains of boards.
- Filling and material from old jackets (sintepon, batting, etc.).

Using all these materials, you will not only be able to make a cat house with your own hands, but also get rid of unnecessary things cluttering your apartment. At the same time, it is not at all necessary to have the skills of a weaver, seamstress or carpenter, since most of these structures are made according to fairly simple patterns.
By the way! If possible, try to study the master class, which tells you step by step how to make a house for a cat.

Plywood cat house
A simple cat house made of plywood (photos are examples in the gallery) will require you to perform the following procedure:
- Let's prepare materials and components: plywood sheets cut to size, metal connecting profile, fasteners, as well as soft thick fabric. A piece of old carpet will also do.
- Using a profile and screws, we connect the individual parts of the future structure.
- Using carpet or other similar coverings, finish the inside of the house.
- Don’t forget to cut a hole of the required size on one of the walls in advance.

A wicker house is a joy for your pet
Fabric hanging trapeze
One of the most simple options is, without a doubt, the use of unnecessary old boxes that once served as packaging. At the same time, quite thin pillows can often be used to make cat housing using special fabric strips. What is needed to make structures of this type?

Let's get a look:
- First of all, you need to prepare everything necessary materials and components, which will be, first of all, sofa cushions. On the other hand, they can be made separately if you do not have ready-made ones in stock. In addition, you will need filler to stuff your pillows with. As a last resort, you can use old rags as a filler.
- The process of creating a trapezoid house begins with the fact that the pillows need to be connected. This is done using special tapes made of fabric. Connecting tapes, the width of which is up to 0.5 meters (this depends on the size of the cat), are sewn on all sides of the pillow.
- Then the second pillow is sewn on. Thus, it turns out that the distance between the pillows ends up being equal to the width of the connecting tapes.
- If you wish, you can also use a hammock, which you can buy or make yourself. Such trapezoids are suspended by special, pre-sewn ropes to a mount fixed on the stem or on the ceiling.

Fabric lounger
Do-it-yourself fabric cat beds are quite simple to make. Here is a short master class on how to make it:
- To begin with, let's select all the necessary materials. These include fabrics made from natural raw materials, threads, as well as small elastic bands and foam rubber (any similar filler can be used).
- Select a piece of fabric of the required size. The best way to do this is to use scissors. When measuring it, you need to take into account the size of your cat.
- If you decide to use filler, then you will have to cut out not one, but two identical pieces of fabric, which are sewn together with threads, thus forming a cover, which is then filled with padding polyester, rags or foam rubber and sewn tightly.
- If desired, you can sew elastic bands or ropes to each side, with which you will tie the fabric lounger to the legs of the chair.

Simple cardboard design
Why do cats love boxes? There are many explanations for this. But the main thing is that they really like all kinds of cozy places. Cats climb into them themselves, and sometimes a cat drags kittens from other places into the closed and cozy picture “house”. They sleep there, sometimes chew something, play, and often pregnant women like to hide in such places future mom. If you go to do cardboard house for a cat with your own hands, you will need to select the necessary materials, and then step by step perform all the necessary actions, according to the instructions:
- Customize the fabric and box to the appropriate size.
- Place the cloth inside. Old unnecessary scraps will also work.
- If the box is closed, cut a hole for entry and exit.

Closed soft house for a cat
On a note! If you have a desire, you can additionally decorate your cat’s house in such a way that it looks more than just cardboard box, but more attractive.
You can place a cardboard cat house in any suitable place in the room. In this case, it is advisable to take into account the character traits of your pet.

Manufacturing of a residential complex
A complex for several cats or for a cat with small kittens is a somewhat more complex structure compared to those described above. For this reason, in order to make a complex for cats with your own hands, you will need certain knowledge in designing pieces of furniture and working with wood in general. So here you go step-by-step instruction on production:
- Prepare the necessary materials, including fabric for upholstery, boards (OSB or chipboard boards are suitable), screws or nails, as well as tubes for assembling the frame.
- You will need to cut out a round base from particle boards, from which you can make that part of the complex that will serve as a bed.
- A metal tube (or several tubes, depending on the design) is mounted perpendicular to the base.
- Boards are mounted along the edges of the base, which will be used as walls. A roof needs to be mounted on top of them, leaving a small hole in it so that the cat and kittens can get out to the upper level whenever they want.
- Alternatively, you can do without this hole by using an external ladder.
- Additionally, you can attach a scratching post and other auxiliary structures.

House for a cat made of foam
And finally, let’s look at a step-by-step diagram for making a house from dense foam plastic with your own hands. By the way, unlike some previous options, all you need is foam boards (or even better, if it’s a ready-made box), as well as fabric or clean rags. You can see the ideas of how such a house for a cat should look in the photographs). You can make this type of design:
- In the form of a simple bed.
- In the form of a closed house, if you have a polystyrene box.

For the comfort of your cat, line the bottom with clean rags or leftover soft fabric.
Conclusion

As we can see, there are many possible options cat places for habitation. At the same time, before making a house for a cat with your own hands, it is advisable to study each of them, figure out what materials you have available and settle on something most suitable. In addition, when choosing, you need to take into account the habits and habits of your cat, which will make his stay as comfortable and convenient as possible.

At the same time, try to avoid having sharp edges or corners in any part of the structure. In any case, everything is in your hands. Therefore, you should not limit yourself solely to the options presented, since there is great amount types of designs for cats, dogs and other pets. The main task here is the manifestation of imagination.
As examples, look at the photos of cat houses that you can make with your own hands:
Reading time ≈ 5 minutes
Cats love active games, jumping on shelves and climbing curtains. But after their games, the owner has to replant flowers from overturned pots, re-glue the wallpaper and collect broken glassware. Make a playground for your furry pet with a house in the form of a kind of “tree”, and there will be much fewer problems. We will tell you how to make a cat house with your own hands from simple materials.
Preparing for work
Prepare the following tools and materials:
- pieces of wood, plywood or fiberboard sheets;
- thick cardboard tubes or plastic plumbing pipes with a diameter of about 7 cm;
- 4 wooden sticks with a diameter of 3 cm;
- upholstery fabric and foam rubber. To create a playhouse for a cat, some old plush-type fabric will do;
- construction stapler with staples;
- twine and hemp rope;
- screwdriver, scissors, saw, jigsaw;
- sandpaper, drill, screwdriver.
To make your own cat house happy for your furry pet, carefully consider its design and size. Make the design sound and durable, as well as safe for the cat. You don't want your cat to get crushed by the house while playing.

Make a diagram and draw drawings of the future gaming complex. Without them, you will not calculate the amount of material. To do this, use different programs or a regular sheet of paper with a pen and pencil.
Woodworking
1. Working with basic parts. There are two main parts - a rectangle 55x40 cm and a square 30x30 cm. Use a jigsaw to cut out parts of these sizes from wood. Make three round holes in the rectangle - two on one side, and one on the opposite, with a diameter of 3 cm (see drawing). That is, the holes should be similar to the diameter of the wooden sticks that will hold the entire structure. Make holes up to about half the thickness of the wood, they should not go through. Look at the photos and videos in our article and you will understand how to make them. In the square, make one hole in the middle in the same way. Sand the parts with sandpaper.


2. Making the upper parts. These parts will be at the “top” of a kind of “tree” in the gaming complex. Cut a circle with a diameter of about 40 cm on a piece of wood. Make the same second circle. In the middle of each piece, cut a hole as indicated above - up to half the thickness of the wood.

3. Manufacturing of rods. The wooden sticks you have prepared will hold the entire structure. But they need to be cut to the appropriate length. The length of the shortest rod is 85 cm, the tallest stick is 173 cm, and the other two should be 120 cm each. Prepare wooden sticks of these sizes. Use a file or jigsaw. You will then place these parts into the holes of the main parts of the house.

4. Processing the middle parts of the house. The main pieces will be the top of the cat house, with other pieces of wood in between. They can be made in the form of rectangles or other shapes. You also need to make holes in them on the sides or on one side. It all depends on your house project.


Upholstery of house elements and preparation of pipes
The next stage in the work is a master class on upholstery of wooden elements: and preparation of cardboard pipes.
Start upholstering the round elements - the upper parts of the house. Cut a large piece of fabric to cover the entire side of the wooden disk. In addition, cut out a circle from foam rubber. Place the cut fabric face down on the table and place foam rubber in it, placing a wooden disk on top. Staple the fabric to the wood with a stapler. Do the same for the second circle.


All other wooden elements of the cat house also need to be upholstered with material and foam rubber placed in the middle.

Prepare cardboard or plastic pipes. The holes inside them should be larger than those of wooden bases. Place wooden sticks inside the cardboard tubes to make the structure more stable.


The next step is labor-intensive - wrap the pipes with hemp rope or twine. To do this, coat the pipe with glue and wrap it with rope. Leave the pipes to dry.


Making cat house elements
The size of the cat house may vary. But it consists of six parts:
- two sides;
- top part;
- rear end;
- front part with door.

Make the elements of the house from wood and cover the structure with material. Connect all elements with thin nails at the borders.


Instead of upholstery, you can paint the house by first treating the wood with a primer.


Make a ladder from pieces of wood for the cat to climb up. You can wrap the steps of the stairs with twine, and you will have a house-scratching post for a cat, because the animal will sharpen its claws on the stairs.


Connecting the elements of the gaming complex
Connect all the elements into a single structure. Insert the columns into the main parts. Attach the house itself and all other elements to the posts wrapped with twine using screws, self-tapping screws, and metal corners. Shelves adjacent to the walls can be attached with corners or on a console to the wall.


