Stories that mention a magic wand are known to many from early childhood, since it is an integral attribute of fairies, witches and other magical creatures. At the same time, a huge number of people strive to become the owner of such an item in real life, but whether this is possible is worth finding out.
What is a magic wand?
In the modern understanding, a magic wand is a small-sized product that is capable of accumulating magical energy and directing it in the desired direction. A magic wand is an object, the prototype of which is a staff, a wand and a scepter. They were integral attributes of magicians and priests, performing magical and sacred functions. With their help, healing was carried out, the weather was changed, evil spirits were expelled, and so on.
Does a magic wand exist?
To believe in the existence of magic or not is the decision of each person. You can find many stories of people who, believing in light and dark forces, create various magical objects, perform rituals and change their lives with their help. Psychics and magicians are sure that a magic wand exists, and if a person believes in magic, then he will certainly be able to make it with his own hands.
You should not count on the fact that with the help of a created magic item you can perform great miracles. With the wave of a magic wand, it will not be possible to turn a person into a toad or rid the world of all evil. To help other people, you need to constantly practice and develop your strengths. The wand can be used to change your life, for example, it will help you pass exams well, improve your health, attract love, develop your inner potential, and so on.

What does a magic wand look like?
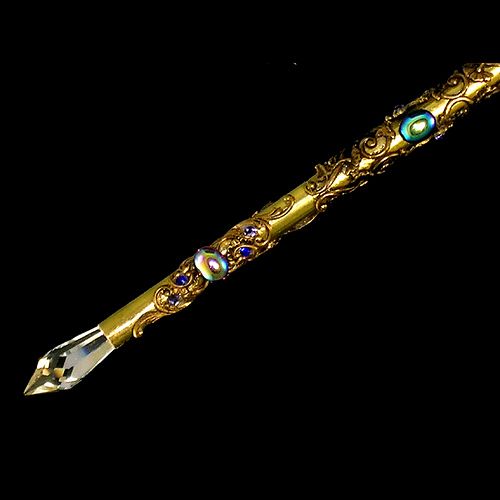
It is impossible to describe exactly what a magic wand should look like, since the product must be individual, and each person has the right to independently change and improve the appearance of this magical device. A real magic wand is a handmade product. You can put any design on it, but keep in mind that each image has its own energy. Many people decorate sticks with runic symbols, the main thing is that their energy matches their own feelings.
Types of magic wands
The main criterion by which magic wands can be distinguished is the material from which it is made. Craftsmen can make it from stone or metal, the main thing is that the material is natural. When figuring out what types of magic wands there are, we note that the most popular and affordable are those made from wood. Selecting a branch is necessary according to a number of rules:
- The chosen stick must be natural so that the vitality of the tree is preserved in it, so you should go to the forest or park in search. Please note that trees planted in the city and in polluted areas have weak energy. It is important not to use pine, spruce and aspen for a magic wand, since these trees take away energy.
- It is forbidden to break a branch, because this way it “dies” and loses all its strength. The tree must give it up on its own, so you need to look at your feet when making a choice. Before starting the search, it is recommended to turn to the forest and make a promise to use it only for the benefit of others.
- A magic wand must be an individual magical item, so it must be felt. To do this, first select a branch with your gaze, and then pick it up, close your eyes and feel its energy. A stick is suitable if the branch seems to have become an extension of the hand.
- Be sure to thank the tree by hugging it to give it some of your energy.

How to make a real magic wand?
Bring the selected branch home and put it in a secret place for a day. This is necessary so that it is saturated with energy. There are simple instructions on how to make a magic wand:
- The ritual of creating a magical attribute must take place completely alone. It is important that no one sees her until the moment of his dedication.
- Clear the branch of bark and sand it with sandpaper. During this, it is necessary to read the plot.
- Make a hole in the base of the stick using a nail, screw or screwdriver. Do everything carefully so that it does not crack. In order for a magic wand created with your own hands to work, you must use a magic core. This could be, for example, a feather that will fill it with the power of Wind, a crystal that gives the energy of the Earth, a coal - a symbol of Fire, or fish scales that personifies the power of Water. Choose an item based on your own element.
- After the item is placed in the stick, you need to close the hole. To do this, use a piece of wood or salt dough mixed with sacred water. It is important to seal the hole with the initial letter of the patron’s element (A – air, air; E – earth, earth; W – water, water; F – fire, fire).
- It is recommended to cover the finished stick with natural essential oil and wrap it in a scarf. Hide it in a secret place until the next full moon.

How to charge a magic wand?
During the period of the full moon, it is necessary to dedicate a magical object so that it begins to work. To do this, follow the instructions on how to revive a magic wand:
- Spread a white cloth on the table, light a candle and say the following words: “Become a guide, helper and guardian”.
- Extinguish the candle in water and bury it in the ground. After this, the magic wand can be used in magical rituals.
How to cast magic with a magic wand?
A ready-made magical attribute can be used in various rituals, since it only concentrates energy, increases it and directs it in the right direction. There are no special spells for a magic wand and it can be used in any magical rituals, for example, to cast a spell on water, for which you point a magic object at the liquid, to get rid of an illness, touch the problem area with the wand, and so on.
Our world is amazing in itself, but sometimes you want to bring a little more magic and enchantment into it! Few people know that you can make a real magic wand yourself!!! So how? Do you want to know how to make a magic wand, following all the magical rules and secrets, how to handle and store it? Follow our instructions exactly, and you will have a personal magic wand that will certainly lift your spirits, serve a wonderful purpose and help you feel like Harry Potter or an excellent student, Hermione.
A real magic wand must be exclusive and individual! Because she herself chooses her, so to speak, owner and copyright holder. She acts as a conductor of the energy of magic and miracle.
Selection of materials
There are few rules, but they exist. Mr. Ollivander confirms!
Firstly, the stick must be natural, i.e. made of wood. It should be chosen in the forest because city trees are weak when it comes to the vitality of the tree. Such trees have a broken connection with the elements.

You need to go to the forest or park to pick up a twig with a positive attitude and complete harmony in your soul. At this moment you should have a desire to merge with nature. Also time your trip and making a magic wand with the waxing phase of the Moon.
In addition, the tree itself must give you the twig. To do this, you must mentally sincerely make a request to the tree.

Then you should take a twig in your hand and feel exactly your wand. Close your eyes and listen to your feelings: has the twig become an extension of your hand...
Don't forget to thank the tree and give it some of your positive energy. This way the wand will maintain its connection with the forest and will generate its energy.

Since ancient times, it was believed that elderberries and nuts were endowed with magical qualities.
Cut the branch carefully and quickly with a sharp knife. The size of the stick should be equal to the length from your middle finger to your elbow. It is better to hide the selected twig from prying eyes and bring it home. In the house it should be saturated with your energy.
Manufacturing technology
Making a wand is a whole sacrament, so it should be hidden from prying eyes.
Clear the branch of your choice from bark and twigs. Sand gently to make your stick smooth. At the same time, you need to pronounce the magic words to yourself:
“I conjure you, O all-powerful branch (of oak, maple, etc.) with the forces of the four elements - Earth, Air, Water and Fire! Take in their strength and power. Be my faithful assistant!
Next, you need to make a hole at the base of the branch. It can be done using a screwdriver, screw, nail or drill. Do it especially carefully so that the stick does not crack. It is necessary to place a magic core in the hole made. But what kind of core it will be, you need to determine yourself.
If you want help AIR energy, then you can put it in a stick bird feather, but not a black crow or a rooster.
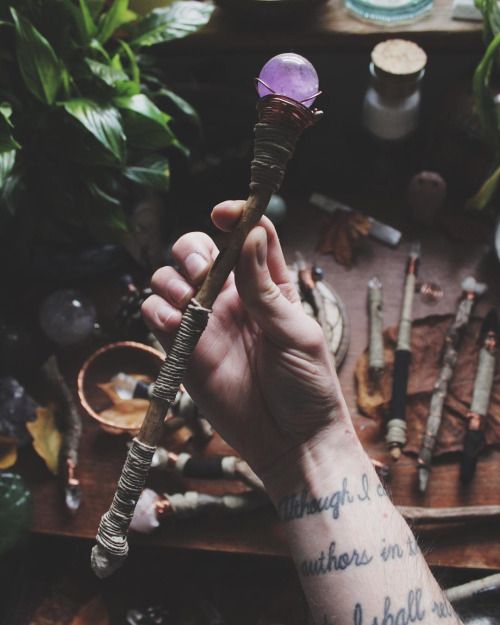
Crystal or pebble will give your wand EARTH energy. Perhaps you will choose a stone that has certain properties or suits your horoscope.
You can also use field herbs. For example, rosemary symbolizes long memory, sage wisdom, lavender devotion, laurel glory.
Attention! Under no circumstances should curry powder be used to create a stick.
Small ember will fill the stick energy of FIRE.
WATER the most complex element, it is unchanging in its variability, therefore it can be symbolized wire, spring washed ashore amber or small sealed flask with water from your chosen source.
After you have placed the core in the stick, you need to seal the hole in the stick. The stick must be sealed in consecrated water. On the seal, draw the initial letter of the selected element. Different schools of occultism have different spellings of the four great elements, choose the one that is closest to you.
Decoration
Some magicians coat the wand with varnish. This is not prohibited, but it is not encouraged either. It is better to cover it with natural, pleasantly smelling oil, wrap it in a scarf and leave it like that until the next full moon.

However, everything depends on the magician, so you can decorate the wand with beads, stones, or give it the desired shape using hot glue and paint it. This is more clearly presented in the master class igrateshka for beginner wizards:
You can also decorate the wand with feathers.

Wrap with magic twine and add a magic crystal.
Acorns, elements of marine fauna - all this can be useful in decorating your wand.

Copper wire will also help with this.

If you are skilled in art, then perhaps you can create a magical masterpiece.

Rite of passage
This is the final stage of creating a wand, one might say, bringing its magic to life. It is recommended to dedicate the wand on Beltane or Walpurgis Night (May 1) or Saiman (October 31). To do this, at midnight the magic wand is placed on a clean white cloth. Place a lit candle nearby.
At the same time, it is necessary to say the following words: “Become a guide, assistant and guardian!” Next, the candle must be extinguished in water and buried in the ground. The ritual must be done completely.

At the same time, the owner of a magic wand must remember:
By wishing and doing evil, the wizard will lose his power. This will happen suddenly and irrevocably!

Don't damage anyone with your wand. Better wish prosperity, health, prosperity and joy to your loved ones and friends!
Don't throw it anywhere and don't point it at anyone! These are important rules when using it!
Magic wand for a little fairy
Little fairies also need a real magic wand. There is no need to do it according to all the rules, because children have the power to change the world with the help of fantasies, so the wand should only help you feel like a fairy fairy!


Take a piece of ribbon or fabric and cut it into narrow strips. It will look more interesting if the stripes are of different colors. The more there are, the more magnificent the magic wand, or rather its top, will be. Gather the cut strips into a fluffy pompom. It can be complemented with beads and satin or silk ribbons. We wrap the stick itself with ribbon or paint it in the desired color. Let's assemble our wand by attaching our pompom to it! The wand is ready, even a child can make this!
Watch the master class TullnieShtuchki how to make a gorgeous magic wand:
In the same way you can make an astrologer's wand:

To accompany the stick you can make a small or, with or.

Lace is also relevant in a magical theme!

Beads, rhinestones and feathers will also come in handy.

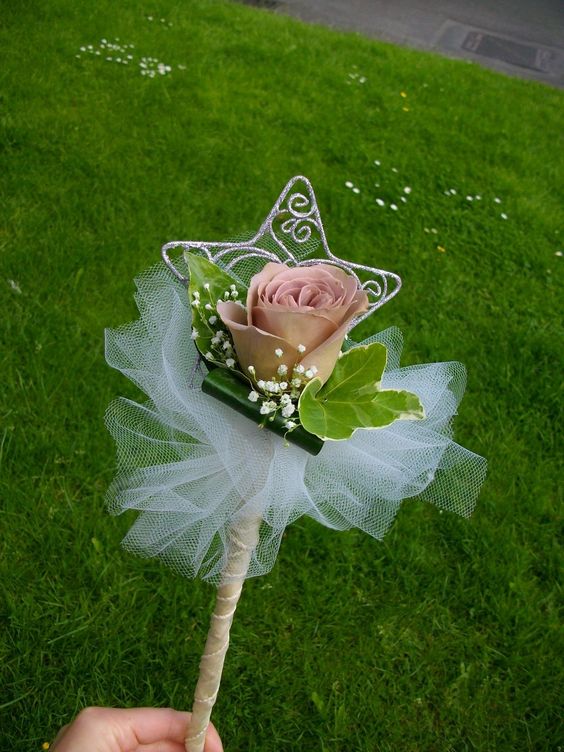
Don't forget that the wand may belong to the flower fairy.

Let's turn a simple pencil into a real magic wand!
This is the easiest way to make a stick from improvised materials at home. Firstly, there is no need to look for a twig on a tree. Secondly, it is easy and simple, and a pencil can be found in every home.
We take a pencil, it is better to choose one with a hardness index of “T” or “T2” and sharpen it, and then decorate the stick with a satin ribbon or other dense fabric.

You can combine ribbons of different colors. Carefully secure the ends of the ribbons with glue.


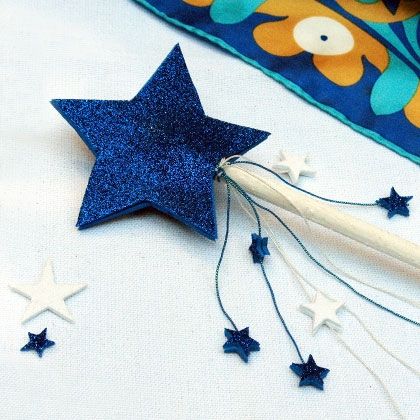
We cut out stars from felt or felt paper that match the color of our stick.

We attach all this to our stick.

The wand is ready, you can go cast some magic!

The simplest magic wand is made of paper
A magic wand can also be made from a simple sheet of A4 paper. In addition, you will need: PVA glue, glue gun, scissors, acrylic paints, brush and glitter.
We take an A4 landscape sheet, coat about 2/3 of it with PVA glue and begin to carefully roll it diagonally into a tube. In this case, the tube should acquire a cone-shaped shape, tapering towards the bottom. Let our future stick dry and cut off the excess edges with scissors.

We take a glue gun and fill the void of the stick from the wider edge. Instead of glue, you can fill it with cotton wool or paper, whichever is more convenient for you to work with.
After the glue has hardened, you can begin decorating the stick. To do this, use a glue gun to make monograms and intricate patterns on a stick. We wait until the pattern dries.
A magic wand is an invariable attribute of the heroes of fairy tales, loved since childhood. To make your children feel like real wizards and join the world of mysteries and miracles, you can make a magic wand at home, with your own hands, from almost any available material, for example, from paper, a branch or a stick.
How to make a real magic wand at home:
1. We are looking for a blank
Go for a walk with the whole family in the park or forest. To find what you need, you will have to leave the beaten path and step into the thicket. After all, this is where all the most wonderful things happen. Look around. It is important to choose a stick that you like for some reason. But attention! This should not be a live branch! After all, according to both human and magical laws, it is impossible to harm nature under any circumstances.
The found stick should be dry, not very long - about 30-40 cm, without knots.
It is better if it is some kind of “magic” tree that has proven itself in legends and traditions: elderberry, rowan, birch, hazelnut.
2. We say a spell:
Basically, you can say any words that you think will give the magic wand the power of miracles. We offer the following:
“Good spirits and magicians of the enchanted world! Give my wand magical powers. I promise that I will only use it for good.”
3. Let's start manufacturing
After your wand has passed the spell, you need to clean it of bark, dirt and dust.
You can sand a little to level the surface.
Then take paints, preferably acrylic ones, and decorate the wand as your soul and the magical spirits that help you tell you.
Instead of paints, you can use colored or wrapping paper, New Year's tinsel, and candy wrappers.
How to make a magic wand from a pencil
In principle, the procedure for creating a magic wand from a pencil will be no different from the procedure for creating a magic wand from a tree branch. The only difference is that you don’t have to sand the pencil.
4. Instructions for use
First rule– never doubt the power of the magic wand and your capabilities.
Do not think about whether it is appropriate or not to use it in any particular case. Just wave it and that’s it – and a miracle will definitely happen.
But before you swing, come up with a ritual for its action. Will it be one swing or three? What should you say or think at this moment? Will you have a special spell for different circumstances? All this must be carefully thought out for it to have an effect.
As you can see, nothing complicated. Of course, you can buy a magic wand in a store, but this is not at all the same as making it yourself, together with your children, turning the craft into a real adventure!
Video about what you can do with a magic wand!
A crystal ball, a book of spells, a charmed amulet and a magic wand are the main witchcraft props that any magician must have at his disposal. Young people who believe that nature has endowed them with the gift of divination often ask practicing psychics the question: where can they buy a magic wand from us? Many novice sorcerers sincerely believe that in London, in Diagon Alley, such wands are sold on every corner, but in Russia there is a certain problem with magical attributes, and therefore they cannot be found in stores. Naive boys and girls do not yet understand that shops selling real magic wands do not actually exist. Only the sorcerer himself can make an effective magical attribute, and the entire process of making such a powerful magical object takes exactly 90 days - that’s exactly how long it takes for a banal twig to gain strength and transform into an occult wand.
Tree Spirit
Before you get down to business, understand that a magic wand is not an automatic machine for fulfilling any whims and desires. A magic wand is something like a vessel, inside of which a tree spirit that is favorable to you should settle, and it will not be possible to drive this forest entity there by force or by cunning. You can only politely invite the spirit, and if he is capricious, you can try to persuade him, which may take quite a lot of time.
How to find the right tree
Before you make a magic wand, determine what type of tree is your protector and benefactor.
You can do this in one of three ways:
- think about which trees you like best;
- walk around the forest park, stand under the canopies of trees of different species, listen to your inner feelings and determine which plant you feel most comfortable near;
- study your horoscope and find out which tree is considered the patron saint of people born under your zodiac sign.

Having decided on the type of “your” tree, find a suitable specimen of this species and ask it for a branch. It is best to ask for it from a tree that “knows you well”, that is, grows in your yard or a neighboring public garden. The ideal time for such a ritual is the evening before the full moon.
The best option for further developments will be the moment when the tree responds to the request and itself drops a branch at your feet. But if such a miracle does not happen, it doesn’t matter. You just need to feel the wave of goodwill emanating from the crown of the plant.
Feeling such a silent agreement, select a shoot suitable for your purposes (a straight twig, elbow-length and no thicker than the index finger) and chop it off with one sharp, powerful blow of the knife.
Processing a twig and turning it into a magic wand
When you bring the branch home, tear off all the leaves and remove the bark. In order not to frighten the spirit of the tree, from now on you cannot touch the magic wand with iron, so you will have to clean and treat the twig with your nails, pumice and stone whetstone. Place a pristine, slightly sticky twig from tree sap on a moonlit windowsill overnight.

The next morning, polish the slightly dried twig with a piece of pumice.
Then, every evening, place the “semi-finished product” of the magic wand under your pillow. And when you wake up, the first thing you do is polish it with a whetstone or the same pumice stone. While sanding, talk mentally or out loud to the twig, tell it about your dreams and life problems.
As it dries, more and more bumps and bumps will appear on the twig, and you will peel and peel them off every morning. This entire cycle will continue until the stick becomes hard and smooth, like ivory.
When this finally happens, the magic wand can be rubbed with beeswax and decorated - wrapping its handle with a leather strap or scarlet cotton thread and attaching a charmed talisman or a tassel of eagle feathers to it.
Having acquired your own magical attribute, take care of it like the apple of your eye, never give it into the hands of strangers and try to keep it with you at all times.

For masquerade and carnival
In the event that you are not going to really bewitch and you just need a beautiful “magic” wand for a fairy or elf king’s carnival costume, making it will be much easier and faster.
To equip a little “witch” for a masquerade ball, there is no need to call a fairy godmother to help. A magic wand, so necessary for a carnival costume, can be built in a couple of hours from any available materials - for example, from colored felt and a long pencil.
So, for work you will need:
- glue gun;
- felt for crafts in three harmonizing colors;
- lurex ribbon;
- a bag of silver sequins;
- long pencil.

Operating procedure
- Draw three circles with a diameter of 7, 5 and 3 cm on cardboard and write five-pointed stars into them. Round the ends of the rays so that the stars look like curly gingerbread cookies.
- Cut out cardboard templates along the outlined contours and, using them as patterns, make two stars of each size out of felt. In total, you should end up with two sets of blanks, each of which includes: one smallest, light-colored star, one medium-sized star in a bright color, and one large one in a dark tone.
- Using a glue gun, attach the stars one on top of the other in descending order.
- In a spiral, tightly wrap the pencil with lurex tape, and secure the ends of the tape with drops of glue.
- Lubricate the underside of one felt piece with glue, attach the inside of the second piece to it and, until the glue sets, insert the sharpened tip of a pencil between the stars.
- Decorate the star with sequins and hand the finished wand to the little “witch”.
After the release of the Harry Potter films, the magic wand became an indispensable attribute of any masquerades or holidays for children, where, in theory, magic should be present. It’s not difficult to make such a wand with your own hands, you will spend at most two hours on a wonderful wand, and you can make a wand for a fairy or a cool wizard, for a little princess or like Potter himself - it all depends on your imagination.
For the magic wand you will need the following:
Two sheets of white A4 paper,
Sushi stick,
Plastic tube (wide),
PVA glue,
Acrylic paints,
Thermal gun,
Round large bead, narrow long bead.
Step-by-step master class on making a magic wand with your own hands:
1. Place a wooden stick and a tube on the paper to understand the angle of inclination.
2. We put the tube on the stick to the point of expansion.

3. Place the workpiece at the correct angle on the paper, and coat the part of the paper from the stick to the right with PVA glue.

4. We wrap the stick with paper without glue, lightly pushing the paper under the stick. Lubricate the corner of the paper with glue.

5. Fold the paper around the stick and let the stick sit until the glue dries.

6. Cut off the edges of the stick evenly, put balls from a regular napkin inside (this is to reduce the amount of hot-melt glue in the future).

7. From the second sheet, cut off 1/3 of the short side for the handle of the magic wand.

8. Glue this part to one end of the stick, slightly pushing out the edge of the strip (creating volume for the bead).

9. This is what the handle of a magic wand looks like without a bead.

10. Drop a large drop of hot glue into the hole in the handle, where the napkin ball has already been inserted.

11. Immediately place a bead on the glue (it can be of any color, but the diameter of the bead should be slightly larger than the diameter of the handle).

12. Along the edge of the bead we lay a thin “stream” of hot glue - this is the lower edge of the magic wand.

13. Along the edge of the stick handle (where the thickening of the paper ends) we make a circular outline with glue.

14. Then, along the very edge of the magic wand handle, we make a stroke again. We constantly twist the stick in our hands so that the glue does not flow to one side. Along the long end of the stick we make a patterned spiral with a very thin strip of glue.

15. At the thin end of the stick we strengthen a long bead in the same way.

16. When the glue is completely dry, we will paint the stick. We use acrylic paints for this.

17. For the handle of the wand we chose dark brown paint. You can paint with a regular soft brush for children's drawing. Let the painted end of the stick dry completely.

18. Paint the thin end of the stick with cream paint and let it dry too. The magic wand is ready. If desired, you can cover it with colorless varnish and make more decorations.


