Initially, Minecraft was a single-player game, but over time it became possible to play online, both with your friends and on public servers. And not so long ago, developers from Mojang added the ability to create your own game servers inside the game itself and it’s called The Realms. Now you don’t need to study the rules for installing and configuring the server and constantly maintaining it. True, this opportunity is not free. But today is not about that.
Now on the Internet there are enough open, public, free servers where everyone can play Minecraft over the network without having to configure and install anything for a long time. Next we will tell you in detail how to do this.
How to start playing Minecraft online
- Download and install Minecraft of any available latest one. We will show using an example that is relevant today.
- You can also (one of the popular ones) run Minecraft from under it.
- Launch the game.
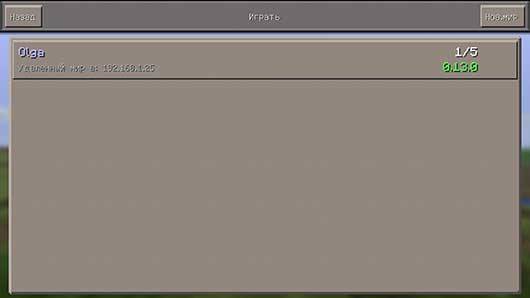
- In the menu click " Online game«.
- Click " Add«.

- In the fields enter “ Server name" and his " Address". Server addresses can be found on the Internet. For example, look here: minecraft-monitor.ru or here: minecraftmonitoring.ru. Just copy the server address and paste it into the game. In our example this is saints-game.ru:25565. The address might look like ip address:port(for example 46.174.48.33:25885) or name:port(as in our case). And so and so is correct, the main thing is to copy the address in full. The name of the server can be anything that is convenient and understandable for you. How to fill out the fields click " Ready«.

- You will see the added server on the screen (if everything was written correctly). All its parameters will also be indicated there: its real name, what game modes are supported and how many players are currently online. To log in to the server, click " Connect«.

- We wait a few seconds and voila we are on the server. Now you need to register. In the console (key "T") type /register password password, where “password” is just your created login password in English letters, you need to dial it twice in a row.
Probably everyone who plays Minecraft has at least once wanted to play an online game with a friend. The easiest way to play was through a phone, since you only needed to distribute Wi-Fi, and the other player would connect to it. But if someone wanted to play Minecraft via a computer over a network, then they probably encountered difficulties.
How to play Minecraft with a friend online?
There are several ways to play:
- Play on one server;
- Play in your world by downloading Hamachi;
- Play with friends over Wi-Fi on your phone.
These methods work for any version of Minecraft, so don't worry if you have an older or a new version.
Method one: playing over IP
For Online Games, just agree with a friend or friends on which server you will play. Next, enter the server’s IP address, log in and you can safely play online all together.
Method two: playing through Hamachi
Download the Hamachi program to your computer, it is available for free. After that, launch and register.
After registration, you will see the following window:


After you have created a network, launch Minecraft, then create new world or select an existing one. After you have logged into the server, open it for the network (to do this, pause the game and click on “Open for the network”). The port will be written in the chat local network.

You won't have to do anything else. Your friend must first connect to your network in Hamachi by writing a name and password. Then copy your IP address and paste it into the address bar. Then, without a space, put a colon and the local network port (these are the numbers that were shown for you). It should be approximately the same as in the screenshot.


Technical understanding of VPN technology and its implementation on a personal computer is not always a simple task for the average user. Difficulties and nuances await him at every stage of creating a network: choosing software or equipment, VPN protocol, settings, etc. It all comes down to “shovelling” thick abstruse books for system administrators, viewing an incredible number of special forums, websites, and video reviews. After all, you need to find the right solution for your specific goals.
But is there more simple ways creating a secure virtual network and connecting to a VPN server? Fortunately, yes. They do not “launch” the network with one click of the mouse, with one keystroke - but they still make life much easier for those who want to organize/use virtual tunneling. A minimum of settings, skills and time spent... to carry out a user task.
Setting up Hamachi: creating a server using Hamachi using the example of the game Minecraft.
Every gamer knows what a game server is, and not every gamer knows how to technically implement and configure it correctly. But this “ignorance” does not subside the gaming fraternity’s passion for multiplayer mode in their favorite games. I would like to “create my own grid” in Minecraft, and in Heroes of Might & Magic (yes, at least in any part!), WarCraft 3, etc.
A game server is not for everyone (given the fact that it needs to be protected from hacker attacks), both in terms of skills and finances, but through Hamachi, dreams do come true - multiplayer on your own network.
So, to set up the Hamachi program do the following:
- Disable the Windows system firewall (this must be done so that it does not block work through Hamachi):
- open the “Start” menu (click on the “Windows” icon);
- in the “Find...” line, enter “firewall” (without quotes);
- at the top of the menu bar (in the same window), in the “Control Panel” block, click “Windows Firewall”;
- in the left column with options, select “disable/enable firewall”;
- in the “Configure settings” block, in all “Settings...” sections, click the radio button opposite the “Disable firewall...” function;
- Click "OK", restart your PC.

- Download Hamachi from the official website or other trusted web resources. Install it on your computer (follow the installer's instructions).
- Run the program:
- Double-click the Hamachi shortcut on your desktop (or launch from the Start menu);
- connect it to the network (click the “Enable” icon, it is located next to the inscription “no network”);
- in the “Register...” window, enter the client’s name (arbitrarily - whatever you like; you can always change it in the settings);
- click “Create”;
- wait until Hamachi selects the IP address (a message “probing...” will appear); at the end of the procedure, the IP and client name will appear instead of 0.0.0.0.
- Perform additional network connection settings:
- in the Hamachi menu, open the “System” section (first item) and select “Options”;
- in the new window, click the “Options” icon;
- on the panel, click “Advanced settings”;
- in the “Connect to server” settings section, set the “Use proxy server” option to “No” (by clicking on the corresponding radio button at the bottom of the list);
- in the “Connection with peer...” section, click on “Local UDP address”, in the second field located at the bottom of the list, next to the buttons, enter the value - 1337; click “Install”;
- in the adjacent “Local TCP address” option, enter 7777 in the same way;
- Click “OK” for the settings to take effect;
- Minimize the program window (do not close it!): click the “-” icon at the top of the window.
- Set up Hamachi local network in OS:
- right-click on the network connection icon located in the tray (PC display image);
- Select “Network and Sharing Center...” in the context menu;
- in the settings window, in the left vertical menu, click “Change adapter settings”;
- find the “Hamachi” connection shortcut and open it with the right mouse button;
- in the list of options, select “Properties”;
- on the “Network” tab (properties window), click on the “Internet protocol version 4...” option and click “Properties”;
- turn on the radio button “Use the following IP...”;
- activate the Hamachi window and rewrite/remember the IP address displayed on its panel;
- go to the connection properties again and enter it in the “IP address” column;
- click on the “Subnet Mask” field (the value will appear automatically - 255.0.0.0);
- activate the “Advanced” button;
- in the “Interface metric:” option, set the value to 10, confirm the change with the “OK” button;
- close the settings windows.
- Set the connection order:
- open the “Network Connections” window again through the connections icon in the tray;
- press "Alt";
- An additional menu will appear at the top of the window; in its “Advanced” section, select “Advanced options”;
- in the “Connections:” block, left-click once on “Hamachi”;
- click on the “up arrow” button so that the program connection is first in the list;
- Click OK.
- Create your virtual network:
- go to the Hamachi window;
- run the command “Create a new network...”;
- in the “Network creation” settings, specify the network identifier (name);
- enter the password 2 times (in the “Password” and “Confirmation” fields), create a strong password - at least 8-10 characters (letters and numbers);
- click “Create” (the name of the network + the number of people connected to it will appear in the program panel);
- tell other network participants (or gamers in the context of the task) the network ID and password to enter (connect) to the VPN network.

- Set up online multiplayer in the game (using the example of Minecraft):
- copy the IP address from the Hamachi interface panel (the address of your node in the created virtual network);
- launch Minecraft, click on the “Network Game” menu;
- paste the copied address into the “IP server” field + the connection port separated by a colon;
- click "Connect";
Now the multiplayer is set up and you can play with friends and comrades, invite like-minded people for joint virtual battles.

Examples of setting up other games supported by the Hamachi VPN network can be found on the page of the Russian-language portal hamachiinfo.ru/podderzhivaemye-igry.html
Using only a local network, without being able to connect to the Internet, in this news we will look at several options on how to do this. The first option will be simpler, but will require an active connection to Wi-Fi router, and most importantly, the router may not be directly connected to the Internet; in our case, it will simply work as a means of transferring data from one phone to another, or to a friend who plays on a tablet. These methods are completely free.
The second method will be a little more complicated, but does not require you to have a Wi-Fi router; the connection between devices will occur through the created mobile point, which can be any Android phone.
Wi-Fi Router. Method number 1
As you understand from the text above, we will need a Wi-Fi router, thanks to which you will transfer information between devices. Just connect all devices to one Wi-Fi, then from any of the devices, preferably the most powerful one available, enter the game.After that, click on the "Play" button and go to the game world creation menu. Choose the settings based on your needs, if you just want to have fun, then choose the creative mode, if you want teamwork, definitely choose the survival mode.


After you create a game world, ask your other friends to go into the game and go to the game world selection menu, where after a few seconds they can see the local server you created and start playing Minecraft PE over the local network.

As you can see, this method of playing over a local network in Minecraft PE is very simple and only requires a Wi-Fi router, even if there is no Internet cable connected to it, you can still play. This method is perfect if you are in a place where there is no Internet, but there is electricity.
The phone is like a Wi-Fi router. Method number 2
This method is somewhat different from the previous one in that you will not need a Wi-Fi router, since one of your Android devices will be configured to transmit mobile data and essentially become a router itself.First, we need to go to the settings of the Androdi-based phone and find the “Modem and access point” menu item there; on different versions of Android OS, it may be called slightly differently.

After that, click on it and you will be taken to a menu where you will see the item "Mobile hotspot"

Click on this inscription and a description will open in front of us this method creating a Wi-Fi router to which up to 10 other devices can subsequently connect.

After that, find the “Settings” button on the screen; in my case, it is located in the upper right corner of the screen, you can have it anywhere, even at the very bottom.

Going to the mobile hotspot settings, you will be asked to select the name of the hotspot, I called it “Minecraft PE” to make it easier to find later. After entering the name, you must enter a password, which must be at least 8 characters, after entering these parameters, click "Save".


Next, turn on the access point using the horizontal slider, after which a warning will appear on the screen that the Wi-Fi module of your device will switch to router mode and will not be able to connect to other routers, click “Ok”.

After this, you can safely enter the game and create a game world in Minecraft PE. After the creation of the world, you need to connect other devices to the access point you created, this is done in the same way as the process you use to connect to a regular Wi-Fi router. In the list of available networks, select the one you created and enter the password.


After which, all players can safely launch the Minecraft PE game and enjoy the game over a local network, where only your friends will be and where no one can interfere with your joint gameplay.


As you can see, this method of playing on a local network in Pocket Edition somewhat more complicated than the previous one, but allows you to play anywhere, be it a street, a school classroom or a deep forest.

The only limitation that such a game imposes is that the same version of the game must be installed on all devices (phones, tablets), since if you create a game in version 0.13.1 people with earlier ones (0.13.0 or 0.12.3) or later (0.14.1 or 0.14.0) versions will not be able to connect to you, keep this in mind!
Play via Bluetooth. Method number 3
This method will talk about playing over a local network without using Wi-Fi at all. This method has several advantages over others, but at the same time it has significant disadvantages, but let's talk about everything in order. In this method you will learn how to play Minecraft PE via Bluetooth. To do this, you will need to create a Bluetooth modem from your device so that other devices can connect to it.The first thing to start with is to turn on Bluetooth and make it visible to other devices; to do this, check the box next to the name of your device; this menu appears automatically after turning on Bluetooth. After you check the box, a timer will start counting down, which shows how long your device will still be visible to everyone else.


Then go to the settings and find the “Modem and access point” menu item, go into it, you can see an example of this item in the screenshot below, but your name may be slightly different or located in a different location.

After going to the “Modem and access point” menu, find the “Bluetooth modem” item and turn it on, this is required so that several phones or tablets can connect to your device at once via a Bluetooth network.

Now you need to go into the Minecraft PE game and simply create a world, after which everyone else can safely turn on Bluetooth on their devices, find your device in the list and calmly connect to you.


Now let's talk about the disadvantages of this method, firstly, it imposes a restriction on playing on different versions of the game, all players must have the same version of the game. Another important disadvantage of this method is that the bandwidth of the Bluetooth channel is much lower than that of Wi-Fi, so the more players connect to you, the more glitchy the game will be. I would also like to note that when using this method, you must be at a fairly close distance with other players, since the signal strength compared to Wi-Fi is much lower and the closer the devices are, the more stable the gameplay will be.
Pros this method is lower power consumption, high mobility thanks to which you can play anywhere and of course ease of use.
When you just start playing Minecraft, you hardly even think about the fact that there is a multiplayer mode. You simply don’t need it, since you obviously have enough for for a long time single player - the game is so fun, varied and exciting that it will take many days before you get tired of playing alone. However, in most cases this day does come - what to do in this case? Then gamers think about whether there is multiplayer in this project. And the answer to this question is yes. Yes, you can play with other fans. And you can do this even if you don’t have the Internet. In this article you will learn how to play Minecraft over a local network, because many gamers' Internet connection may not be fast or stable enough to support a full-fledged game on the server. But the local network is always stable and operates at the highest speeds.
Types of multiplayer
Before you figure out how to play Minecraft over a local network, you need to understand what modes there are. You may not like any of this, and you will abandon this idea. Although this is unlikely, because for the most part the modes repeat the single player. There are four of them in total, and one of the most common is the creative mode. Here you get an unlimited supply of materials and create real works of art from various blocks.
Another extremely popular mode is survival, it is standard. Here you find yourself in the middle of a randomly generated world without any equipment or resources at all, and you need to get the necessary items, materials from scratch, build a house and prepare to survive in harsh conditions. Hardcore mode is very similar to survival, but with a significantly increased difficulty level. Well, the adventure mode is a thematic game in which you may even be given certain tasks, unlike other modes. Which option to choose is up to you. Now it’s time to find out how to play Minecraft over a local network.
World creation

First of all, you need to determine what will serve as the host. This is very important point, since all server information, all data will be stored on the host computer, and it will also be the one with the most load. Therefore, the role of the host should be played by the gamer who has the most powerful computer. Considering the fact that you will play over a local network, therefore, you will all have the same connection speed, the computer configuration plays a key role here. However, this is only the first step that you have to take to figure out how to play Minecraft over a local network.
When the host is determined, the task of creating a new world in which the game will take place is entrusted to his shoulders. Some gamers are already at this stage interested in whether everyone will be able to get this opportunity and how to play Minecraft online. Absolutely anyone who has at least some connection to other players can play via the Internet and local network. Only the creation and connection processes are slightly different in the case of global and local networks.
Opening the world and setting up the server

If you are trying to figure out how to play over a local network in Minecraft, then this point will be the most important for you. As soon as you create a new world, you need to go to the menu and select Open to LAN, which means “Open for a local network”. This way your server will become accessible to those who are connected to the same local network as you. After this, you will need to make game settings, enter console commands, and most importantly, select a specific mode that you agree with other players. When you're done with this, the server will be ready to receive guests. If you are asked how you manage to play with friends with poor or no internet, you can safely answer: “And we play Minecraft with a friend online.” If this person also belongs to your local network, you can invite him to your company.
Connect to the server

So, you have a game world that is open to joining from local network addresses. But how to make a connection, because so far only the administrator lives on the server? In older versions of the game, the host needs to copy the server address that will appear after the world is opened, and then send it to those who will participate in the game. When they enter the game, they insert this address into the required field and connect. However, in new versions the process has been significantly simplified - when a player logs into Minecraft and wants to play on a local network, he is immediately offered a list of servers available on its expanses.
Connection features
There is one unpleasant fact that, unfortunately, cannot be corrected. If you don't have an Internet connection, you won't be able to use automatic server discovery, even if you have a new version of Minecraft. You will have to enter the server address manually.


