 Your pet’s own house is a comfortable, secluded space where he can hide from annoying attention, relax and gain strength for new adventures. Anyone can make a house for a cat with their own hands - the main thing is to be inspired, choose the right tools, buy materials and decide on the format.
 Before you get started, it's worth exploring the benefits of a homemade cat house that's tailored to your pet's individual needs. The main advantage is the ability to design a house that best suits the pet’s build and lifestyle. The store often presents standard models, which may not be suitable in size for a large pet, or create another problem - taking up a lot of usable space in the room. When making a house for a cat with his own hands, the owner can choose optimal size
products and independently create suitable patterns and blanks. 
- Pet owners who know how to make a cat house with their own hands receive a number of other benefits:
- cost savings;
- the opportunity to realize your creative potential;
- creating a unique and original house design;
the ability to use scrap materials in the work.
 House format
It is advisable to decide on the format of the future house before starting work. This could be a soft cat house made from foam rubber. Also popular are houses made of cardboard, wood, wicker and other materials, made in the format of beds, tents, birdhouses, hammocks, play complexes, etc. The choice of the format of the house determines not only its cost, but also the selection of certain materials, labor intensity and duration of work .
The owner may be interested in a soft house for a cat with his own hands; patterns for making it can be made based on templates downloaded from the Internet. In the process of creating a house, you will need skills in using a sewing machine and cutting tools. Also, the work will require pre-prepared Consumables- soft fabric (tapestry, fleece, velor, velvet), threads, foam rubber and polystyrene.
The sequence of work can be schematically represented by the following list:

Using this scheme, you can make a soft house of any shape, the main thing is to choose durable, non-staining fabric and soft, high-quality foam rubber. Anyone with experience in sewing and a few hours of free time can make a soft house for a cat with their own hands.
T-shirt house
Those who love original ideas can make a cat house with their own hands from a T-shirt that is unnecessarily collecting dust in the closet. To make the house neat and tidy, you need to use a clean T-shirt from thick fabric. The presence of original prints and bright designs on a T-shirt is welcome, as it allows you to achieve a more impressive appearance of the product. The process of creating a house is not complicated - the owner will need a couple of hours of time and a minimal set of tools.
 The following materials will be required for the blanks:
- cardboard (to create the bottom);
- wire (used to create a frame);
- scotch;
- pins;
- Bright T-shirt made of high quality fabric.
Further work is carried out according to the following scheme:
- The bottom is cut out of cardboard (its dimensions are selected individually).
- The frame is assembled from wire. A T-shirt is put on a blank made of frame and cardboard, secured with tape.
- The neck of the T-shirt serves as the entrance to the house, so it needs to be placed on one of the walls of the future house.
- The remaining fabric is collected at the bottom and pinned together. At this point, the construction of the house is considered complete.
As you can see, every owner who cares about the pet’s personal space can make a homemade house for a cat from a T-shirt. Among the advantages of such a house are the following factors:

If the owner has access to the Internet, he can learn how to make a house for a cat from a T-shirt by watching master classes with photographs and video instructions. With the help of master classes, making a house for a cat with your own hands from a T-shirt is even easier. It can be made in the form of a tent, rectangular box, booth, etc.
Cat house made using basket weaving technique
People who are familiar with the basics of basket weaving can please their pets with original wicker houses.
 Such products have a number of advantages - a light weight, natural ventilation, environmental friendliness, simplicity of technology and low cost. Of course, it will take quite a lot of time to make a full-fledged house, however final result work justifies the high labor intensity.
Having the skills of weaving, you can make a house for a cat from newspaper tubes, vines and other pliable and bendable raw materials. Before you start weaving, you should decide on the size and shape of the house in order to properly make the frame and prepare the required amount of consumables.
Cardboard house
There are quite a lot of interesting master classes on the Internet. Among them you can find lessons that tell you in detail and in an accessible way how to make a house out of cardboard for a cat. Such a house will have an original appearance and an affordable cost. In the process of work, ordinary packaging cardboard or ready-made cardboard blanks available in stock can be used. You can also use old boxes household appliances or interior items.
Advantages of cardboard houses:

Design disadvantages:

House with play area
Making a playhouse for a cat with your own hands from foam rubber, plywood, pipes and materials is not easy. However, the complexity of the work is justified by the production of a luxurious house in which the pet can not only relax, but also give vent to its physical energy - climb slides, sharpen its claws and play with toys. The owner will be able to learn how to make a house with a play area for a cat after reading the information provided in this section.
During the work you will need the following set of materials:

The craftsman will need a jigsaw, nails, scissors, pins, nails, hammer, etc. as tools.

Using this simple scheme, you can build an interesting playhouse for a cat with a scratching post with your own hands, in which your pet will happily spend his leisure time. When making a playhouse, the pet owner can show creative potential and realize the most interesting and unusual ideas.
Original cat houses
While searching on the Internet for information on how to make a cat house yourself, a user may come across interesting ideas. For example, you can see a master class where the authors suggest making a fruit house for a cat; patterns for such a house can be drawn up yourself or downloaded from the website. It is enough to have skills in handling a sewing machine and tools for cutting fabric, and then it is not at all difficult to make such an extraordinary house for a cat, and the cats never remain indifferent and are happy to explore their new corner.
After making the house, the owner will be able to proudly place the product in the living room - after all, his appearance will highlight the original taste and creative abilities of the pet owner.
Among other original ideas that crafters should adopt, we can highlight the following options for cat houses:

We won’t go into deep thought, but let’s just say one thing: your beloved cat definitely needs its own small home. If you do not provide the four-legged dog with its own home, then it will do it for you, arranging a place to sleep and rest in the closet, under the sofa, in the washing machine, and even in any convenient corner. We will tell you how to make a cat house with your own hands in this article.
No artificial materials!
Cats, like people, are very sensitive to various materials. And it is especially unpleasant for them if the material produces a sharp, bad smell, because they have a heightened sense of smell. That is why give preference only natural materials: replace plastic with wood, read the composition of pillows, and buy all fabrics only from natural composition like cotton. Synthetics can not only smell unpleasant, but also have poor air permeability and often become electrified, which will be very, very unpleasant for a cat with thick hair. So arm yourself with the most natural ingredients possible to create a home.
Glue? Only classic PVA or any other water-based one!
The glue used should not emit a terrible unpleasant odor after drying, and preference should be given to glue that is as safe as possible for the animal, i.e. PVA and its analogues. The fact is that the cat may try to chew the glued element, which is why the glue can get inside with saliva. Pay attention to this.
When making a house, use PVA glue
Don't skimp on sizes!
Of course, there is no need to overdo it either, but houses for cats should be designed so that the pet can sleep both curled up and stretched out along its entire length. And, of course, when designing a house, take into account the size of your individual.
We secure the home to the floor
Don't want to spoil expensive laminate or parquet? Think of some other mounting option, for example, to the wall. The cat will run into its little house and jump on it, so the structure must be more or less firmly fixed. And when designing, be sure to take into account the weight of the animal: the larger it is, the stronger the base should be.
fasten new house pet
Option No. 1 - from a regular T-shirt
For this simple masterpiece we will need a square piece of thick cardboard or plywood, two pieces of wire about 5-7 mm thick, as well as a pillow, a T-shirt and something for fixing.
House from cardboard box
You can also take a low stepladder (about a meter high), wrap the vertical beams with twine, and lay sheets of plywood between the steps, having previously covered them with some soft material. And on the leaves that will lie on the lower steps, you can make a full-fledged house. So you get three in one: and cat house with your own hands, and a scratching post, and shelves on which the pet can lie down and enjoy peace.
Many needlewomen and needlewomen are familiar with this technique. Its essence is simple: you take sheets of paper (newspapers), an object whose shape you want to repeat (for example, sculpt a large fish from plasticine), and then gradually cover the object with paper using PVA glue. As a result, you will get a durable multi-layer structure of the desired shape.
How to make a cat house using this technique? Very simple! We take a fairly large bag that needs to be filled with towels and rags (don’t take big ones, let there be a lot, just small ones). Next, give the bag the desired shape (for example, a large stone) and start covering it with newspapers. We advise you to do this: soak the first layer with a little newspaper and just cover the bag without applying glue. And then immediately glue the second layer onto the wet newspapers. And each subsequent layer, just coat the newspapers with PVA glue and glue, glue.
When all this is dry, cut a hole for the cat on one side with a knife. Under the newspaper, of course, you will find that same bag, cut it and take out all the rags from inside one by one. Finally, take out the bag itself, you can get it out without any problems, because the first layer was not glued with water, not glue. Next, let the cat’s future home dry a little, then cover the space inside with several more layers.
House made of papier-mâché. All that remains is to decorate
Our frame is completely ready, now you can decorate it, make a stand if you wish, and put a pillow inside. We advise you to make an imitation of stone, in combination with the papier-mâché technique it will look very beautiful, it will create the feeling that you have carved a house for your pet in stone.
We take regular corrugated cardboard and cut out rings from it. Then the rings are glued one to one, after which we get a shell house, like a snail. You can find photographs of similar structures to better see what it all looks like. To work, you only need glue and cardboard itself, and the result is very original and interesting.
Corrugated cardboard house
Option No. 5 – triangle made of plywood and carpet
It is extremely easy to make such a house for a cat with your own hands; you only need a corner profile, self-tapping screws, carpet and plywood. Take three rectangles of plywood, make them into a triangle shape, fasten them with a profile and screws, and then make a back wall of plywood in the shape of a triangle.
After this, cover the resulting structure with carpet - and you’re done, you can hand over the work to your pet and let him evaluate it.
Cat house-toilet
Well, then modify it to your taste. You can attach a scoop inside to the wall, you can screw wheels on the bottom, cover this entire structure with colored fabric, make a soft seat, so that you end up with something like a pouf or banquette. In general, there are a lot of ideas here. By the way, the same closed tray can be assembled from an old cabinet with an opening door. Just cut a hole in the door with a jigsaw, place the tray inside - and you're done!
Do-it-yourself cat houses with a scratching post - also necessary thing, because Over time, many felines begin to tear at everything that falls under their claws. Making scratching posts with your own hands is very easy: take a wooden or plastic pole, which is simply wrapped tightly with twine or other thick rope. Just don’t secure the coils with nails!
How to combine a scratching post with a home? Yes, in absolutely any combination! We take a sheet of plywood, install the house itself on it, next to it is a post with a scratching post, and nail a soft bed onto the post. That's it, the simplest design is ready! You can simply attach the sharpener to the dwelling itself, build a complex multi-level structure, place the scratching post under the dwelling, above it - as your heart desires!
House for a cat with a scratching post
If you have a lot of time and energy, and you adore your pet, you can build a huge complex! Here you can provide stairs, hanging structures under the ceiling, soft pipes that go around the sofa, and houses in the walls. Set up multi-tiered cottages, decorate it all with artificial or live plants and much, much more. There are a lot of ideas on the Internet, both how to make a cat house with your own hands, and how to build huge complexes in which you can even get lost! And the most interesting thing is that there are no restrictions: you can take on work of the most impressive scale.
DIY cat complex
The choice is yours!
As you can see, it is not difficult to build a home for a cat, and it can be made from a variety of materials.
We showed you cat houses, and also gave you ten options on how to equip a cat’s home on your own. We tried to tell you how to do it beautiful house with your own hands, starting from the very simple options, and ending with complex cottages for the real cat elite!
We hope that you liked it and that you have found a solution for yourself that will allow you to turn all your ideas into reality. Modify our proposed solutions as you please, creating non-standard and creative cottages for your pets.
Living in the same territory as humans, cats still remain independent animals. Therefore, a house made of a cardboard box, which the owner can make with his own hands, is suitable for them.
Why do cats need a cardboard house?
The cats' interest in cardboard boxes attracted the attention of not only their owners, but also scientists. There have been debates and theories about this phenomenon for a long time.
The most realistic ones include:

 A caring owner can make a paper bow on a string and throw it to the pet so that it can jump onto it from its shelter.
Required materials and tools
When planning to make a house for your pet with your own hands, you need to stock up necessary materials and tools.
Advice!
The main thing to remember is that all devices must be highest quality, no pungent odor and pleasant to the touch.
At the slightest discomfort, the pet will simply refuse to use the prepared house.

To make a comfortable place for a cat you will need:
- Cardboard. Both plain and corrugated sheets, as well as ready-made boxes and crates, are suitable here.
- Sharp cutting objects (knife and scissors).
- Stationery (ruler and pencil).
- Glue. Special attention care should be taken in selecting this particular ingredient. It should not have a pungent odor, since the four-legged pet has a very acute sense of smell.
It is important to check the packaging for confirmation of environmental safety.
- Upholstery. When choosing a material, you need to concentrate on density and softness.
- Internal lining. It must have water-repellent properties.
- Wide tape.

Step-by-step instructions for making a cat house
Before you start building a house, you should carefully observe the habits of your pet. It is important to evaluate how he likes to relax, spend his leisure time (playing, sleeping or watching), whether he has a love of scratching furniture and how developed the hunting instinct is.
You should know!
It is better for the owners of an active animal to equip a whole complex of cardboard, supplementing it with posts and covering it with material for scratching claws.
Hunters will benefit from a structure with additional openings that will allow them to observe the area from different positions.
Simple house out of a box
The animal should be comfortable in its house, so choose a box of the appropriate size. The ideal option would be an object in which the cat can stretch out to its full height. When the choice is made, begin marking the inlet hole.

A plate that is placed on the cardboard and traced will help with this. Then carefully cut off the excess cardboard using a knife and get a round entrance of a suitable size. Next task is the arrangement of the roof of the cat house.

To do this, the cardboard is cut not only from the entrance side, but also from the opposite side. This is necessary to ensure ventilation inside the box.

After this, the sides are connected by the edges and fastened with glue (stapler). All that remains is to place the warm bedding inside and the house is ready for use.
Two-story cardboard houses
If he lives in the house active pet, then a one-story house will not be enough for him. Therefore, you can create a structure of two floors or a whole complex. For such manipulations you will need hot glue, as well as templates for window and door openings.
Advice!
Initially, you should prepare boxes of the required size for the first and second floors. Then attach the templates to them, trace them with a pencil and carefully cut out the openings with a stationery knife.
Cut off the top 2 flaps of the first box, and the bottom flaps of the second box. Separately in each box, glue the sides together. On the smallest one, draw a triangle and glue it from below to the other two doors.

Visually it should resemble a roof. All that remains is to glue the two boxes together, wait until the structure dries, cover it with warm material and send your pet inside.
T-shirt tent
To create this shelter format, you need to prepare a T-shirt ( big size), wire hangers, cardboard (hard), duct tape, wire cutters, awl and sewing supplies.

Using wire cutters, pinch off the hooks from the hangers, and then straighten the remaining pieces of wire, which will serve as the tent's arcs. In a large piece of cardboard, the width of which corresponds to the length of the arcs, holes are made (in the corners).

The prepared arcs are fastened crosswise with tape and inserted into holes made in the cardboard. The edges need to be folded so that they do not jump out, and secured with tape for security.

The prepared T-shirt is pulled onto the frame so that the hole for the head is on the side. This will serve as the entrance to the future house. To prevent the T-shirt from coming off, it is carefully sewn from the bottom.
Cat bed
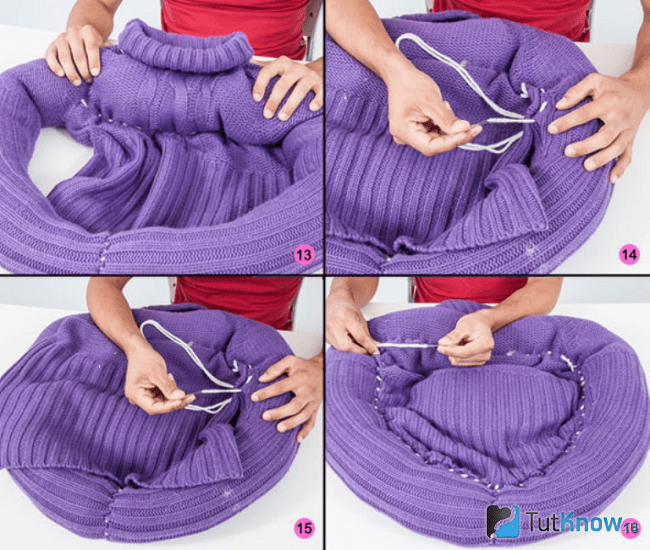
Before starting work, you need to stock up on an old sweater, padding polyester, holofiber (foam rubber) and sewing supplies.

The neck of the selected sweater is cut off and the hole is sewn up from one shoulder to the other.

The sleeves are filled with insulation, visually they will resemble a sausage, and sewn together.
 Next, the sweater is covered with a piece of foam rubber, which will act as a warm and flat bottom.

After that, the lower edges are tightly sewn up and then attached to the base of the sleeve, so that a closed circle is formed.

From cardboard circles
When making this cat device, you cannot do without a compass. The number of disks and their volume directly depends on the size of the disk itself. pet. On average, you will need about 40 rings, which are divided into groups according to diameter. Each should contain 5 pieces.

Circles are drawn on cardboard sheets, which are 18-22 cm in diameter. Every subsequent 5 pcs. increase in size by 0.5 cm.
Important!
The main thing is to carefully cut out all the details of the future house so as not to spoil its external aesthetics.
The largest circle serves as the base, and the rest are folded onto it. First, the structure is only half assembled, after which the entrance is marked and cut out.

Only after all the preparations can you start gluing. When the structure is completely dry, a pillow or soft bedding is placed in it.
Design with scratching post
To make the house multifunctional, you can equip it with a place for grinding claws. To do this, create a one-story or two-story cardboard frame, according to the instructions given above. Then it is covered with carpet, which perfectly copes with the task assigned to it.

To begin with, the side surfaces and top are tightened with one cut, which is selected in accordance with the size of the box. For the front wall on which the entrance is located, a separate solid piece is cut out.

To ensure that the finish adheres tightly to the surface, it is attached using a stapler or hot glue gun. It is better to use the second method to improve the aesthetic qualities of the house and protect the animal from injury from iron staples.

When the skin is completely glued, it is given time to dry. Then they cut a hole for the entrance, leaving a few centimeters to bend the edges of the carpet inward. The finished product is left for several days to dry completely.
Ideas for decorating a cat house
To ensure that the cat’s cardboard shelter does not stand out from the interior, you can decorate it with wallpaper or stickers, and also attach various inscriptions.

Fabric upholstery is also suitable, which will add special elegance to the house. An oriental theme is suitable for a Persian cat, so a house in the form of a tent will emphasize its luxurious features.
Cardboard house Your furry pet will love it and will provide its needs for individual space. The main thing is to correctly calculate the proportions and take into account all the character traits of your family friend.
For comfortable stay It is recommended to build personal apartments for cats in your apartment. The design must take into account all the needs of the animal. The construction is not universal, since each pet has its own temperament and habits. You can make a cat house with your own hands.
There are many ideas and sketches for building a cat house. When making a structure, it is necessary to take into account the availability of free space in the apartment, the preferences of the pet, and the design of the room where the house will be installed. If you choose the right fabric for decoration and the shape of the structure, it will decorate any interior.
Loungers and hammocks
A lounger is the simplest and easiest type of house to build. It is made in the form of a basket, box, stand with soft bedding.
Depending on where you want to place the future bed, you can choose its shape. It can be angular (if placed in a corner), rectangular (if you want to place it on a window). Here we describe an option for making a regular oval bed. For adult cat the optimal diameter is 40 or 50 cm. But of course, look at your cat, if you or just a cat is quite large, then it is better to make the size larger. We recommend trying on your cat.
Choose fabric that is pleasant to the touch and safe for the cat. You can take any color you like.
We will need:
- a sheet of fiberboard (you will need 2 pieces 36x48 cm), you can take thick cardboard;
- foam rubber (for the side - length 135 cm, width 10 cm, for the inside 36x48 cm);
- fabric or carpet;
- heat gun;
- stationery knife or scissors;
- tape measure or ruler;
- compass;
- threads, needles and pins.
Step-by-step instruction:
- First, let's draw an oval on a piece of paper. You can use a compass for this. We draw a segment of 48 cm and divide it into three equal parts, denoting two points as A and B. From both points we draw circles with a compass so that the edge of the circle is at adjacent points. We draw arcs above and below the intersection of the circles, and we get an oval. Let's cut it out.
- We take our fiberboard sheet or cardboard, put our oval on it and trace it. Cut out 2 identical shapes.
- Next we make the sides from foam rubber. We bend it in half along its entire length and glue it together.
- Afterwards we cover the foam rubber with fabric, its width should be slightly larger, you can take 14 cm. Glue it together.
- On the outside we leave a free edge of the fabric and fix the side to the bed, again with glue. We connect the ends of the side.
- Glue the loose fabric to the bottom of the oval. To make our bed look good from below, we cover it with the second oval prepared earlier.
- Next, take the foam rubber and cut it into an oval shape. We cut it a little along the entire length, since the inner part should be a little smaller. Afterwards we wrap it in fabric, making allowances and securing them on the bottom side.
- Apply glue to the part of the foam rubber without fabric and glue it inside the bed. Alternatively, you can sew two parts.
 Another option
 Hammocks are comfortable loungers. The pet can sit comfortably and relax on them.
A special feature of the design is the presence of mounts on which it is suspended in various places. It is recommended to make the base of the hammock rigid so that the animal is comfortable and comfortable.
You can even make a cat bed out of your old sweater. To do this, sew up its neck from the wrong side. Then sew at the same height as the sleeve cutouts to create a single border. It needs to be filled with insulation, and then the cuffs must be sewn up. Also put insulation inside, or better yet, a soft pillow, and sew it up. Here are the step-by-step photos:
Booth houses
This is a closed type design. The home has a roof and is upholstered in soft fabric. In such a house, the pet can take a break from other inhabitants of the apartment. If the size of the building allows, you can place a scratching post in it.
Step-by-step manufacturing instructions are in front of you in the photo:
Miniature furniture
A resting place for a cat can be made in the form of a sofa, armchair and other pieces of furniture. The decor includes miniature bedspreads and pillows. The pet gets used to such a sleeping place very quickly.
Option for making a luxurious sofa for your cat:
You can make a sofa simpler:
You don’t have to rack your brains and build a home for your pet out of a cardboard box. Having previously cut an entrance and windows in it, put bedding inside. However, such a house will quickly become unusable (the animal will tear it or gnaw it during games).
It is better to make a building with walls made of several layers of cardboard. If you do this carefully, your homemade home will look no worse than a store-bought one.

How to make a similar house step by step:
Multi-storey houses or play complexes
The manufacture of such a design will take more time than those previously listed. There is enough space for everything: stairs, scratching post, toys, etc. In such a house, the pet will always find something to do, even in the absence of the owner.
Original houses
Any interior will be decorated with such original structures for pets:
- from two captive baskets connected in the form of a pearl;
- sewn from thick fabric in the shape of a cat: with ears, a tail, and a hole in the shape of a yawning mouth;
- from wooden cubes (the walls can be decorated with colored paper);
- mini wigwam;
- in the form of a ball made of carpet (the opening of the home can be decorated around the edges with a knitted scarf);
- hanging fabric with a soft bottom, hanging anywhere;
- egg-shaped with smooth and hard walls, thanks to the bedding on the inside;
- a vertical house with scratching posts on the sides and a sleeping place in the form of a cylinder in the center.
Built into furniture/cabinet
A home can be built on a shelf of a chest of drawers, a closet, or an unnecessary bedside table. The inside of the furniture is covered with fabric, and bedding is placed in the middle. It is better to install the house in a quiet place, not in the corridor. You can place it in the room where your pet is most often.
For small apartments
In small apartments, you can build a hammock for a cat from a T-shirt, towel or thick fabric. It can be placed in any free space, including under furniture. It is convenient to clean and wash.
Houses built into furniture are also an ideal option for small apartments. For several animals, a design with two or three floors, with a dedicated sleeping area for each pet, is suitable. Such a structure will help save space.
You can place a corner house in the free space. It will not take up useful space in the room. This design is made according to individual drawings. It can be installed at an obtuse or acute angle.
Why does a cat need a house?
An animal needs its own apartment to rest from being surrounded by people, other pets, and to hide from an annoying child. If the pet does not have its own secluded place, it will sleep anywhere: on the sofa, table, bed, etc. Having your own corner will make the life of the owners easier; the pet will not disturb or leave its fur in undesirable places.
Requirements
The building for cats must meet the following requirements:
- The height of the structure is as close as possible to the level where the animal spends the most time (bedside table, chair, bed, etc.), but should not be less than 40 centimeters.
- There is no unpleasant smell of chemicals in the house, otherwise the pet simply will not accept it.
- The home is suitable for the size of the pet, it should be comfortable in it (size for average cat- at least 40*40 centimeters).
- The structure must be strong, safe and stable.
- The circumference of the entrance to the structure is at least 15-20 centimeters.
- The cleanliness of the house must be carefully monitored.
- To make the building, only high-quality, environmentally friendly materials are used so as not to harm the health of its occupant (plywood, cardboard, concrete, cotton).
- It is recommended to build a playground in the home.
- If a scratching post is installed in the structure, access to it should be free. Otherwise, the pet will sharpen its claws on walls, wallpaper, etc.
- In a multi-tiered house it is necessary to do additional output. This is how animals arrange their homes in the wild.
Differences between houses for cats and cats
Cats and cats have different needs. Therefore, their housing should be different. The male will be comfortable on the roof of the house, which has only one entrance. It is enough for the animal to have a safe shelter with a good view.
The cat will be comfortable in a design with an emergency exit. It is better to make a viewing platform not on the roof, but on a separate rack. Such preferences are due to the fact that the female’s house is also a shelter for the offspring. Children should be kept away from the “observation deck”. An additional move is necessary so that the kittens can escape in the event of an attack on their home.
Material
The upholstery is made of plush, carpet, suede, velor. You can sew pillows and bedding from the same materials. Sintepon or foam rubber are used as filler.
Pet stores also sell artificial materials for stuffing recreational items. They are produced in the form of granules and retain heat well.
Fastenings are made of reinforcement. This material will ensure the strength and stability of the structure. All parts of the structure are connected with odorless glue and nails. For soft material, a stapler is used.
Other materials are also used. The most important thing is that they do not become electrified. This will cause discomfort to the pet.
How to choose a house type
When choosing a home, you need to pay attention to the age of the pet. Kittens are active and mobile. They need large buildings with various tunnels, stairs, toys. At the same time, it is important to monitor the safety of children during games.
As a pet ages, its character and behavior patterns develop. Animals that do not like strangers will feel comfortable in a kennel.
Hammocks, loungers, and miniature furniture are suitable for sociable cats. For pets who love heights, it is recommended to build a two-story home.
Some cats are afraid of enclosed spaces. Suitable for them open spaces recreation (loungers, hammocks). You can make several holes in a closed house, then the animal will not be afraid of it.
For heat-loving pets, it is advisable to line the inside of the home with plush.
The dimensions of the building must correspond to the size and breed characteristics of the animal. For example, large species prefer small resting spaces.
Before making a cat house, you need to observe the animal’s habits. In the place where the structure will be placed, you can put objects that will later be in the home. For example, a bed, a scratching post. This will help you understand whether your pet likes them.
A few more ideas
You can build a house from scrap materials with your own hands. You will need:
- two wires of fifty centimeters each;
- T-shirt or sweater;
- cardboard sheet;
- scotch.
The manufacturing procedure is simple: the wires are crossed, the joints are covered with tape, the ends are insulated so that the cat does not get hurt. The base is made of cardboard. Four holes are cut in the corners of the sheet, and wire arcs are inserted into them. The ends of the wire are bent to the inside of the cardboard and secured with adhesive tape. The sleeves of a T-shirt or sweater are cut off and their necklines are sewn together. The resulting material is stretched onto the frame so that the neck serves as the entrance.
Step-by-step instructions for making a warm outdoor dwelling:
- take two cardboard boxes different sizes and put one into the other;
- newspaper or polystyrene foam is placed on the bottom of a large one for insulation;
- a bedding, mattress, soft fabric or old towels are placed at the bottom of the smaller one (the material is natural, synthetics do not retain heat);
- the doors of the small box are closed, an entrance is cut into its roof (in the corner);
- the optimal size for the hole is 14*14, its edges are covered with tape;
- the lid and walls of the large box serve as a canopy, protecting the home from gusts of wind;
- the structure is placed in a dense polyethylene bag, the seams are taped.
In such a house the animal will not freeze even in winter.
A wigwam house will decorate any interior. The frame is made of metal rods, which are tied together with a strong rope. The structure is covered on all sides, except one, with a fabric pattern. Foam rubber or bedding is placed on the floor of the home.
Your pet will feel comfortable in the ottoman house. Furniture usually consists of wooden and MDF parts. The fabric is removed from the bottom side and a round entrance is cut out with a jigsaw. The wood is treated with latex paint, and soft bedding is placed inside the home.
Having looked at how to make a house for a cat with your own hands from a sweater, T-shirt, foam rubber. Make a sofa, a bed, or a scratching post for your beloved pet.
How to make a bed with your own hands?
It’s better to start simple, make a sleeping place for your beloved pet from an unnecessary sweater. See how this can be done. You will need:
- sweater;
- padding polyester;
- needle with a large eye;
- scissors;
- threads

Stuff your sleeves and top part padding polyester sweaters. Sew the sleeves together to create a round edge piece. Make stitches under the breastbone as well to continue this circle.

Sew the sleeves to the sides of the sweater. To make it easier for your cat to sleep, you can put a little padding polyester between the shelf and the back of this knitted item. Only then sew the bottom of the sweater to the bottom of the sewn sleeves.
Here's how to make a pet bed and look how great it turned out.
If you don't want the collar of the sweater to be visible, then tuck it in, then stitch along the edge of the neckline.
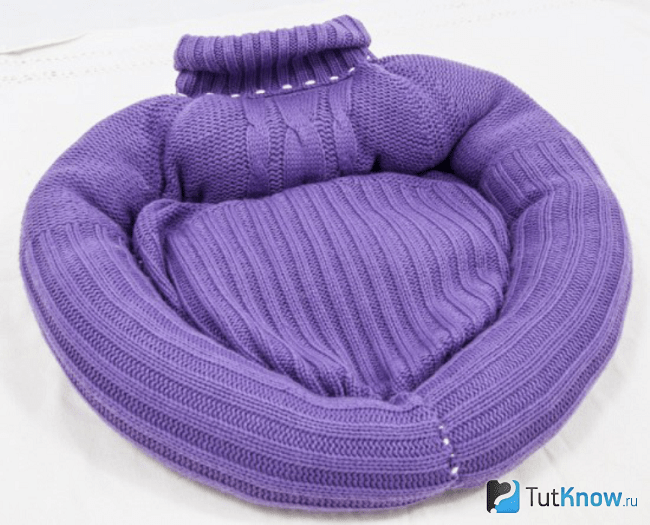
See what this design will look like if you tuck the collar inside. Step-by-step photographs allow you to see the manufacturing process in detail.

It is important to make a cat bed so that your pet can feel comfortable and free in it.
If you want to sew a sleeping place for an animal, then take:
- a small pillow filled with synthetic material;
- scissors;
- thick fabric;
- sewing machine
On the unfolded fabric on the right and left, place the prepared strips of filler, which will soon become sides. Topstitch them to indicate.
On the free part of the fabric, between these two strips, place the oval piece from the pillow. Sew sides 1 and 2 to form sides, giving the workpiece a rounded shape.
To fit the bottom, cut out the fabric with a seam allowance and stitch it inward to the bottom of the sides. Here's how to make a cat bed.

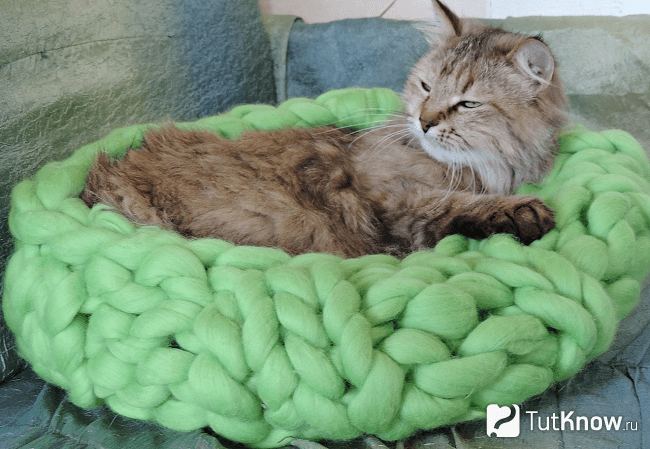
If you know how to knit, then create a sleeping place for your beloved pet from thick roving.
You can do it even simpler, quickly make a hammock-type cat bed. For this you will need:
- thick fabric;
- 4 straps and fastening fasteners for them;
- needle with strong thread.

If you have a wicker mat, thread pieces of wire into it from four sides at the corners and tie them to the table legs. She will definitely like this cat bed.

You can fix 2 straps on the 1st and 2nd sides of the fabric rectangle and tie them to a vertical support. This is how you can quickly make a hammock for your pet.

In winter, they will happily bask near a warm radiator, so you can make them these beds.

Of course, you can make real beds and sofas for your pets. Pets will surely like such sleeping places and will look wonderful in the apartment.
How to make a sofa, a bed for a cat?
First, you need to measure your cat so that the future bed will fit her properly. Now place the following materials next to you:
- thick foam;
- furniture fabric;
- glue.
You can immediately glue these foam pieces together, then cover them with fabric and glue it down. Or you can first cover each piece with fabric, then glue the resulting parts together to make a sofa.
There is another option: sew a cover to the size of the bed, then you can put it on the bed and, if necessary, remove it to wash it. Sew a zipper or Velcro on the bottom side.
Don't forget that new natural fabrics shrink a little after washing. Therefore, it is better to wash the fabric first and then sew a cover for the sofa.
Here's how to make a bed for a cat. For this original creation you will need:
- unnecessary table;
- decorative elements made of wood;
- sandpaper;
- baseboard;
- foam;
- textile;
- braid;
- dye;
- saw.
Use scraps of wooden baseboard to make a headboard for your bed. Then paint the entire structure in the desired color. Mark a piece of foam to size on the bed. Sew a cover for it from fabric, sew decorative braid at the corners of the sides. This is such a wonderful cat bed in the form of a bed.

If you have a jigsaw and plywood, then draw the details of the future bed on a wooden blank and glue them together with wood glue. If you have several pets, then make them a bed consisting of several tiers. The photo on the right is a bed for three cats, on which they can easily fit.

If the household has a wicker basket, attach its bottom to the wall, put a towel or small pillow inside.

If you know how to use rattan, then make a rectangular house like this in the form of a chest with a window and an arched door. Place a pillow on top so your pet can lie down here.

See how to make a couch in the form of a spacious bed with your own hands using a suitcase. If you have 2 cats, then remove the lid from the bottom. At the bottom of each of these bases you need to attach legs. To do this, you need to screw in a self-tapping screw from the inside so that its tip comes out, here it will stick into the upper part of the leg, connecting this element to the bed.
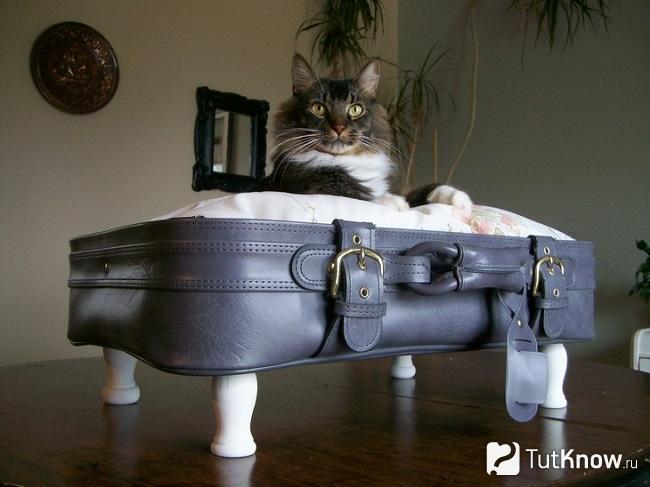
If the pet is alone, then leave the suitcase lid in place, securing it so that it does not close at the wrong time. Place a soft, flat pillow on the bottom, tying it with straps.

And if you have a round suitcase, then it is enough to attach three legs to it, placing them at the same distance from each other.

In this case, the legs can be very different, which are available. If there are only door handles, use them. Drill 4 holes in the bottom corners of the suitcase with a drill, insert the upper metal parts of the threaded handles here, and tighten with screws.

Here's how you can arrange the lid of a suitcase and its bottom to save space and create 2 cat beds. You need to attach high legs to the top lid to give the lower animal more room. We attach small legs to the suitcase itself.

How to sew a house for a cat with your own hands?
It will be warm and cozy. This home looks great. To make it, take:
- sheet synthetic filler;
- cardboard;
- stapler;
- ruler;
- pencil;
- textile;
- scissors;
- sewing machine
- Cut 5 blanks from a cardboard box. Four of them will be of the same shape, made in the shape of an equilateral triangle. Their sizes should be based on the size of the cat. You can make triangles with sides of 45 cm. A hole is cut in one of them in the middle so that the cat can freely get out and go inside the house. Fifth detail? This is also a square with a side of 45 cm.
- Each of these parts must be covered with synthetic sheet insulation and secured with a stapler.
- Place the triangle on the fabric folded in half, cut two such blanks from the fabric with extra space for seams. Sew the part on one side, insert insulated cardboard here, fold the sides of the triangle inward, stitch the edge on a machine or stitch it by hand.
- In the same way, decorate all the triangular sides of the house. Where there will be an entrance, you need to tuck the edges of the canvas over the cardboard hole and also sew it up with thread and a needle.
- Cut the bottom out of cardboard, attach synthetic insulation to it, and cover it with fabric. All that remains is to sew all four triangles together to create a roof and sides at the same time, then sew the bottom at the bottom of these elements. This is best done on the hands, using a hidden seam.

This type of cat house also consists of four walls and roof elements; the master class will tell you step by step how to make it.

Here's what you'll need:
- newspaper;
- marker;
- scissors;
- textile;
- foam;
- braid;
- optional? cardboard.

- Using the same template, cut out four blanks from foam rubber, 1 cm smaller than the fabric ones on all sides. If you want to give the house rigidity, then you will also need cardboard parts identical in size to the foam ones.
- For each side you will need 2 identical pieces of fabric, fold them with their right sides facing each other and stitch them on the top and sides. Turn the workpiece out through the bottom hole, insert parts made of foam rubber and, if desired, cardboard parts.
- In the wall where the entrance will be, make a hole for it using a wide braid that stretches well or bias tape.
- Also make the bottom layered by placing foam rubber between two pieces of fabric. Connect the roof wall pieces together, then sew them to the bottom of the cat house.
If you want to make it in 15 minutes, then prepare:
- pliers;
- small T-shirt;
- cardboard square with sides 40 cm;
- pins;
- hangers made of strong wire;
- scotch.

You can decorate a cardboard rectangle a little and make it stronger by covering it with paper tape. Make holes in the corners, but not very close to the edge, so that pieces of wire can pass through here.

Here's how to make a cat house next. Using tape, connect two wires in the center crosswise, thread their ends into the holes, with reverse side bend them using pliers.


Cover the pieces of wire on the reverse side with tape.

Place a T-shirt on top so that the neck becomes the entry hole.

Fold the bottom of this garment, as well as the sleeves, inward, fasten it here with pins, but you can also hem it with a thread and a needle. If you want to finish this work quickly, you don’t have pins at hand and you don’t have time to sew, then just tie a couple of knots on the back of the T-shirt.

This tent is easy to clean. You simply remove the piece of clothing, when it’s time to wash it, pull the clean one back onto the frame. Your favorite animal will happily relax in such a house.
It is better to lay something soft on the cardboard, for example, a terry towel. Then the cat will be even more comfortable in its new home.

If cardboard and tape are not available, you have a small rectangular pillow, then make holes in it in the corners. Insert the wire here, then also pull the T-shirt.

Some pet lovers make a cat house out of an old TV. To do this, the kinescope and other parts are removed from it. The outside of the building needs to be painted, a small mattress laid inside, and a wonderful home for your pet is ready for housewarming.

Here's how else you can make a house for a cat with your own hands. Photos will help with this. Take:
- foam;
- compass;
- thread and needle;
- thick fabric;
- artificial fur.

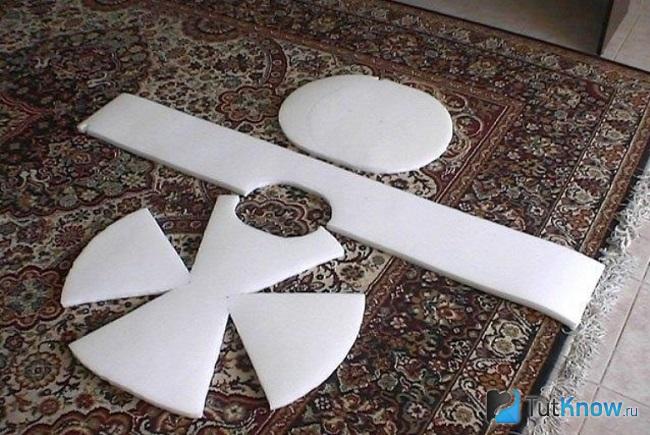
On paper, draw patterns of the following parts:
- oval bottom;
- a rounded part consisting of four wedges, which will become both walls and roof;
- rectangle with a semicircular cutout in the center.
The following diagram will simplify the task of precise cutting.
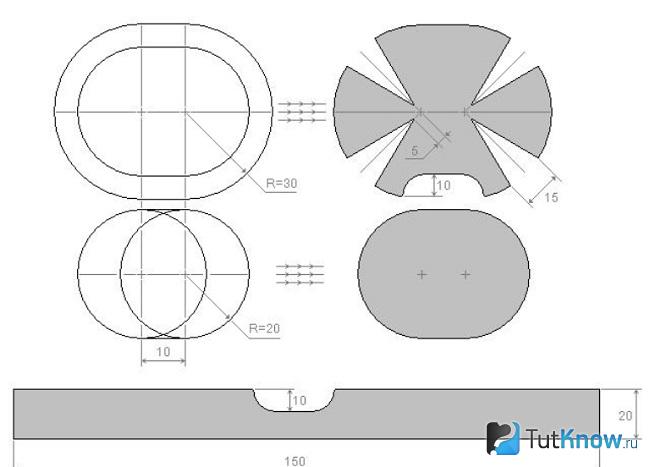
Now the parts need to be connected in the correct order, secure the roof with clothespins, and sew with a thread and a needle. It is better to fix the knot so that it does not slip through the foam. To do this, make a double thread, insert a needle into the foam rubber, make one turn and insert its tip into the resulting loop, tighten.

Using the same pattern, you need to cut out a piece of fabric and fur from each part, but for the bottom it is done differently. An oval mattress made of fabric, fur and foam rubber is sewn to size for it.

Sheathe all the blanks with the materials presented, and the cat’s home is ready. You can sew 2 buttons on the top of the house, and in the same place sew loops on both sides of the lid to secure it to the bed.
House scratching post for cats
After you have mastered so much useful material, you will be able to make a whole complex for your beloved cat.

To make this you will need:
- plywood or MDF;
- glue gun;
- nails;
- furniture fabric;
- plastic pipe;
- bar;
- 7 slats;
- rope;
- pencil;
- tools.

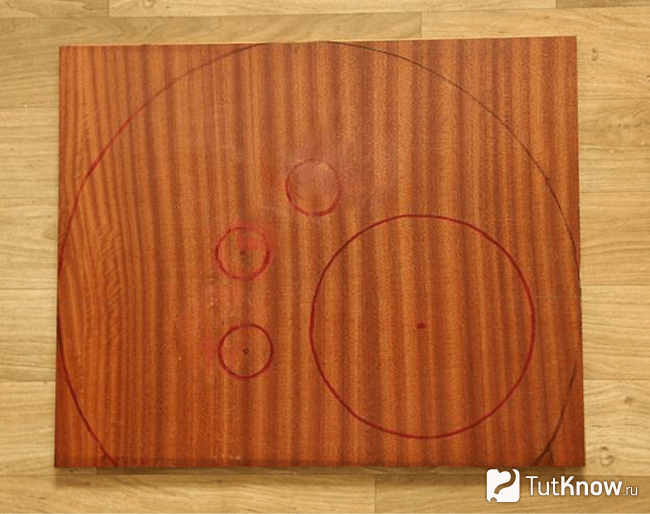
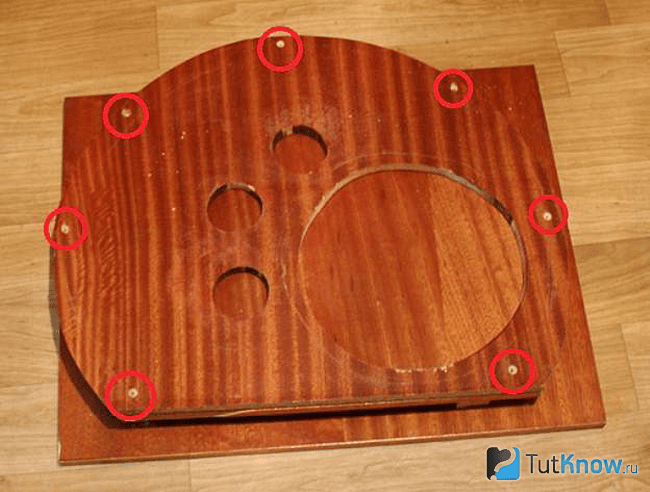
Find the middle of the board and mark it. Place the end of the rope here, with a pencil attached to the reverse side. Draw a circle.
Now on it, a little to the right, you need to draw another one, but of a smaller diameter; to the left of this we draw three small circles.
The following diagram contains the required dimensions for these recesses.
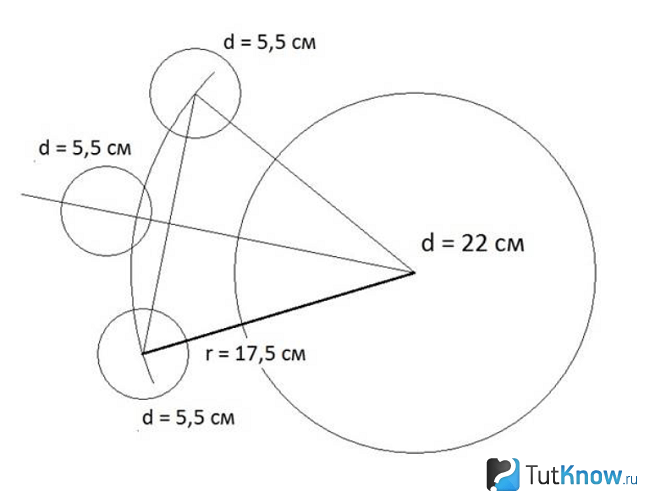
After cutting out all these holes with a jigsaw, mark the places where you will attach the slats. Drill holes on this part and on the second one, which will become back wall, that one is solid.
You have already prepared the slats; their sharp edges need to be trimmed off. Now place each rail between the back and front walls, thread the self-tapping screws into the holes made with a drill, and tighten them. In this way, fasten the entire structure.

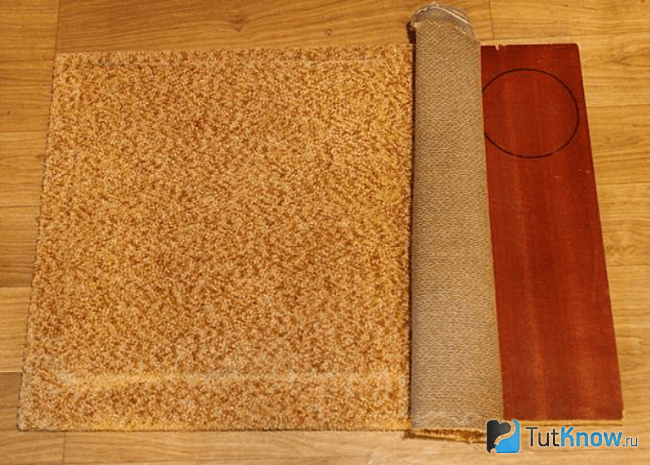
According to the size of the back and front walls, you need to cut out parts from furniture or other dense fabric. Don't forget to cut notches for the front wall blank. As you may have guessed, they resemble a cat's paw. Using a glue gun, secure the material to the wooden parts of the house.

The base of the structure will be made from the same wooden material that you chose at the beginning. Attach the house to this part, draw where you need to glue the foam rubber, and what size it is. Also mark where the pipe will be located, because this is a scratching post house.

Glue the foam rubber, and use glue to attach a rectangle of furniture fabric on top, cut to fit the size of the base.
Now cut the canvas to the size of the roof of the house, attach it to the wooden slats using a furniture stapler. Attach the floor to the base using self-tapping screws.
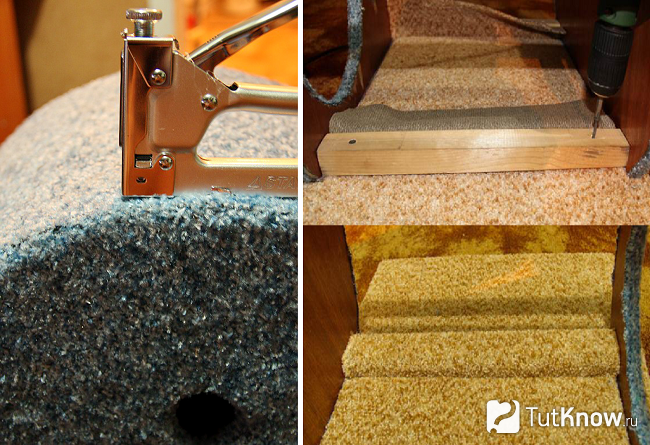
To make the fleecy fabric look beautiful, use nail scissors to remove its elements from under the staples.

The back wall can be left on the inside the same as it was, but the side wall inside also needs to be covered with fabric.

This is what kind of scratching post house you will get at this stage.

Now you need to take 2 rounded bars or give a rectangular one this shape. Insert these blanks on sides 1 and 2 inside the pipe. Its diameter is 11 and its height is 60 cm.

There will be a bed at the top of the house; you need to cut out the wooden base with a jigsaw semicircular shape. You will need two such parts, the first one you will close the pipe.
Place foam rubber of the same shape on top, glue the fabric onto it, bring its edges to the sides of the bed, gluing them here.

Using self-tapping screws, screw the pipe from below to the base, and cover this area with a strip of fabric.
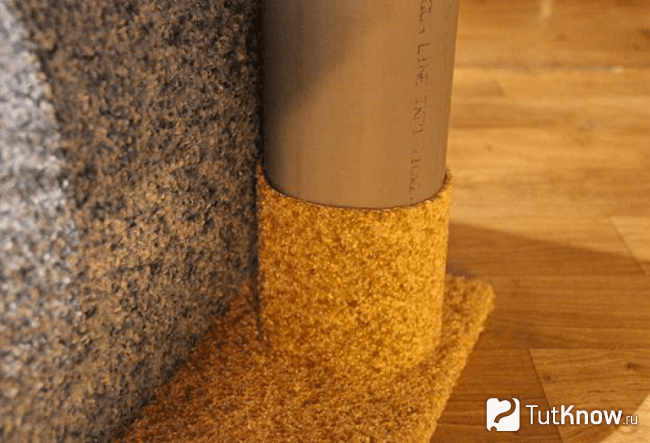
Wrap a rope around the scratching post and glue its top and bottom ends. Attach the thread with the toy with the mouse.

This is such a wonderful scratching post house.
If you want to build a whole complex for your beloved pet, then study the diagram below with structural elements and their sizes.

Such a palace is being built from plywood, which is peeled off on all sides with carpet.
Fasteners will help connect the parts. See how the individual elements are attached to the timber that connects the structure.

Plastic pipes with wooden blocks inserted at the end can also be used as connecting elements.
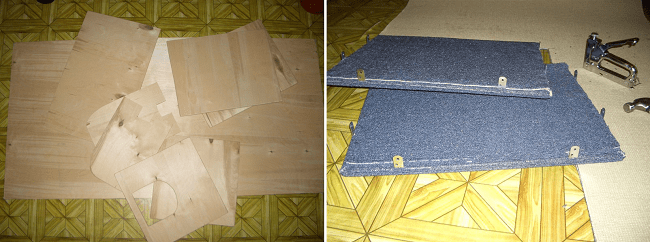
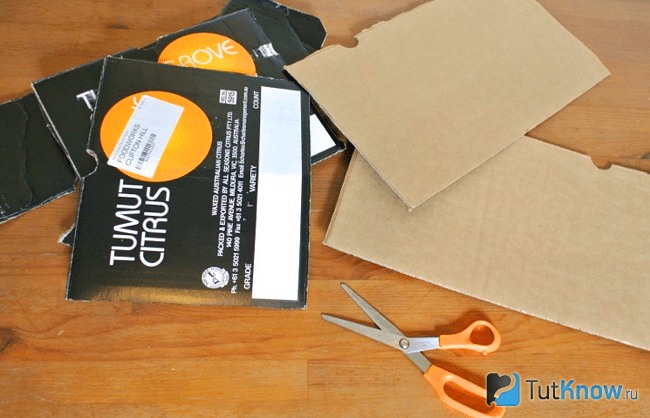
A building with such an openwork roof will surely please your four-legged pet and will decorate your apartment. To create such a house you will need:
- 2 cardboard boxes;
- scissors;
- animal-friendly paint in a can;
- colored paper;
- scotch;
- glue.

For one cardboard box you need to cut off the bottom and top, leaving one frame.
Paint these pieces as well as the inside of the second box.

Place the cup against the wall of the house. Another item of similar shape, but bigger size place it where you want to make an arch. Trace with a pencil and cut out these structural details.
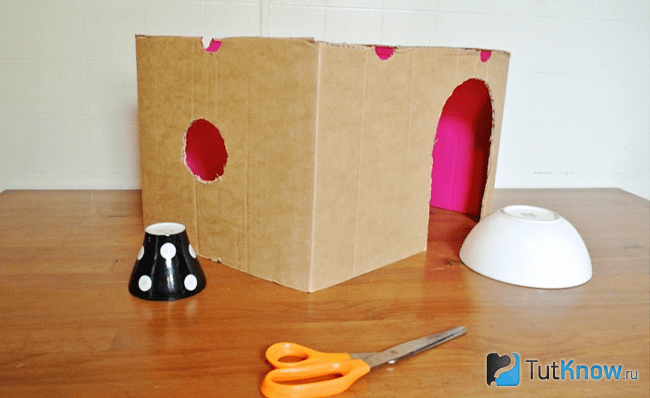
Using tape, connect the first two elements to form the roof of the house. Also using this adhesive tape you need to attach it in place.

To decorate the roof, cut out identical tile elements from colored paper using a template, glue them onto the roof, starting from the bottom, gradually moving up to the ridge. Arrange these parts in a checkerboard pattern.
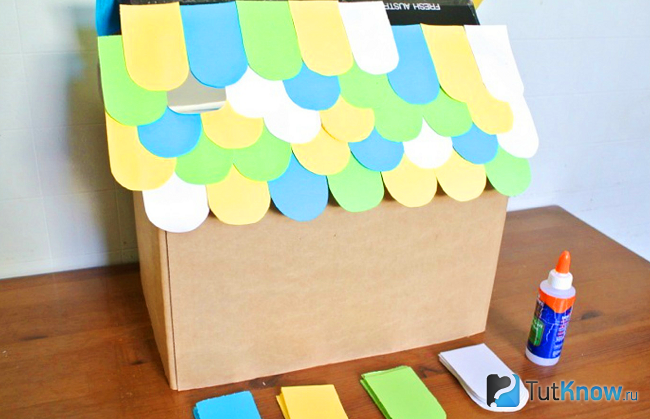
Cut out the chimney from leftover cardboard, glue this piece together, and attach it to the top of the cat house. You can move in a new resident and see how much he likes the structure.
Today you learned about houses for cats that you can make with your own hands. Of course, there are many more ideas and materials for making a cozy home. For example, the following.

Felt house? This is another fashion trend that goes deep into the past. See, our ancestors also made felt boots and various household items from wool. Now this craft is very profitable, so you can make houses for cats from felt for sale. We invite you to watch a video that tells you how to make such a home for a pet using the wet felting technique.
The next review will tell you how to make a scratching post house.


